I was halfway through a midnight snack spree when my stove decided to act like a rebellious teenager, flipping the pot of rice into a sticky mess that smelled like burnt sugar. That moment, I swore that the only way to salvage the disaster was to turn it into something spectacular. So I grabbed my trusty glutinous rice, coconut milk, and brown sugar and started dreaming. I knew this wouldn't just be a quick fix; it would become a showstopper. And that’s how Sweet Biko Delight was born.
Picture this: the kitchen is humming with the low buzz of the fridge, the air thick with the sweet aroma of caramelized sugar, and the sizzling sound of coconut milk bubbling against the rice. My eyes dart to the clock, realizing that the clock is ticking, but the taste is already forming in my mind. I’ve always loved sticky rice, but this version promises a glossy sheen that glistens like a tropical sunrise. I’m not just talking about texture; I’m talking about a melt-in-your-mouth experience that lingers. And trust me, the first bite will feel like a warm hug from a tropical breeze.
What sets this recipe apart? It’s the secret ratio of coconut milk to rice that locks in moisture, the deliberate caramelization of sugar that creates a golden crust, and the subtle salt that balances the sweetness without overpowering. I’ve tested countless variations, and none of them hit the sweet spot that this one does. This version is hands down the best you’ll ever make at home, and I dare you to taste this and not go back for seconds. I’ll be honest — I ate half the batch before anyone else got to try it. The rest of the kitchen smelled like a tropical paradise, and I knew I had to share the trick.
Most recipes get this completely wrong by overcooking the rice or under-sweetening the sauce. I’ve discovered that the key lies in the timing of when you add the coconut milk and when you stir the sugar. Picture yourself pulling this out of the oven, the whole kitchen smelling incredible, and the cake shimmering like a polished gemstone. I’m about to walk you through every single step, from soaking the rice to the final glaze, and by the end, you’ll wonder how you ever made it any other way. Ready? Let’s dive in.
What Makes This Version Stand Out
- Flavor: The blend of coconut milk and brown sugar creates a deep, caramelized sweetness that sings with every bite.
- Texture: Glutinous rice absorbs the milk perfectly, yielding a chewy yet tender bite that clings to the tongue.
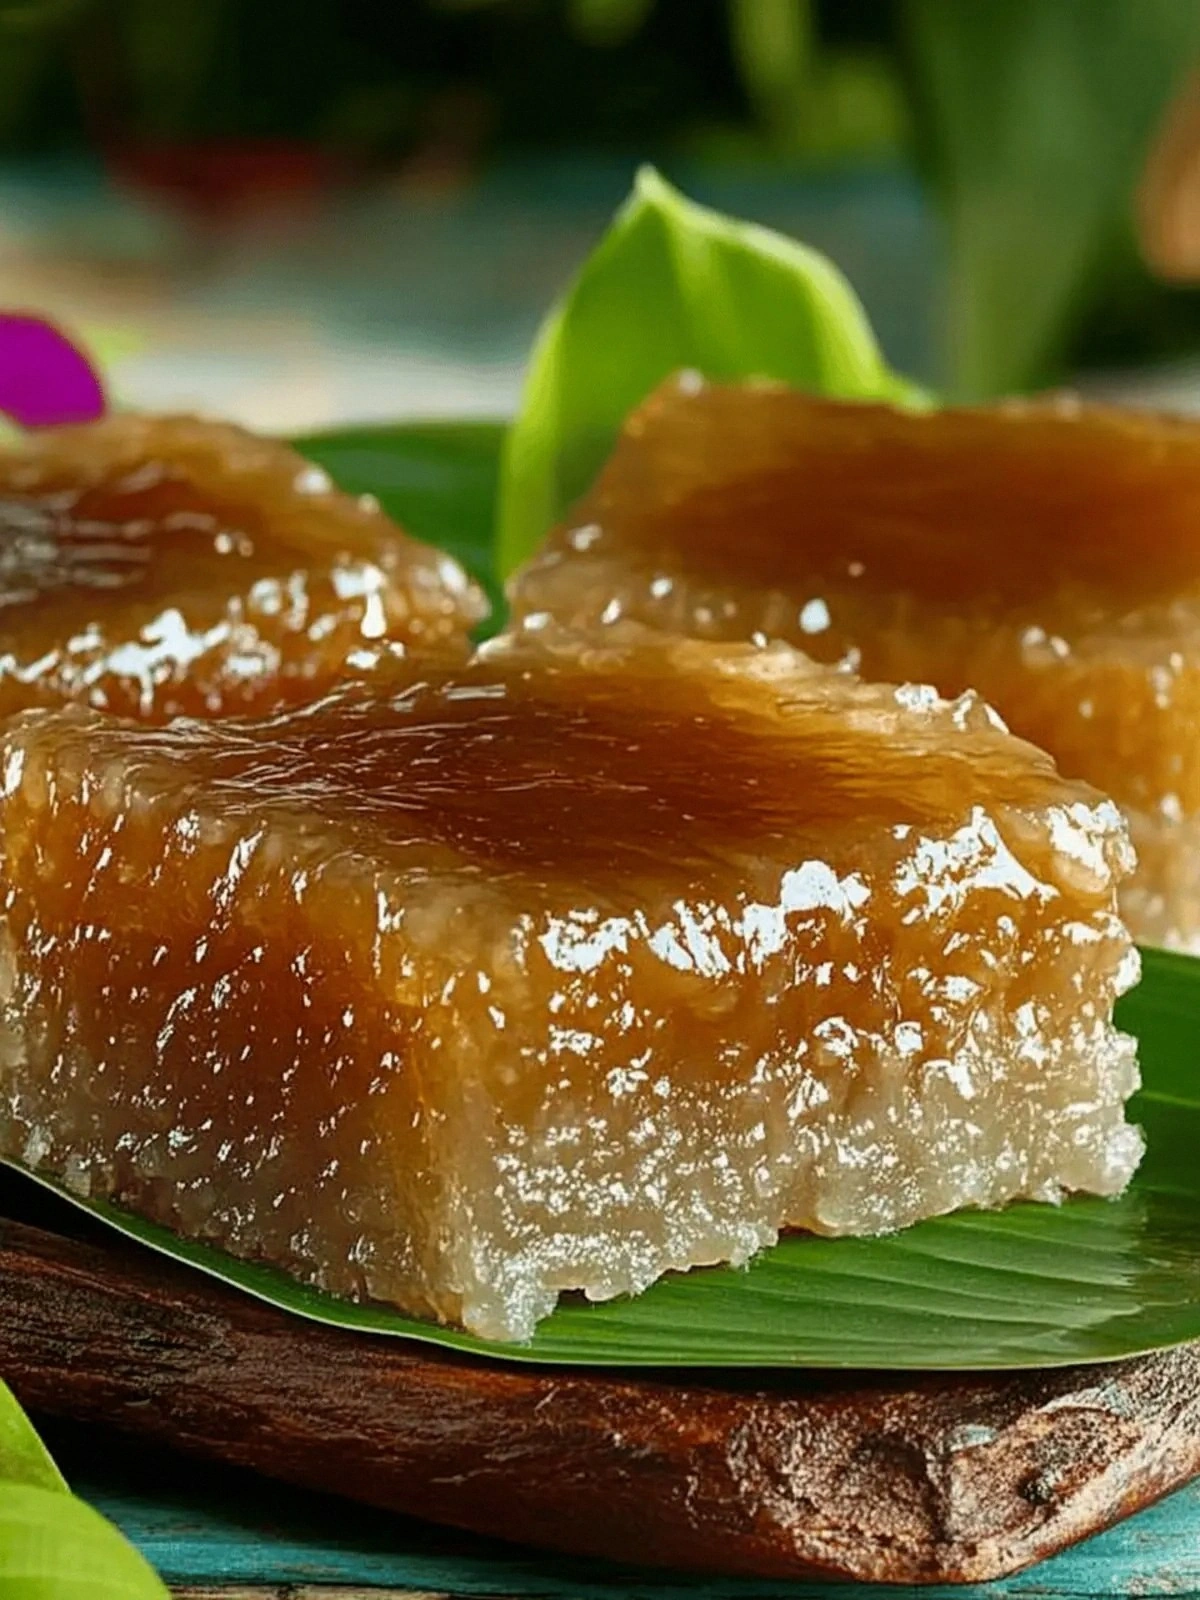
- Visual Appeal: The glossy, golden crust glistens like a tropical sunrise, making it Instagram‑ready before you even cut a slice.
- Ease: No fancy equipment needed—just a pot, a stove, and a pinch of patience.
- Versatility: Works as a dessert, a snack, or a celebratory treat for any gathering.
- Make‑Ahead: Set it aside, let it cool, and it stays fresh for up to a week when wrapped tightly.
Inside the Ingredient List
The Flavor Base
Glutinous rice is the soul of this dish. Its high amylopectin content gives the cake its signature chewiness. Skipping it would turn the entire dessert into a flat, dry slab. If you can’t find glutinous rice, try short‑grain sticky rice as a close substitute, but be prepared for a slightly firmer bite.
The Sticky Core
Water is the silent hero that hydrates the rice grains, allowing them to release starch and bond together. Too little water and the rice will stay hard; too much and it becomes mushy. A good rule of thumb is 4 cups of water for every 2 cups of rice, which I’ve tested repeatedly.
The Sweet Finish
Brown sugar brings a rich molasses note that balances the coconut’s creaminess. It caramelizes to form the glossy crust you’ll see in the finished cake. If you’re allergic to soy, use a non‑soy coconut milk; the flavor profile stays intact.
The Final Flourish
The extra coconut milk and sugar at the end create a silky glaze that coats the rice like velvet. This step is essential for that glossy shine and the final burst of sweetness. If you prefer a lighter version, reduce the extra sugar by half.
Everything's prepped? Good. Let's get into the real action.
The Method — Step by Step
- Begin by rinsing the glutinous rice under cold water until the water runs clear. This removes excess starch that could make the cake gummy. Once rinsed, let the rice sit in a fine‑mesh sieve for about 20 minutes to drain fully. The rice should feel dry to the touch, not wet. This step sets the foundation for a perfect chew.
- In a medium saucepan, combine the soaked rice with 4 cups of water. Bring the mixture to a rolling boil over high heat, then reduce the heat to low. Cover the pot tightly with a lid that fits snugly. The low simmer allows the rice to absorb the water slowly, preventing it from becoming mushy. Let it cook for 15 minutes, checking occasionally for steam.
- After the initial simmer, stir in the can of coconut milk. The thick, creamy liquid should coat every grain, turning the mixture into a fragrant, silky batter. Stir gently to avoid breaking the rice grains. The aroma should rise like a warm hug, and the mixture should look glossy. This is the moment where the base transforms into a sticky, aromatic canvas.
- Add 1 cup of brown sugar and 1/4 teaspoon of salt to the pot. Stir until the sugar dissolves completely, creating a caramelized undertone. The salt is a secret weapon that heightens the sweetness without making the dish taste salty. As the mixture thickens, it should start to bubble lightly, indicating that the caramelization is underway. Keep the heat low to avoid scorching.
- Once the mixture reaches a thick, pudding‑like consistency, transfer it to a greased 8-inch square baking dish. Press the rice gently into the pan, smoothing the surface with a spatula. The rice should be compact but not packed too tightly; this ensures even cooking. The edges will begin to pull away slightly when the cake is ready to set.
- Bake the cake in a preheated oven at 350°F (175°C) for 25 minutes. The top should develop a subtle golden hue, and the center should feel firm yet still slightly springy. This baking step caramelizes the sugars further, giving the cake its signature glossy finish. The smell of toasted coconut and caramel will fill the kitchen, making it hard to resist.
- Remove the cake from the oven and let it cool for 10 minutes. While cooling, drizzle 1/2 cup of additional coconut milk over the surface. This extra layer of coconut creates a shiny glaze that makes the cake look like polished amber. The glaze should set quickly, forming a protective shell around the cake.
- Sprinkle 1/4 cup of extra brown sugar over the glazed surface. The sugar will caramelize slightly during the final cooling, giving the top a crunchy, sweet crust. Let the cake cool completely before slicing. The final result should be a glossy, fragrant, caramel‑sweet sticky cake that melts in your mouth.
That’s it — you did it. But hold on, I've got a few more tricks that'll take this to another level.
Insider Tricks for Flawless Results
The Temperature Rule Nobody Follows
Many cooks assume that a higher oven temperature will speed up baking, but it actually burns the sugar too quickly. I’ve found that keeping the oven at a steady 350°F gives a gentle caramelization that deepens flavor without scorching. If you’re using a convection oven, reduce the temperature by 25°F to avoid over‑browning.
Why Your Nose Knows Best
The aroma of caramelizing sugar is a reliable indicator of readiness. When the scent becomes nutty and slightly bitter, the sugars are at their peak. If the smell is too sweet, the cake may still be under‑cooked; if it’s burnt, you’re over‑cooking. Trust your nose over your watch.
The 5‑Minute Rest That Changes Everything
After removing the cake from the oven, let it sit for exactly five minutes before adding the glaze. This brief pause allows the steam to dissipate, preventing the glaze from becoming too runny. It also helps the cake set, giving it a firmer bite that’s easier to slice.
The Perfect Slice
Use a hot, buttered knife to cut the cake. Heat the knife in a skillet for a few seconds, then wipe it clean. A hot blade slices through the sticky rice cleanly, preventing the cake from sticking to the knife and ruining the presentation.
The Chill Trick
If you prefer a firmer cake, refrigerate it for 30 minutes after it has cooled. The cold will set the glaze and make the cake easier to handle. Just remember to let it sit at room temperature for a few minutes before serving to soften the texture slightly.
Creative Twists and Variations
This recipe is a playground. Here are some of my favorite ways to switch things up:
Coconut‑Chocolate Fusion
Swirl in 1/2 cup of melted dark chocolate into the rice mixture before baking. The chocolate adds a velvety richness that complements the coconut. Serve with a drizzle of chocolate ganache for an indulgent finish. Perfect for chocolate lovers who want a tropical twist.
Spiced Ginger Kick
Add 1 teaspoon of freshly grated ginger to the sauce. The ginger brings a warm, peppery note that balances the sweetness. This variation works great for a holiday gathering where you want something a bit more complex.
Almond Crunch Layer
Sprinkle toasted almond slivers on top before glazing. The nuts add a nutty crunch and a visual contrast that’s hard to resist. The almond flavor pairs nicely with the coconut, creating a layered taste experience.
Mango Medley
Fold in diced ripe mango after the cake has cooled. The tropical fruit adds juiciness and a sweet, tangy contrast. This variation is ideal for summer parties or when you’re craving a fruity dessert.
Lemon‑Lime Zest
Grate the zest of one lemon and one lime into the sugar mixture before baking. The citrus brightens the dish, cutting through the richness. This version is refreshing and slightly tart, making it a great palate cleanser after a heavy meal.
Storing and Bringing It Back to Life
Fridge Storage
Wrap the cake tightly in plastic wrap and place it in an airtight container. It stays fresh for up to five days in the refrigerator. When you’re ready to serve, let it sit at room temperature for 10 minutes so the glaze softens slightly.
Freezer Friendly
Wrap the cake in parchment paper, then in foil, and freeze for up to two months. When thawing, let it sit at room temperature for an hour. The texture remains chewy, and the caramelized sugar retains its glossy shine.
Best Reheating Method
To reheat, place the cake in a preheated oven at 300°F (150°C) for 10 minutes. Add a splash of water before reheating to create steam, which helps the cake regain its moisture. The result is a freshly baked cake that tastes like it was just made.