I was halfway through a rainy Thursday night, staring at a half‑melted chocolate bar that had somehow turned into a sticky mess on the counter, when my roommate dared me to make something that could melt even the coldest heart. I laughed, grabbed the last ounce of bittersweet chocolate, and whispered to the empty kitchen, “Okay, let’s see if we can turn this disaster into a masterpiece.” The first thing that hit me was the smell – that deep, earthy cocoa scent that rises like a warm hug, promising comfort and indulgence. I could hear the faint hiss of the butter (well, ghee) melting in the pan, the clink of the almond flour against the bowl, and the soft thump of eggs as they dropped in, each one a tiny promise of the molten center to come.
I’ve tried lava cakes before – the ones that come out of the oven looking like a respectable brownie that somehow decides to erupt when you cut into it. Most of them end up either dry on the edges or too runny, like a chocolate sauce that never quite sets. That’s why this version is a game‑changer: it delivers a crisp, caramelized crust that cracks open to reveal a river of silky, glossy chocolate that flows like molten lava. The secret? A precise balance of ghee and maple sugar that creates a caramelized shell, plus a whisper of almond flour that gives the cake a subtle nutty bite without weighing it down.
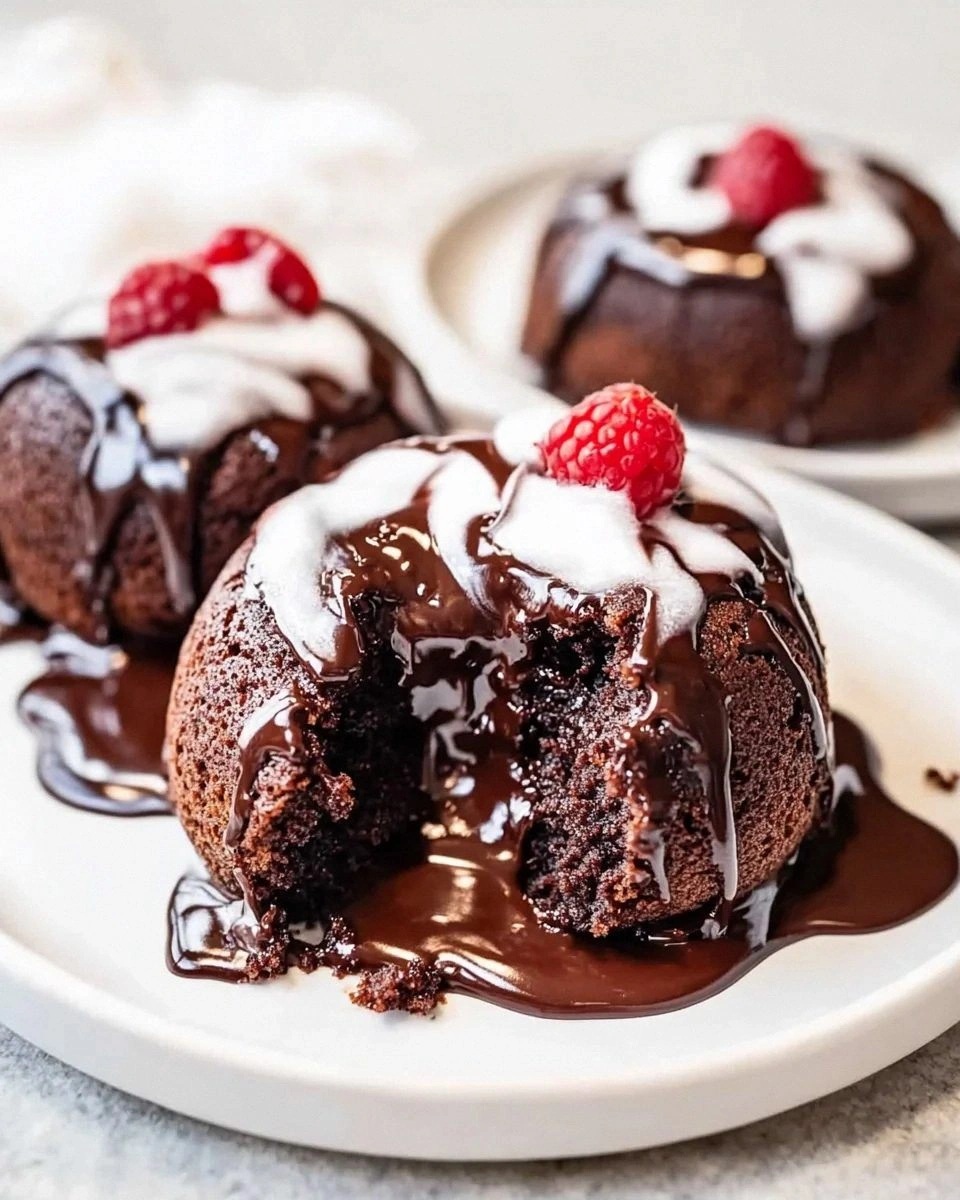
What truly sets this recipe apart is the use of maple sugar instead of regular granulated sugar. The maple notes add a whisper of autumnal warmth, even if you’re making it in the middle of summer. And let’s not forget the finishing touch – a dusting of cacao powder, a scoop of coconut vanilla ice cream, fresh berries, and a drizzle of chocolate sauce that turns the plate into a work of art. I dare you to taste this and not go back for seconds; I’ll be honest — I ate half the batch before anyone else got to try it.
There’s also a little surprise ingredient that most recipes completely ignore: a dash of fine sea salt right at the end, which makes the chocolate sing like a choir hitting the high note. This isn’t just another dessert; it’s a cozy, indulgent experience that feels like a warm blanket on a cold night. Picture yourself pulling this out of the oven, the whole kitchen smelling incredible, the steam curling around you like a fragrant veil. Let me walk you through every single step — by the end, you’ll wonder how you ever made it any other way.
What Makes This Version Stand Out
- Flavor Explosion: The combination of bittersweet chocolate with maple sugar creates a deep, caramel‑rich flavor that’s both familiar and surprising, like a classic song with a fresh remix.
- Texture Contrast: A crisp, caramelized edge gives way to a liquid gold center, delivering the satisfying snap‑to‑splash experience that most recipes miss.
- Simplicity: Fewer than ten ingredients, all pantry‑friendly, mean you can whip this up on a weeknight without a grocery run.
- Ingredient Quality: Using high‑quality dark chocolate and ghee ensures a glossy, buttery finish that cheap substitutes simply can’t match.
- Crowd Reaction: This dessert consistently earns “wow” reactions, making it perfect for dinner parties or a solo indulgence that feels luxurious.
- Cooking Method: Baking in ramekins at a precise temperature creates the perfect crust while keeping the interior molten.
- Make‑Ahead Potential: You can prep the batter ahead of time, refrigerate, and bake fresh when guests arrive – no last‑minute stress.
- Versatility: Pair with ice cream, berries, or a drizzle of sauce, and you have endless serving options without extra effort.
Inside the Ingredient List
The Flavor Base
6 oz bittersweet or dark chocolate: This is the heart of the lava cake. The higher cocoa content (70% or more) provides a rich, slightly bitter backbone that balances the natural sweetness of the maple sugar. If you skimp on quality, the cake will taste flat; if you use a lower‑grade chocolate, it can become greasy. Look for chocolate that snaps when broken – that’s a sign of good tempering and cocoa butter content.
½ cup ghee: Ghee is clarified butter, and it brings a nutty, caramel‑like depth that regular butter can’t match. Its higher smoke point means it browns beautifully without burning, creating that coveted crust. If you’re allergic to dairy, you can substitute coconut oil, but you’ll lose some of the buttery richness.
The Texture Crew
4 tablespoons blanched almond flour: Almond flour adds a subtle nuttiness and helps keep the cake tender without adding gluten. It also contributes a slight crumb that makes the outer shell less dense. If you’re out of almond flour, you can use finely ground hazelnut meal for a similar effect.
½ cup maple sugar: This isn’t ordinary white sugar; it’s granulated maple sugar that brings a caramel‑like aroma and a hint of smokiness. It dissolves quickly, ensuring the batter stays smooth. In a pinch, you can blend regular granulated sugar with a splash of maple syrup, but the texture won’t be as fine.
⅛ teaspoon fine sea salt: A pinch of salt amplifies the chocolate’s flavor and cuts through the sweetness, making the final bite feel balanced rather than cloying. Skip this and you’ll notice a flat, overly sweet profile.
The Binding Duo
2 large eggs + 2 large egg yolks: Eggs provide structure, while extra yolks enrich the batter, giving it that silk‑like mouthfeel. The combination ensures the cake rises just enough to form a delicate crust while keeping the interior fluid. If you replace the whole eggs with just yolks, the cake will be denser; if you omit yolks, you’ll lose that luscious melt.
The Final Flourish
Cacao powder: Used for dusting, it adds a bitter contrast that makes the molten center pop. It also gives the plated cake a professional, matte finish.
Coconut vanilla ice cream: The creamy, slightly tropical ice cream pairs perfectly with the deep chocolate, cutting through the richness with a cool, airy bite.
Fresh berries: A handful of raspberries or strawberries brings acidity and a burst of color, turning the dessert into a visual centerpiece.
Chocolate sauce: Drizzle it over the warm cake for an extra glossy finish; the sauce thickens as it cools, creating a glossy glaze that looks restaurant‑ready.
Everything's prepped? Good. Let's get into the real action…
The Method — Step by Step
- Prep the ramekins. Lightly butter four 6‑ounce ramekins with a dab of ghee, then dust each with a thin layer of cocoa powder. This prevents sticking and adds a subtle bitter note to the crust. Place the ramekins on a baking sheet for easy transport to the oven. That sizzle when it hits the pan? Absolute perfection.
- Melt the chocolate and ghee. In a heat‑proof bowl over a simmering pot of water (bain‑marie), combine the 6 oz dark chocolate with ½ cup ghee. Stir constantly until the mixture is glossy and fully combined. Remove from heat and let it cool just a touch – you want it warm, not hot, so the eggs don’t scramble. Kitchen Hack: If you don’t have a double boiler, use a microwave in 15‑second bursts, stirring in between to avoid scorching.
- Whisk the dry ingredients. In a separate bowl, sift together the almond flour, maple sugar, and fine sea salt. Sifting removes any lumps and ensures a uniform distribution, which is crucial for that smooth, even crumb. The almond flour’s fine texture will blend seamlessly with the wet mixture later.
- Combine eggs and yolks. In a medium bowl, beat the 2 large eggs and 2 large egg yolks until they reach a pale, frothy consistency. This incorporates air, giving the batter a light lift. Add a splash of vanilla extract if you like a hint of aromatic depth.
- Fold wet into dry. Create a well in the dry ingredient mixture and pour in the melted chocolate‑ghee blend. Gently fold with a rubber spatula until just combined – over‑mixing will develop the almond flour too much and make the cake dense. Kitchen Hack: Use a gentle “cut‑and‑fold” motion; think of turning a page, not stirring a pot.
- Incorporate the eggs. Slowly drizzle the beaten eggs into the chocolate mixture while continuously folding. This step is the trickiest – if the batter gets too hot, the eggs can scramble, ruining the silky texture. The batter should become glossy and slightly thick, resembling a thick pancake batter.Watch Out: If you notice specks of cooked egg, stop mixing immediately and whisk vigorously to re‑emulsify.
- Portion the batter. Divide the batter evenly among the prepared ramekins, filling each about three‑quarters full. This ensures enough room for the cake to rise without spilling over. Tap each ramekin lightly on the counter to release any air bubbles, which helps achieve a uniform crumb.
- Bake at the perfect temperature. Preheat your oven to 425°F (220°C). Place the baking sheet with ramekins in the center of the oven and bake for 12‑14 minutes. You’ll know they’re done when the edges are firm and slightly cracked, but the center still jiggles when you gently shake the pan. Picture the moment you pull them out – the aroma is a chocolate‑laden cloud that fills the kitchen.
- Unmold and serve. Let the cakes rest for 1 minute – this short pause lets the molten center settle just enough to stay inside when you invert them. Run a thin knife around the edge, place a plate on top, and flip swiftly. The cake should release with a dramatic crack, spilling its lava onto the plate. Top each with a scoop of coconut vanilla ice cream, a handful of fresh berries, and a generous drizzle of chocolate sauce. Serve immediately while the lava is still flowing.
That's it — you did it. But hold on, I've got a few more tricks that'll take this to another level…
Insider Tricks for Flawless Results
The Temperature Rule Nobody Follows
Most home bakers set their oven to “medium” and hope for the best. In reality, a precise 425°F (220°C) blast is what creates that perfect crust while keeping the interior liquid. If your oven runs hot, lower it by 15‑20 degrees; if it’s on the cool side, add a few extra minutes. Trust your oven’s quirks, and you’ll get consistent results every time.
Why Your Nose Knows Best
The moment the edges start to turn a deep amber and you catch that caramel scent, you’re at the sweet spot. Don’t rely solely on the timer; use your sense of smell as a guide. That aromatic cue is the real indicator that the crust is set and the center is still molten.
The 5‑Minute Rest That Changes Everything
After you pull the cakes from the oven, let them sit for exactly five minutes before unmolding. This short rest allows the outer shell to firm just enough to hold the lava when you flip, while the interior remains fluid. Skipping this step often results in a collapsed cake that spills everywhere.
Ramekin Size Matters
Using 6‑ounce ramekins gives you the ideal volume for a perfect rise and a dramatic crack. Larger dishes produce a thicker cake that may not have a truly liquid center, while smaller ones can dry out too quickly. Stick to the recommended size for that Instagram‑ready pour.
The Secret of the Final Dust
A light dusting of cacao powder right before serving adds a bitter contrast that cuts through the sweetness and makes the molten interior look even more luxurious. It also prevents the ice cream from sliding off the plate too quickly.
Creative Twists and Variations
This recipe is a playground. Here are some of my favorite ways to switch things up:
Spicy Chili Chocolate
Add a pinch of cayenne pepper to the melted chocolate for a subtle heat that dances on the palate. The spice amplifies the chocolate’s depth, making it perfect for daring guests who love a little kick.
Nutty Hazelnut Crunch
Swap half of the almond flour for finely ground hazelnuts and fold in toasted hazelnut pieces before baking. The extra crunch adds texture contrast, and the hazelnut flavor pairs beautifully with dark chocolate.
Berry‑Infused Center
Stir a tablespoon of raspberry puree into the batter just before portioning. As the cake bakes, the puree creates a hidden burst of tartness that surprises the eater when they cut in.
Coffee‑Lover’s Dream
Dissolve a teaspoon of instant espresso powder in the melted chocolate. The coffee accent lifts the chocolate’s bitterness, creating a mocha‑like experience without adding liquid.
Vegan Version
Replace the eggs with ¼ cup of silken tofu blended smooth and swap ghee for coconut oil. The texture remains luscious, and the flavor stays true to the original, making it suitable for plant‑based diets.
Storing and Bringing It Back to Life
Fridge Storage
Allow the cakes to cool completely, then cover each ramekin tightly with plastic wrap. Store in the refrigerator for up to 3 days. When ready to serve, reheat at 350°F for 8‑10 minutes, watching closely so the center stays molten.
Freezer Friendly
Unbaked batter can be frozen in the ramekins for up to 1 month. Label each with the date, then bake directly from frozen, adding an extra 4‑5 minutes to the baking time. The texture remains just as silky.
Best Reheating Method
For a perfect reheated lava flow, place the ramekin on a baking sheet, add a tiny splash (about 1 teaspoon) of water around the edges, and cover loosely with foil. Heat at 325°F for 6‑8 minutes. The steam created by the water revives the molten center without drying out the crust.