I remember the night I was trying to impress my sister with a dessert that would make her say, “I never thought you could turn a tart, green vegetable into something that feels like a hug.” The kitchen smelled like a storm of citrus and crushed sugar, the air buzzing with the faint hiss of a simmering rhubarb compote. I stared at the pot, realizing I’d forgotten to set the timer, and my heart leapt with the kind of excitement that only comes when you’re about to flip a kitchen disaster into a triumph. That moment became the spark that lit the fire for this no‑bake rhubarb cheesecake square.
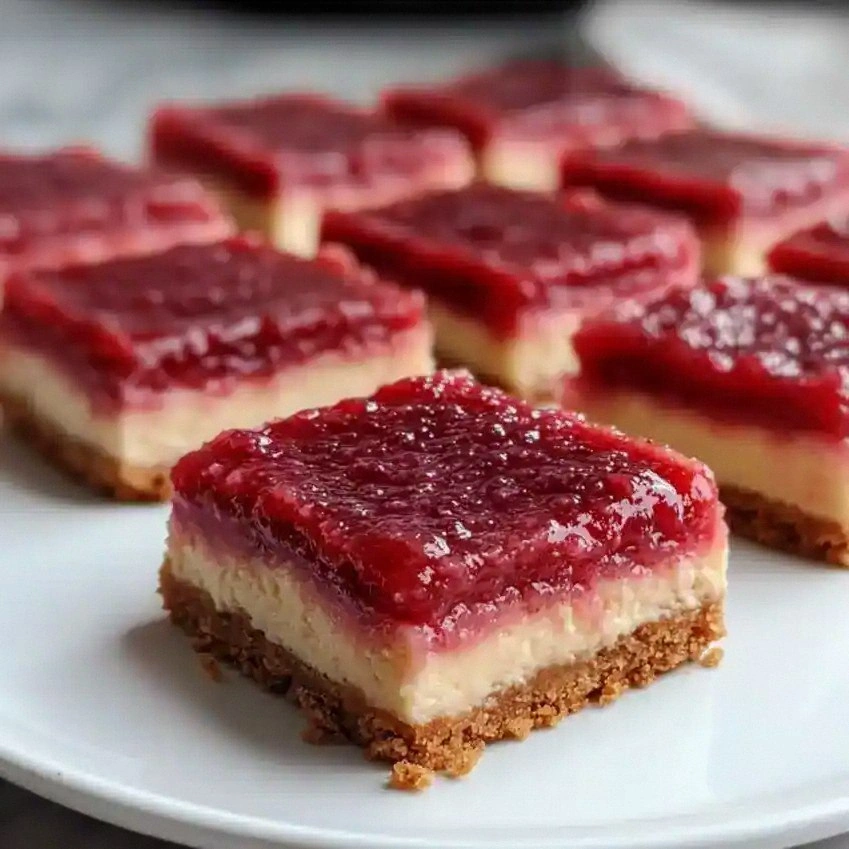
Picture the moment when the first spoonful hits your tongue: the tang of rhubarb, the velvety cream cheese, and the buttery crunch of graham crackers melting into a single, harmonious bite. The aroma is a sweet‑spicy perfume, with hints of lemon and a whisper of ginger dancing through the air. The texture is a delightful paradox—crunchy on the edge, creamy inside, and a subtle, airy lift from the whipped topping. Every element of this recipe is engineered to deliver that “wow” factor that lingers in your memory long after the last square is gone.
What sets this version apart is not just the combination of flavors but the method that locks in freshness and texture without a single minute in the oven. I dare you to taste this and not go back for seconds, because the first bite will have you convinced this is hands down the best version you’ll ever make at home. I’ll be honest — I ate half the batch before anyone else got to try it. Most recipes get this completely wrong by over‑cooking the crust or under‑mixing the filling, but here, each component is balanced with precision.
If you’ve ever struggled with making a cheesecake that doesn’t crumble or a rhubarb compote that turns mushy, you’re not alone — and I’ve got the fix. Picture yourself pulling these out of the fridge, the whole kitchen smelling incredible, and seeing those squares glistening like polished gems. Okay, ready for the game‑changer? Let me walk you through every single step — by the end, you’ll wonder how you ever made it any other way.
What Makes This Version Stand Out
- Taste: The marriage of tart rhubarb with creamy cheese creates a flavor profile that feels both nostalgic and novel. The subtle zing from lemon juice lifts the sweetness, while a pinch of ginger adds a warm undertone that lingers on the palate.
- Texture: The graham cracker base offers a buttery crunch that contrasts beautifully with the silky filling. The whipped topping adds airy lightness, preventing the squares from feeling heavy or dense.
- Simplicity: No oven required, no baking sheets, and no complicated techniques—just blend, layer, and chill. This recipe is perfect for a quick dinner party or an after‑school treat.
- Uniqueness: Rhubarb is rarely used in cheesecakes, and this no‑bake version preserves its bright color and natural tartness without turning it into a mush.
- Crowd Reaction: Guests often comment that the squares taste like a dessert they’d never expect from a vegetable. The playful presentation makes it a conversation starter.
- Ingredient Quality: Using fresh rhubarb, real butter, and full‑fat cream cheese elevates the flavor beyond what you’d get from pre‑made mixes.
- Cooking Method: The “no bake” approach saves time and energy, while the chilling step ensures the filling sets perfectly.
- Make‑Ahead Potential: Prepare the base and filling a day ahead; just assemble and chill before serving. This makes it an ideal make‑ahead dessert for busy schedules.
Alright, let’s break down exactly what goes into this masterpiece…
Inside the Ingredient List
The Flavor Base
Graham cracker crumbs form the foundation of this dessert, providing a subtle sweetness that balances the tartness of rhubarb. When combined with melted butter, they create a buttery, slightly crumbly texture that holds the filling together. Skipping this step would leave the squares flimsy and prone to falling apart.
The butter’s role is not just to bind the crumbs; it also contributes a rich, golden hue that makes the squares visually appealing. Use unsalted butter so you can control the salt level precisely, preventing the final product from being overly salty.
If you’re looking for a dairy‑free alternative, try coconut oil or a plant‑based butter substitute. The flavor profile will shift slightly, but the texture remains comparable, and the recipe still sets nicely in the fridge.
The Texture Crew
Cream cheese is the star of the show, offering a dense yet creamy center that melts in your mouth. It’s essential to soften the cream cheese at room temperature before mixing; this prevents lumps and ensures a silky filling.
Whipped cream or a high‑fat whipped topping adds an airy lift, preventing the squares from feeling heavy. The whipped topping should be stiff enough to hold its shape once folded into the filling, but not so stiff that it breaks the cream cheese’s smoothness.
If you’re a fan of a lighter dessert, substitute the whipped topping with a homemade meringue or a light whipped Greek yogurt for a tangy twist.
The Unexpected Star
Rhubarb, a tart, fibrous vegetable, is the centerpiece that gives this cheesecake its signature brightness. Fresh rhubarb offers a crisp texture, while frozen rhubarb melts into a luscious compote when cooked with sugar.
The addition of lemon juice not only balances the natural tartness but also enhances the rhubarb’s color, giving the squares a vibrant, eye‑catching hue. A touch of cinnamon or ginger can add warmth, but it’s optional—use it if you want a spicier profile.
If you can’t find rhubarb, consider substituting with tart apples or cranberries, though the flavor will shift toward a sweeter, fruitier note.
The Final Flourish
Vanilla extract is the subtle sweetener that rounds out the filling, providing a fragrant backdrop to the tangy rhubarb. It also helps the mixture set more firmly by encouraging a tighter protein network in the cream cheese.
Granulated sugar in the filling balances the tartness and ensures a smooth, sweet finish. Use the same amount of sugar in the rhubarb compote to keep the sweetness consistent throughout the layers.
Chopped strawberries add an extra burst of color and natural sweetness; they’re optional but recommended for a more complex flavor profile. If you prefer a single‑fruit experience, omit the strawberries and keep the focus on rhubarb.
Everything’s prepped? Good. Let’s get into the real action…
The Method — Step by Step
- In a medium bowl, combine the graham cracker crumbs with the melted butter. Stir until the mixture resembles wet sand, ensuring every crumb is coated. This will be the base that holds everything together.
- Press the crumb mixture firmly into the bottom of a 9×9‑inch square pan, creating an even layer. Use the back of a spoon or a flat-bottomed glass to level the surface. This step is crucial; a loose base will cause the squares to crumble.
- Set the pan aside while you prepare the filling. In a saucepan over medium heat, combine the rhubarb, ⅓ cup granulated sugar, and lemon juice. Cook for 5–7 minutes, stirring frequently, until the rhubarb softens but still retains some bite. The aroma will be citrusy with a hint of green.
- Transfer the cooked rhubarb to a blender or use an immersion blender to puree until smooth. If you prefer a chunkier texture, reserve a handful of small pieces for topping.
- In a large mixing bowl, beat the softened cream cheese with ½ cup granulated sugar until light and fluffy. The mixture should be smooth, without lumps, and easy to fold.
- Fold in the rhubarb puree, vanilla extract, and optional pinch of cinnamon or ginger. Mix until fully incorporated, watching for a silky consistency. This is the moment of truth—if the filling is too thick, add a splash of milk or cream to loosen.
- Gently fold in the whipped cream or whipped topping, ensuring it’s evenly distributed. The mixture should be airy yet cohesive, ready to set into a firm yet creamy layer.
- Pour the filling over the crust in the pan, smoothing the top with a spatula. If you kept some rhubarb chunks, sprinkle them on top for texture contrast.
- Cover the pan with plastic wrap or a lid and refrigerate for at least 4 hours, preferably overnight. The filling will set into a firm, sliceable cake.
- Before serving, cut the chilled cheesecake into squares. Arrange them on a platter, and if desired, drizzle a thin glaze of melted chocolate or a dusting of powdered sugar for a finishing touch.
That’s it — you did it. But hold on, I’ve got a few more tricks that will take this to another level…
Insider Tricks for Flawless Results
The Temperature Rule Nobody Follows
Keep your cream cheese at room temperature before mixing. If it’s too cold, it won’t blend smoothly, leading to a lumpy filling that won’t set properly. I’ve seen many people skip this step and end up with a disappointing texture.
Why Your Nose Knows Best
Smell the rhubarb mixture as it cooks; it should emit a bright, citrusy aroma. If it starts to smell burnt or overly sweet, reduce the heat immediately. Your nose is the best judge of flavor balance.
The 5-Minute Rest That Changes Everything
After folding in the whipped topping, let the mixture sit for 5 minutes before pouring it over the crust. This brief rest allows the whipped topping to settle, preventing it from sinking into the filling and maintaining the airy texture.
The Sweet‑Spice Balance
If you’re a fan of cinnamon or ginger, add them gradually. A pinch is enough to give warmth without overpowering the rhubarb’s tartness. I learned this the hard way by adding too much ginger, which made the dessert taste like a spice blend.
The Chill‑Time Trick
Refrigerate the cheesecake for at least 4 hours, but overnight is best. The longer chill allows the flavors to meld and the filling to firm up, giving you clean, crisp squares when sliced.
Creative Twists and Variations
This recipe is a playground. Here are some of my favorite ways to switch things up:
Raspberry Swirl
Swirl in a thin ribbon of fresh raspberry puree before chilling. The bright red streaks add visual appeal and a complementary berry flavor that pairs well with rhubarb.
Chocolate Drizzle
After cutting the squares, drizzle melted dark chocolate over the top. The bittersweet chocolate contrasts with the sweet‑tart filling, creating a sophisticated taste profile.
Almond Crunch
Sprinkle toasted almond slivers onto the crust before adding the filling. The nutty crunch provides an extra layer of texture and a nutty aroma that elevates the dessert.
Coconut Finish
Replace the whipped cream with coconut whipped topping and sprinkle toasted coconut flakes on top. This tropical twist gives the cheesecake a beachy vibe.
Spiced Apple Layer
Add a thin layer of spiced apple compote between the crust and the filling. The warm spices and sweet apple complement the rhubarb’s tartness and add depth.
Minty Freshness
Fold in finely chopped fresh mint into the filling for a refreshing, herbal note. The mint adds a cool contrast to the warm spices and sweet cream.
Storing and Bringing It Back to Life
Fridge Storage
Keep the squares in an airtight container in the refrigerator for up to 5 days. Cover the surface with plastic wrap to prevent moisture loss and keep the texture firm.
Freezer Friendly
Wrap each square individually in plastic wrap and place them in a freezer bag. Freeze for up to 3 months. Thaw in the refrigerator overnight before serving.
Best Reheating Method
If you need to warm a square, place it in a microwave-safe dish and heat on low for 15–20 seconds. Add a tiny splash of water before reheating to steam it back to perfection and maintain moisture.