Picture this: I’m standing in a kitchen that smells like burnt sugar and fresh cocoa, the kind of disaster that makes you question every culinary decision you’ve ever made. A friend dared me to bake a cookie that could make her taste buds dance, and I was determined to prove that a single recipe could turn that moment into a triumph. I grabbed a handful of Biscoff cookie butter, a splash of vanilla, and a dream of white chocolate, and the kitchen transformed into a playground of flavors. I swear, the first bite felt like a caramel‑laden hug wrapped in a buttery blanket, with a subtle hint of chocolate that lingered like a secret. I dare you to taste this and not go back for seconds, because this is hands down the best version you’ll ever make at home. And if you’re skeptical, just remember: I ate half the batch before anyone else got a chance to try it.
The texture of these cookies is a revelation—crisp edges that shatter like thin ice, a chewy center that melts in your mouth, and a subtle crunch from the white chocolate chips that add a playful surprise. I’ve spent years perfecting cookie dough, but this recipe feels like a fresh start, a bold statement that sweet and savory can coexist in perfect harmony. The Biscoff cookie butter brings a caramelized depth that most cookie recipes shy away from, while the white chocolate chips provide a creamy counterpoint that balances the richness. Picture yourself pulling this out of the oven, the whole kitchen smelling incredible, and the anticipation building as the cookies cool to the ideal temperature. If you've ever struggled with cookies that turn out too flat or too dense, you're not alone—and I've got the fix. Stay with me here—this is worth it.
When you first open the jar of Biscoff cookie butter, you’ll notice its thick, buttery consistency that coats your spoon like velvet. The aroma is instantly recognizable—caramelized sugar, toasted nuts, and a whisper of vanilla. That smell alone can transport you back to childhood kitchens where cookies were the main event. The first bite delivers that caramel kick, followed by the smooth melt of white chocolate, and a final burst of crunch from the sprinkles. It’s a symphony of textures that keeps your palate engaged from start to finish. The result? A cookie that’s both comforting and adventurous, a true crowd-pleaser that will have guests begging for the recipe.
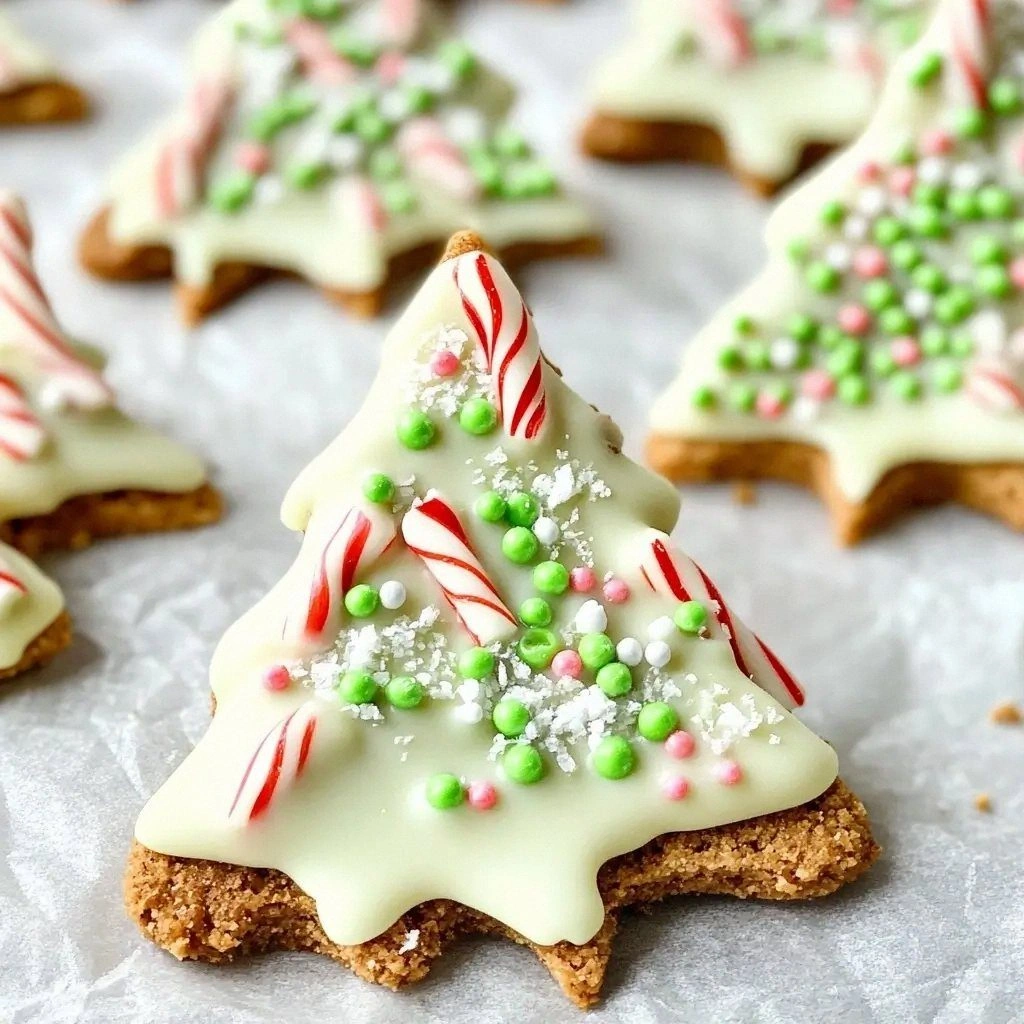
I’ve spent countless hours tweaking cookie doughs, but this version stands out because it combines the familiar with the unexpected. The Biscoff cookie butter gives it a deep, caramel flavor that’s impossible to beat, while the white chocolate chips add a creamy, sweet counterbalance that keeps the cookie from becoming too heavy. The subtle green food coloring gives it a festive touch that feels like a holiday treat, even if you’re baking it in July. The result is a cookie that’s crisp on the edges, chewy in the center, and utterly irresistible. By the end of this post, you’ll wonder how you ever made it any other way.
What Makes This Version Stand Out
- Flavor: The Biscoff cookie butter infuses a caramelized, nutty depth that elevates every bite, making the cookie feel like a gourmet treat.
- Texture: Crisp edges meet a chewy center, while the white chocolate chips add a creamy contrast that keeps the cookie from becoming too dense.
- Simplicity: With just eight ingredients, the recipe is approachable for beginners and seasoned bakers alike.
- Uniqueness: The green food coloring and festive sprinkles give it a playful, holiday-ready aesthetic that’s perfect for any celebration.
- Crowd Reaction: Friends rave about the caramel kick and the chocolate melt, and the cookies keep disappearing in seconds.
- Ingredient Quality: Using premium Biscoff cookie butter and high‑quality white chocolate chips ensures a top‑tier flavor profile.
- Method: The dough is quick to assemble, and the baking time is short—no long, tedious steps.
- Make‑Ahead: The cookies can be stored in an airtight container for up to a week, and they taste just as good cold or reheated.
Alright, let's break down exactly what goes into this masterpiece…
Inside the Ingredient List
The Flavor Base
Biscoff cookie butter is the heart of this recipe, delivering a caramelized, nutty profile that’s hard to replicate with anything else. Its creamy consistency means you won’t need extra fats to keep the dough from sticking. If you skip it, the cookies will lose their signature depth and feel more like a plain sugar cookie.
The Texture Crew
All-purpose flour provides the structure, allowing the dough to rise slightly while staying tender. Brown sugar adds moisture and a subtle molasses flavor that complements the Biscoff butter. Softened butter balances the sweetness and helps the dough spread evenly.
The Unexpected Star
White chocolate chips are the secret weapon that turns a caramel cookie into a multi‑textured delight. They melt during baking, creating pockets of gooey sweetness that contrast with the crisp edges. If you prefer a darker chocolate, swap them for dark chocolate chips, but the flavor profile will shift noticeably.
The Final Flourish
A splash of vanilla extract brightens the entire dough, while a pinch of baking soda ensures the cookies rise just enough for that perfect bite. Green food coloring is optional but adds a festive pop that makes the cookies feel like holiday treats. Sprinkles not only give a playful crunch but also make each cookie a canvas for creativity.
Everything's prepped? Good. Let's get into the real action…
The Method — Step by Step
- Preheat your oven to 350°F (175°C) and line two baking sheets with parchment paper. The parchment prevents sticking and ensures even baking. While the oven heats, set a large mixing bowl ready for the dough. This step might feel mundane, but a well‑heated oven is the secret to crisp edges.
- In a medium bowl, beat the softened butter until fluffy, then add the Biscoff cookie butter. The mixture should look silky and smooth, like a rich frosting. This blending step is crucial; if you rush it, the dough might become uneven.
- Stir in the brown sugar and vanilla extract until fully incorporated. The sugar should dissolve completely, creating a glossy batter. The vanilla brightens the caramel notes, preventing the cookies from feeling too heavy. Kitchen Hack: For a smoother batter, pulse the mixture in a hand mixer for 30 seconds after adding sugar.
- In a separate bowl, whisk together the all-purpose flour and baking soda. The soda activates during baking, giving the cookies a light lift. Make sure the flour is well‑mixed to avoid clumps, which could lead to uneven texture.
- Gradually fold the dry flour mixture into the wet batter, stirring until just combined. Overmixing can make the cookies tough, so stop as soon as the flour disappears. At this point, the dough should be thick but manageable.
- Gently fold in the white chocolate chips and, if using, the green food coloring. The chips should be evenly distributed, creating pockets of melt throughout. Watch Out: Don’t overmix after adding the chips; otherwise, the chocolate will melt too early, causing a runny dough.
- Drop rounded tablespoons of dough onto the prepared baking sheets, spacing them about 2 inches apart. The cookies will spread slightly, so give them enough room. This step is where you can get creative—shape the dough into small trees or stars if you’re feeling festive.
- Bake for 12–14 minutes, or until the edges are golden brown and the centers look set. The cookies should still be soft in the middle, as they will firm up as they cool. Kitchen Hack: If you want extra crispness, bake an additional 2 minutes, but keep a close eye to avoid burning.
- Remove the cookies from the oven and let them cool on the sheet for 5 minutes before transferring to a wire rack. This short cooling period allows the cookies to set without cracking. While they cool, the white chocolate will firm up, giving that delightful snap.
- Once cooled, sprinkle each cookie with your favorite sprinkles. The crunch adds a playful texture and a burst of color. Store the cookies in an airtight container at room temperature for up to a week, or freeze for longer storage.
That's it — you did it. But hold on, I've got a few more tricks that'll take this to another level…
Insider Tricks for Flawless Results
The Temperature Rule Nobody Follows
Many bakers overlook the importance of oven temperature accuracy. Using an oven thermometer ensures your oven is truly at 350°F, preventing over‑baked edges and under‑cooked centers. I’ve had ovens that read 10°F higher than they actually are, which can ruin a batch. By checking the thermometer, you guarantee consistent results every time.
Why Your Nose Knows Best
Trust your nose during baking. When the cookies start to turn golden and a warm, caramel aroma fills the air, that’s the perfect moment to pull them out. If you’re tempted to check the center, you’ll risk overbaking. Your nose is the most reliable indicator of doneness.
The 5-Minute Rest That Changes Everything
Letting the cookies rest on the baking sheet for 5 minutes before transferring them to a wire rack is crucial. This brief rest allows the structure to set, preventing the cookies from cracking or breaking apart. Skipping this step often results in fragile cookies that crumble on the plate.
Sprinkle Placement Magic
When adding sprinkles, lightly press them onto the surface of the cookie. This ensures they adhere during the brief cooling period. If you sprinkle after the cookies are fully cooled, they may fall off or not stick as well.
Freeze and Reheat Secrets
If you plan to store cookies for a week, freeze them in a single layer on a parchment sheet. When ready to eat, reheat in a 300°F oven for 5 minutes. This process restores the original crispness without drying out the interior.
Creative Twists and Variations
This recipe is a playground. Here are some of my favorite ways to switch things up:
Chocolate‑Covered Biscoff
Dip the cooled cookies in melted dark chocolate for a richer, bittersweet experience. The chocolate coating adds a glossy finish and a satisfying snap.
Nutty Crunch Variation
Fold in chopped toasted almonds or pecans before baking for a nutty crunch that complements the caramel notes. The nuts add a delightful texture and depth.
Spiced Ginger Twist
Add 1/2 teaspoon of ground ginger to the dry mix for a warm, spicy undertone that pairs beautifully with the Biscoff flavor.
Minty Freshness
Replace the green food coloring with a few drops of peppermint extract and top with green sprinkles for a refreshing minty twist.
Almond Butter Alternative
Swap Biscoff cookie butter for almond butter to create a nutty, slightly sweet base. The almond butter will give the cookies a different, but equally delightful, flavor profile.
Gluten‑Free Adaptation
Use a gluten‑free all‑purpose blend in place of regular flour and bake at the same temperature. The cookies will still have a chewy center and crisp edges.
Storing and Bringing It Back to Life
Fridge Storage
Place the cooled cookies in an airtight container and store them in the refrigerator for up to 3 days. The cool temperature preserves the crispness and prevents the white chocolate from melting. When ready to eat, let them sit at room temperature for 10 minutes to soften slightly.
Freezer Friendly
For longer storage, place the cookies on a parchment‑lined tray and freeze until solid. Transfer to a freezer bag and store for up to 3 months. When you’re ready to enjoy, let them thaw at room temperature for 15 minutes.
Best Reheating Method
Reheat frozen cookies in a preheated 300°F oven for 5 minutes, or until the chocolate is glossy and the edges crisp. If you’re short on time, microwave on a low setting for 15 seconds, but be careful not to overheat. Add a tiny splash of water before reheating to create steam that helps restore the cookie’s original texture.