Picture this: I’m standing in my kitchen, the scent of onions swirling around me, when my phone buzzes with a frantic text from a friend who just discovered the world‑best deep‑fried snack. “I need a recipe that’s crunchy, not greasy, and can be made in an air fryer,” she wrote. I stared at the empty countertop, realizing that the only thing missing was a recipe that would make onions taste like a festival of flavor, not a soggy after‑thought. That moment sparked a culinary obsession that turned a simple grocery list into a masterpiece of crispy, caramelized goodness.
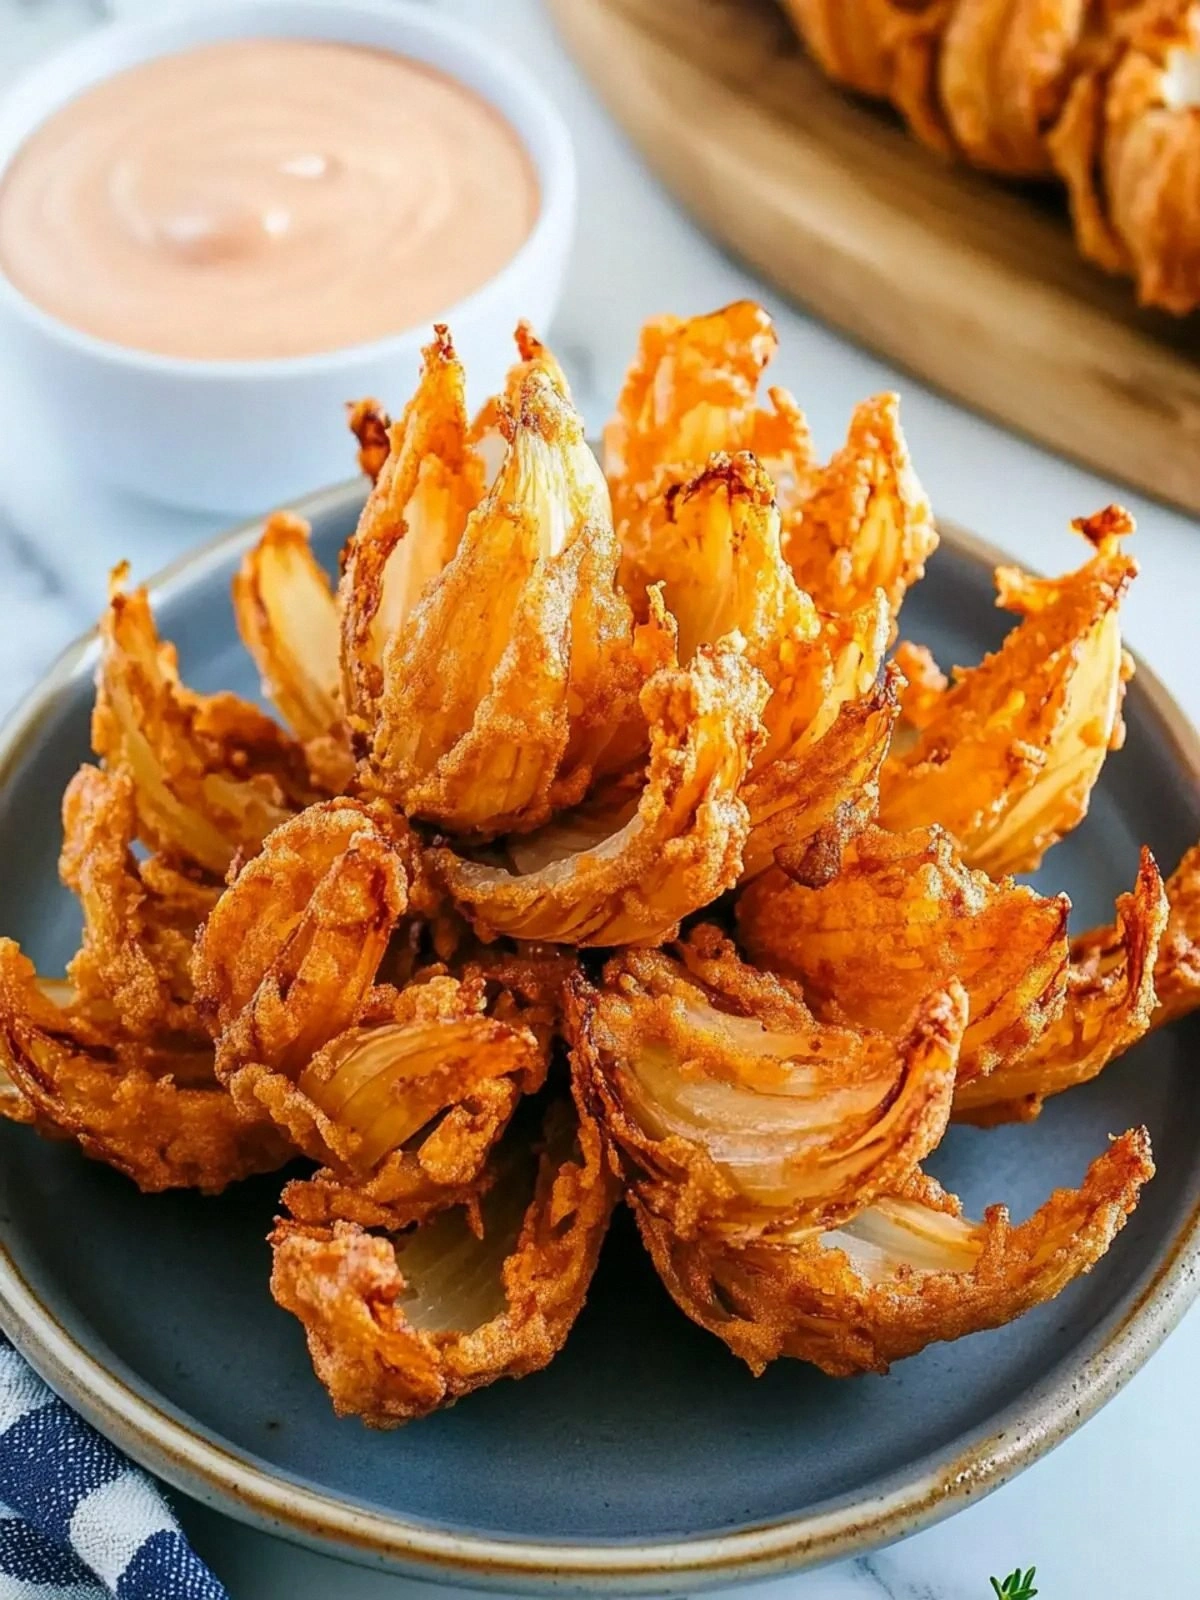
The first bite of a blooming onion should feel like a symphony: a crackle that whispers caramelized sugars, a burst of smoky paprika, and a hint of cumin that lingers like a secret. The aroma of toasted onion layers mingles with the subtle earthiness of thyme and oregano, creating a heady perfume that makes the whole kitchen feel like a bustling market. The texture is a paradox: the outer shell is blisteringly crisp, while the interior remains tender and juicy, each bite releasing a savory, sweet whisper. I dare you to taste this and not go back for seconds—once you crack that golden crust, you’ll crave the next bite before your eyes have even registered the crunch.
What sets this version apart is not just the air‑fryer's ability to render a deep‑fried texture without the oil, but the precise balance of spices that turns a humble onion into a showstopper. I’ve spent hours experimenting with paprika ratios, discovering that a generous tablespoon is the sweet spot that gives the batter that smoky depth without overpowering the natural onion sweetness. The cayenne pepper is the secret weapon that adds a subtle heat, a whisper of fire that lingers on the palate, making each bite a dance of flavors. The ground cumin and dried herbs bring a warm, aromatic backdrop that elevates the dish from simple to extraordinary.
If you’ve ever tried a blooming onion that fell flat, you know the disappointment that follows—a soggy center, a bland coating, and a lackluster crunch that feels like a culinary letdown. I’ve been there, watching my friends’ faces fall when the first bite was anything but spectacular. That’s why I’m so proud of this recipe, which guarantees a golden, crackling exterior and a juicy, flavorful core every time. The next step? Let me walk you through every single detail—by the end, you’ll wonder how you ever made it any other way.
What Makes This Version Stand Out
- Flavor: The blend of paprika, cayenne, cumin, thyme, and oregano creates a layered, smoky, and slightly spicy profile that elevates the natural sweetness of the onion.
- Crispness: Air frying achieves a light, airy crunch that mimics deep frying without the excess oil, leaving a satisfying snap with every bite.
- Texture: The batter adheres firmly to the onion slices, forming a protective shell that caramelizes beautifully while preserving the tender interior.
- Time: From prep to finish, the entire process takes just 45 minutes, making it an ideal quick‑fire appetizer for busy evenings or spontaneous gatherings.
- Health: The use of an air fryer reduces oil absorption, cutting calories while still delivering a satisfying crunch.
- Versatility: Swap in different herbs or spice levels to tailor the flavor to your taste or dietary preferences, making this recipe a kitchen staple.
Inside the Ingredient List
The Flavor Base
The sweet onion is the star of this dish, its layers unfurling like a delicate flower when sliced thinly. The onion’s natural sugars caramelize during the air‑fry, creating a sweet undertone that balances the bold spices. Choosing a fresh, firm onion ensures a crisp bite and a clean, bright flavor. If you prefer a milder taste, use a white onion instead of a sweet one; the result will be slightly less sweet but still delicious.
The Texture Crew
All‑purpose flour provides a neutral canvas that absorbs the spices and creates a sturdy coating. The batter’s consistency should be slightly thicker than pancake batter, allowing it to cling to the onion without dripping. If you’re looking for a gluten‑free version, try a 1:1 blend of rice flour and cornstarch, but keep an eye on the texture—it may be slightly less cohesive. The batter’s thickness also determines the final crunch; a thinner coating will be lighter, while a thicker layer will yield a denser crunch.
The Unexpected Star
Cayenne pepper is the spice that sets this dish apart. A small pinch of heat adds depth without dominating the sweet onion’s flavor profile. If you’re a heat‑averse crowd, reduce the cayenne to a quarter teaspoon or omit it entirely; the dish will still shine thanks to the paprika and cumin. For a smoky twist, add a splash of smoked paprika, which will give the batter a subtle, campfire aroma.
The Final Flourish
Eggs and milk bind the batter, creating a smooth, glossy coating that crisps beautifully in the air fryer. The eggs also provide a protein boost, while the milk adds moisture, preventing the batter from drying out. If you’re vegan, replace the eggs with a flaxseed “egg” (1 tablespoon ground flaxseed mixed with 3 tablespoons water) and use a plant‑based milk. The oil spray bottle is the final touch, ensuring a light, even coating that seals in the crispness.
Everything's prepped? Good. Let's get into the real action.
The Method — Step by Step
- Step 1: Slice and Separate. Use a sharp knife to cut the onion into 8 wedges, then gently peel away the outer skin. Separate each wedge into thin, even slices, about 1/8 inch thick, ensuring uniform cooking. Place the slices on a clean cutting board and let them rest for 5 minutes to allow the natural sugars to bloom slightly. This step is crucial; uneven slices will cook at different rates, leading to a less uniform crunch.
- Step 2: Prepare the Batter. In a shallow bowl, whisk together 2.5 cups of all‑purpose flour, 1 tablespoon paprika, 1 teaspoon cayenne pepper, 0.5 teaspoon ground cumin, 0.5 teaspoon dried thyme, and 0.5 teaspoon dried oregano. In a separate bowl, beat 2 large eggs and then whisk in 1 cup of milk, creating a smooth, slightly runny mixture. Slowly pour the wet mixture into the dry, stirring until the batter is thick enough to coat the onion slices without dripping. Adjust the consistency by adding a splash of water if it’s too thick; it should hold its shape on a spoon.
- Step 3: Coat the Onion. Dip each onion slice into the batter, ensuring every edge is fully coated. Gently shake off excess batter, letting the thin film cling to the onion. Place the coated slices onto a parchment‑lined tray, spacing them evenly to prevent sticking. This step is where the batter’s thickness determines the final crunch; a thicker coating will give a denser bite, while a thinner one will be lighter.
- Step 4: Preheat the Air Fryer. Set your air fryer to 200°C (390°F) and let it heat for 3 minutes. Preheating ensures the batter begins to set immediately upon contact, preventing sticking and promoting even browning. While the fryer heats, spray a light mist of oil over the coated onions to help achieve that golden finish. The oil spray will also help the batter crisp up without absorbing too much fat.
- Step 5: Air Fry the Onions. Arrange the onion slices in a single layer in the air fryer basket, leaving a small gap between each piece to allow air circulation. Cook for 12 minutes, flipping halfway through, until the coating is golden brown and the edges begin to curl. The aroma that fills the kitchen during this step should feel like a warm, caramelized feast, a promise of the crunch that awaits. The batter should smell toasty, not raw.
- Step 6: Check for Crispness. After 12 minutes, remove the basket and check the coating. It should be a deep amber color with a slight sheen. If you prefer a darker crust, return the onions for an additional 2–3 minutes. The key is to keep an eye on the edges—they should pull away from the batter and look like they’re ready to snap. The interior should still be tender, not over‑cooked.
- Step 7: Rest Before Serving. Transfer the cooked onions to a wire rack or a paper towel‑lined plate and let them rest for 3 minutes. Resting allows the steam to escape, preventing the coating from becoming soggy. While they rest, you can garnish with a sprinkle of fresh parsley or a dusting of sea salt for a finishing touch. The aroma at this stage is irresistible, a final preview before the first bite.
- Step 8: Serve Immediately. Serve the blooming onions hot, either as a standalone appetizer or as a side to complement a main course. Pair them with a cool dip, such as a garlic aioli or a tangy yogurt sauce, to cut through the richness. The crunch should crackle with each bite, the caramelized sugars releasing a sweet burst that pairs perfectly with the subtle heat from the cayenne. Enjoy the moment of pure, crispy bliss.
That’s it — you did it. But hold on, I’ve got a few more tricks that’ll take this to another level.
Insider Tricks for Flawless Results
The Temperature Rule Nobody Follows
While most people default to 200°C, the exact temperature can vary depending on your air fryer model. If you notice the coating browning too fast, reduce the heat by 10°C; if it’s too slow, increase it slightly. A consistent temperature ensures a uniform crisp without burning the spices. I’ve found that a 200°C setting works best on most models, but feel free to tweak it to your taste.
Why Your Nose Knows Best
The aroma is your best judge of doneness. As the batter browns, the smell of caramelized onions and toasted spices will intensify. When the scent shifts from raw to rich, it’s a sign that the coating is perfectly crisp. Trust your nose; it will guide you to the ideal finish.
The 5‑Minute Rest That Changes Everything
Letting the onions rest on a rack allows the steam to escape, preventing the coating from becoming soggy. During this brief pause, the surface dries slightly, enhancing the crunch. I’ve seen people skip this step, only to find their onions soggy and disappointing. Remember, a short rest is a long‑lasting crunch.
Spray Oil, Don’t Soak
Using a spray bottle keeps the coating light and airy. A heavy coat of oil can make the batter greasy and heavy. Spray lightly, just enough to create a protective barrier that crisps without adding excess fat. This technique is a game‑changer for health‑conscious cooks.
Keep the Batter Smooth
Any lumps in the batter will result in uneven coating. Whisk the batter until it’s silky smooth before dipping the onions. If you’re in a hurry, use a hand mixer on low speed for 30 seconds; this ensures a consistent batter that adheres evenly.
Don’t Skip the Flour
Flour is the backbone of the coating. It creates the structure that holds the spices together and forms the crispy shell. Skipping flour will result in a thin, fragile coating that falls apart. Stick to the recipe’s flour amount for the best texture.
Creative Twists and Variations
This recipe is a playground. Here are some of my favorite ways to switch things up:
Smoky Chipotle Version
Swap the paprika for smoked paprika and add a tablespoon of chipotle powder. The result is a deep, smoky heat that pairs wonderfully with a creamy cilantro lime dip. This version is perfect for a summer BBQ or a Mexican‑inspired gathering.
Herb‑Infused Mediterranean
Replace the cumin with oregano and add a teaspoon of dried rosemary. The aromatic herbs give the coating a Mediterranean flair. Serve with a tzatziki sauce for a refreshing contrast.
Sweet and Spicy Maple Glaze
After air frying, drizzle a thin layer of maple syrup over the onions and return them to the air fryer for 2 minutes. The syrup caramelizes, adding a sweet glaze that balances the cayenne heat. This version is ideal for a holiday appetizer.
Vegan Delight
Use a flaxseed “egg” and plant‑based milk, and replace the oil spray with a light mist of coconut oil. The result is a plant‑based, crispy onion that still delivers all the flavor. This version is great for vegans or those looking to reduce dairy.
Cheesy Crunch
Sprinkle grated parmesan or cheddar over the coated onions before air frying. The cheese melts into the coating, creating a savory, cheesy crust. This variation is a crowd‑pleaser at parties.
Spicy Peanut Butter Dip
Serve the onions with a homemade peanut butter dip flavored with lime juice, soy sauce, and a touch of honey. The nutty dip complements the crisp onions, making for a fusion snack that’s both addictive and balanced.
Storing and Bringing It Back to Life
Fridge Storage
Store the cooked onions in an airtight container for up to 3 days. Keep them on a paper towel to absorb excess moisture. Reheat in the oven at 180°C for 5 minutes to restore crispness. The container should be sealed tightly to prevent the onions from drying out.
Freezer Friendly
Freeze the onions in a single layer on a parchment sheet before transferring to a freezer bag. Store for up to 2 months. Reheat in the air fryer at 200°C for 8 minutes, or in the oven at 180°C for 10 minutes. The coating should regain its crunch, though it may not be as crisp as freshly made.
Best Reheating Method
The best way to bring the onions back to life is to use the air fryer or oven, not a microwave, which will steam them. Add a tiny splash of water before reheating to create steam that rehydrates the interior without making the coating soggy. This trick ensures the onions taste almost as fresh as when they were first cooked.