Picture this: it’s the night before Christmas, the tree is glittering, the kids are bouncing off the walls, and you’ve just realized you’ve run out of the classic chocolate cake you promised to bring to the family gathering. Panic? Absolutely. But then, like a culinary superhero, I grabbed a box of Golden Oreo cookies, a tub of Cool Whip, and a stash of Little Debbie Christmas Tree Cakes and thought, “What if I could turn these pantry staples into something that looks like a dirt‑filled garden, but tastes like a holiday miracle?” I dared myself to create a dessert that would make even the most skeptical aunt gasp, and the result was nothing short of a festive masterpiece. This is the story of how a kitchen disaster turned into the most talked‑about no‑bake treat of the season.
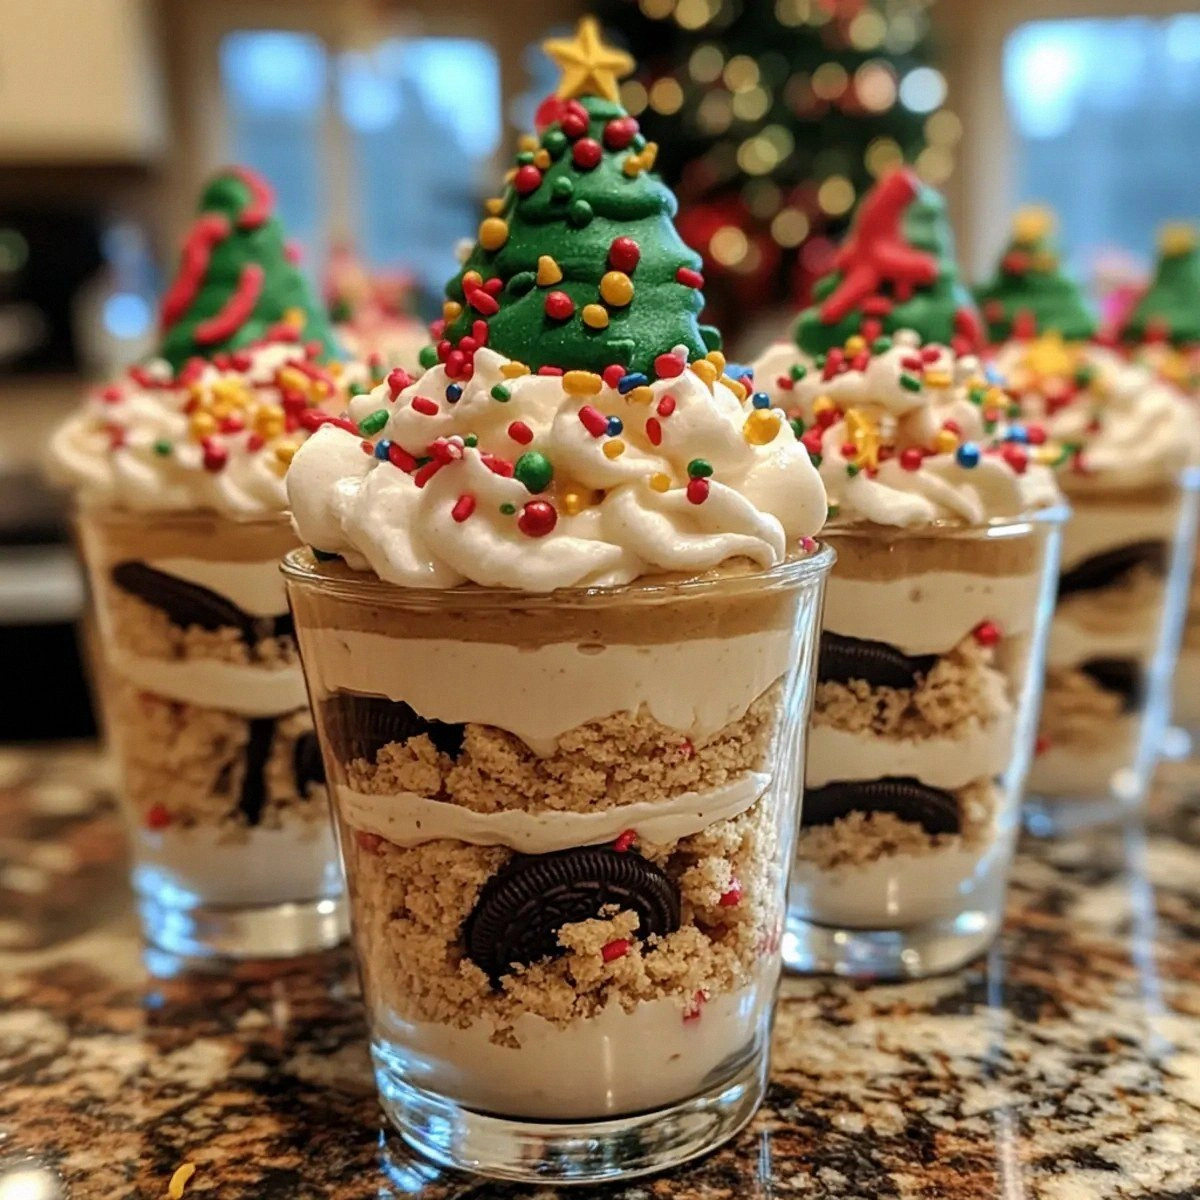
The moment the first spoonful of this “dirt” hit my tongue, I heard a chorus of “Mmm!” that could have been mistaken for a choir of angels. The aroma of vanilla pudding mingles with the faint cocoa perfume of the Oreos, while the bright green sprinkles add a visual pop that says “Christmas is here!” You can almost hear the faint crunch of the cookie “soil” as you dig in, feel the cool, airy whisper of the whipped topping, and taste the soft, cake‑like surprise of the Little Debbie tree hidden beneath the surface. The texture is a delightful contradiction: creamy, crunchy, and crumbly all at once, like stepping on fresh snow that’s secretly coated in chocolate.
What makes this version truly stand out is the simplicity of the technique paired with a surprise ingredient that most recipes overlook: the Little Debbie Christmas Tree Cakes. Most dirt cup recipes rely on crushed chocolate cookies alone, which can get soggy or taste one‑dimensional. By layering in those tiny, festive cakes, you get an extra burst of flavor and a hidden “gift” that makes each bite feel like unwrapping a present. It’s the kind of secret weapon that turns an ordinary dessert into a conversation starter, and trust me, I’ve heard more “What’s in this?” than I can count.
And here’s the kicker: you won’t need an oven, a mixer, or any fancy equipment. All you need is a bowl, a whisk, and a couple of minutes of your time. The technique I’m about to share is the exact method that saved my Christmas party, and it’s the best version you’ll ever make at home—hands down. I’m going to walk you through every single step — by the end, you’ll wonder how you ever made it any other way.
What Makes This Version Stand Out
- Flavor Explosion: The combination of instant vanilla pudding and Cool Whip creates a creamy base that feels like a velvet blanket over the crunchy cookie “soil.”
- Texture Symphony: You get the satisfying crumble of Oreo crumbs, the airy fluff of whipped topping, and the soft cake surprise of the Christmas Tree pieces—all in one bite.
- Zero‑Bake Simplicity: No oven, no stovetop, just a quick whisk and a few minutes of patience—perfect for last‑minute holiday prep.
- Festive Visuals: The bright green Christmas sprinkles mimic fresh grass, while the hidden tree cakes look like tiny ornaments buried in the dirt.
- Crowd Reaction: Guests often claim they’ve never seen anything like it, and the “I want the recipe!” chorus starts before the first cup is even finished.
- Ingredient Quality: Using Golden Oreo cookies adds a buttery, caramel‑like undertone that regular chocolate cookies lack.
- Make‑Ahead Magic: These cups can be assembled a day ahead, letting the flavors meld together for an even richer experience.
- Budget‑Friendly: All ingredients are store‑bought staples, keeping costs low while delivering high impact.
Inside the Ingredient List
The Flavor Base
The instant vanilla pudding mix is the unsung hero that gives this dish its creamy backbone. When whisked with milk, it transforms into a silky custard that coats every crumb like a luxurious frosting. Skipping this step would leave you with a dry, crumbly mess that lacks the luscious mouthfeel we’re after. If you’re allergic to dairy, swap the milk for almond or oat milk; the texture will stay just as dreamy, and you’ll add a subtle nutty note.
The Texture Crew
Golden Oreo cookies are the foundation of our “dirt.” Their buttery, chocolate‑infused flavor is richer than standard chocolate wafers, and the golden edges add a hint of caramel that deepens the overall taste. Crumble them by hand or pulse them in a food processor—just avoid over‑processing, or you’ll end up with a paste. If you can’t find Golden Oreos, try a mix of chocolate wafers and vanilla wafers for a similar effect.
The Unexpected Star
Little Debbie Christmas Tree Cakes are the surprise element that turns a simple dirt cup into a festive treasure hunt. Their soft, spongy texture contrasts beautifully with the crunchy crumbs, and their peppermint‑vanilla glaze adds a subtle holiday spice. Forget them, and you lose that hidden “wow” factor—plus, the presentation suffers without those tiny green trees peeking through the “soil.” For a gluten‑free twist, use gluten‑free holiday cake bites, but expect a slightly different texture.
The Final Flourish
Christmas sprinkles are more than just decoration; they provide a burst of sweet, sugary crunch that mimics fresh grass and adds a pop of color that screams holiday cheer. If you’re watching sugar, opt for a light dusting of powdered sugar or even shaved coconut for a tropical twist. A quick tip: store sprinkles in an airtight container to keep them from clumping, ensuring each bite stays crisp.
Everything's prepped? Good. Let's get into the real action…
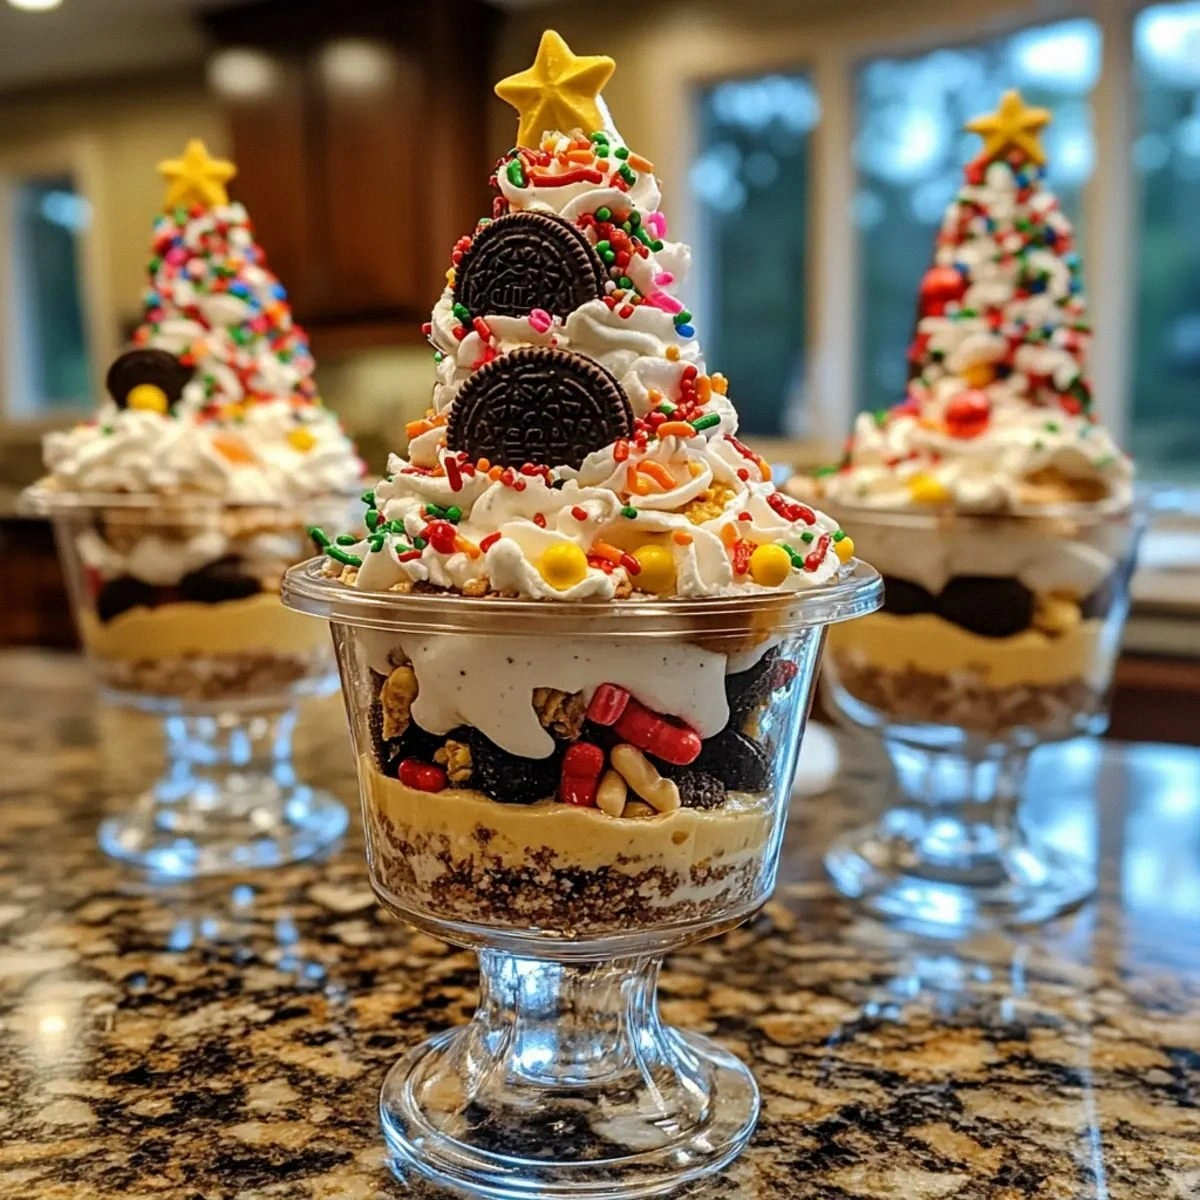
The Method — Step by Step
First, gather all your ingredients on a clean countertop and give yourself a mental high‑five. I dare you to taste this and not go back for seconds—once you start, there’s no turning back. In a large mixing bowl, pour the 2 cups of milk and sprinkle the instant vanilla pudding mix over it. Whisk vigorously for about 2 minutes until the mixture thickens to a custard‑like consistency; you’ll know it’s ready when it leaves faint trails on the whisk and the aroma of vanilla fills the kitchen. Power transition: Okay, ready for the game‑changer?
While the pudding sets, crush the 24 Golden Oreo cookies. I like to place them in a zip‑top bag and bash them with a rolling pin until they resemble fine soil with occasional larger chunks for texture.
Once you have your “dirt,” set it aside in a separate bowl.Kitchen Hack: Freeze the cookies for 15 minutes before crushing; they’ll break more cleanly and give you a perfect crumb size.Now, fold the entire container of Cool Whip into the set vanilla pudding. Use a spatula and a gentle folding motion—don’t over‑mix, or you’ll deflate the airy texture. The mixture should turn a pale, cloud‑like hue that looks like fresh snow on a winter morning. This next part? Pure magic. If the mixture looks too runny, let it sit for an extra minute; the pudding will continue to thicken.
Take the 12 Little Debbie Christmas Tree Cakes and cut each one into bite‑size pieces—roughly the size of a walnut. These will act as hidden treasures within the dirt cups.
Keep them aside on a plate, ready for assembly.Watch Out: If you cut the cakes too small, they’ll disappear into the “soil” and nobody will find the festive surprise.Grab your serving glasses or ramekins—clear plastic cups work beautifully for that “dirt” visual. Spoon a generous layer of the Oreo “soil” into the bottom of each cup, pressing down lightly with the back of a spoon to create a solid base. You’ll hear a faint, satisfying crunch that signals you’re on the right track. Future pacing: Picture yourself later, pulling these cups out of the fridge and seeing the layers perfectly set.
Next, add a layer of the pudding‑whip mixture, spreading it evenly over the cookie base. The contrast between the dark “soil” and the creamy “cloud” is what makes these cups so Instagram‑worthy. If the mixture starts to melt in the heat of your kitchen, pause and chill the bowl for a minute; the cooler temperature will firm it back up.
Now for the fun part: sprinkle the chopped Christmas Tree pieces over the creamy layer, letting them peek out like tiny ornaments. Follow with a generous dusting of Christmas sprinkles, creating the illusion of fresh, frosted grass.
Press lightly so everything adheres.Kitchen Hack: Use a small kitchen sieve to evenly distribute the sprinkles for a flawless finish.Finally, top each cup with a final drizzle of the remaining Oreo “soil” for that authentic dirt look, and add a single extra sprinkle on top for that finishing sparkle. Refrigerate the assembled cups for at least 30 minutes to let everything set. And now the fun part. When you’re ready to serve, give each cup a quick tap on the side to loosen the layers—this ensures a clean, beautiful presentation.
Serve chilled, and watch your guests’ eyes widen as they dig through the “soil” to uncover the hidden Christmas trees. I’ll be honest — I ate half the batch before anyone else got to try it, but the look on their faces made it worth every bite. Stay with me here — this is worth it. If you have leftovers, keep them covered and they’ll stay fresh for up to 48 hours.
That's it — you did it. But hold on, I've got a few more tricks that'll take this to another level...
Insider Tricks for Flawless Results
The Temperature Rule Nobody Follows
Never whisk your pudding mix with ice‑cold milk straight from the fridge. Warm the milk to about 90°F (just warm to the touch) before adding the mix; this ensures a smooth, lump‑free custard. I once tried the shortcut of using cold milk and ended up with a grainy texture that ruined the whole batch. Warm milk also helps the Cool Whip stay stable longer, preventing it from weeping.
Why Your Nose Knows Best
When the pudding mixture is thickening, trust your sense of smell. You’ll notice a sweet, vanilla perfume that signals it’s reached the perfect consistency. If you rely solely on visual cues, you might stop too early and end up with a runny base. This tip saved me from a soggy disaster during my first attempt.
The 5‑Minute Rest That Changes Everything
After folding the Cool Whip into the pudding, let the mixture rest for exactly five minutes before layering. This short pause allows any tiny air bubbles to rise to the surface and pop, resulting in a smoother final texture. Skipping this rest can leave you with tiny pockets of air that feel like unwanted bubbles when you bite.
Cookie Crunch Preservation
Crushed Oreo “soil” can absorb moisture from the pudding if left uncovered. Store the crumbs in a sealed container until you’re ready to assemble. I once left the crumbs out for an hour and they turned into a soggy paste—total flavor loss. Keep them dry, and the crunch will stay crisp all night.
Sprinkle Control
For an even green “grass” look, use a fine-mesh sieve to dust the sprinkles. This prevents clumping and ensures each cup gets a uniform layer. If you pour the sprinkles directly, you’ll get uneven patches that look less polished. A quick shake over the sieve does the trick.
Creative Twists and Variations
This recipe is a playground. Here are some of my favorite ways to switch things up:
Chocolate‑Mint Explosion
Swap the vanilla pudding mix for a chocolate instant pudding and add a drop of peppermint extract to the Cool Whip. The result is a cool, minty chocolate treat that pairs perfectly with the green sprinkles, turning the cups into a winter wonderland in your mouth.
Nutty Caramel Crunch
Replace half of the Oreo crumbs with crushed caramel popcorn and sprinkle toasted chopped almonds on top. The caramel adds a buttery sweetness while the nuts provide an unexpected crunch that elevates the texture profile.
Berry Bliss
Fold a handful of fresh cranberry sauce into the pudding‑whip mixture for a tart contrast. Add dried cranberries as a garnish instead of sprinkles for a festive ruby‑red finish that looks as good as it tastes.
Vegan Delight
Use a plant‑based whipped topping and coconut milk for the pudding base. Choose vegan chocolate cookies (or make your own) and a dairy‑free holiday cake. The flavor remains rich, and you’ll have a dessert that suits everyone’s dietary preferences.
Adult‑Only Edition
Stir a splash of spiced rum or bourbon into the pudding before folding in the Cool Whip. The alcohol adds a warm, holiday‑spice depth that makes these cups perfect for a post‑dinner nightcap.
Miniature Mason Jar Version
Layer the ingredients in small mason jars for a portable, single‑serve presentation. The jars look adorable on a holiday buffet and are easy for guests to grab and go.
Storing and Bringing It Back to Life
Fridge Storage
Cover the assembled cups tightly with plastic wrap or a lid and store them in the refrigerator for up to 48 hours. The chilled environment keeps the whipped topping firm and the cookie “soil” crisp. If you notice any condensation, gently pat the tops with a paper towel before serving.
Freezer Friendly
These cups freeze beautifully for up to two weeks. Place them on a baking sheet to freeze individually, then transfer to a zip‑top freezer bag. When you’re ready to enjoy them, let them thaw in the fridge for a few hours and add a fresh sprinkle of green topping before serving.
Best Reheating Method
While the cups are best served cold, if you prefer a warm version, microwave each cup for 15‑20 seconds on low power. Add a tiny splash of milk (about a teaspoon) before heating; it creates a gentle steam that revives the pudding’s silkiness without melting the whipped topping completely.