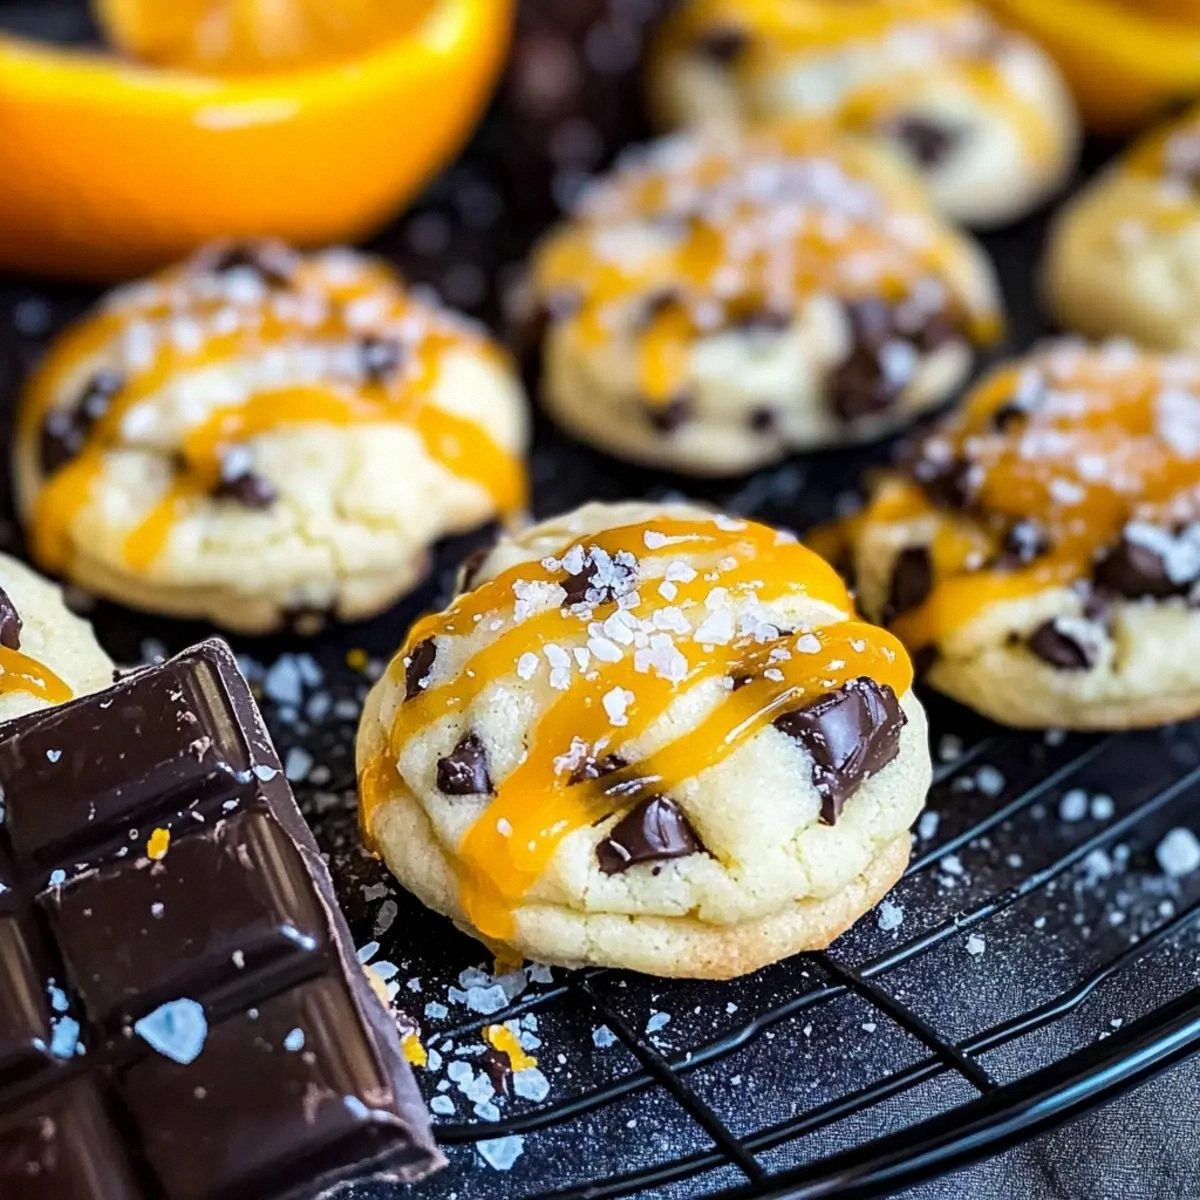
I’m going to start this post with a confession that might shock you: I once burned an entire batch of cookies because I was too busy scrolling TikTok while the oven preheated. The result was a charcoal slab that could have doubled as a paperweight, and I was left with a kitchen that smelled like regret and burnt sugar. That disaster sparked an obsessive quest for the perfect cookie—one that would never let me down, no matter how many times I get distracted. After countless trial‑and‑error sessions, I finally landed on a recipe that feels like a hug from a pastry chef who knows exactly how you like your sweets: salted dark chocolate orange cookies that balance bitter, sweet, and a whisper of citrus with a pinch of sea salt that sings on the tongue.
Picture this: the moment you open the oven, a warm, buttery aroma mingles with the bright zing of orange zest, while dark chocolate flecks glisten like midnight stars. You hear the faint crackle of the crust as it releases from the pan, and you can already feel the buttery melt between your fingertips as you lift a cookie. The first bite is a symphony—crisp edges that shatter like thin ice, a chewy, almost cake‑like center that holds a molten orange‑infused chocolate core, and a final salty kiss that makes your taste buds do a happy dance. It’s the kind of indulgence that makes you forget about the calories and just revel in pure, unapologetic pleasure.
Most cookie recipes either over‑sweeten or under‑season, leaving you with a one‑dimensional treat. This version stands out because it layers flavor like a well‑crafted cocktail: the dark chocolate provides depth, the orange zest adds brightness, and the flake sea salt gives that surprise pop that turns a good cookie into an unforgettable one. I dare you to taste this and not go back for seconds—seriously, I’ve tried it with friends who claim they’re “not that into sweets,” and they end up begging for the whole tray. The secret? A simple glaze that marries powdered sugar, butter, and a splash of orange liqueur, creating a glossy finish that’s both elegant and addictive.
And now for the teaser: I’m about to reveal a technique that most bakers completely miss—how to temper the dark chocolate just enough to keep it glossy without melting the butter in the dough. This step is the game‑changer that ensures every bite has that perfect snap of chocolate, not a greasy mess. Okay, ready for the game‑changer? Let me walk you through every single step — by the end, you’ll wonder how you ever made it any other way.
What Makes This Version Stand Out
- Flavor Depth: The combination of bittersweet dark chocolate and fresh orange zest creates a layered taste profile that evolves with each bite, delivering both richness and brightness.
- Texture Contrast: A crisp, caramelized edge meets a soft, chewy center, while the glaze adds a silky, melt‑in‑your‑mouth finish that’s impossible to resist.
- Simplicity: Despite the gourmet vibe, the ingredient list is short, and the steps are straightforward—no fancy equipment required.
- Unique Ingredient: Flake sea salt isn’t just garnish; it amplifies the chocolate’s depth and balances the sweetness, turning the cookie into a sophisticated treat.
- Crowd Reaction: These cookies have a habit of disappearing in minutes at parties, leaving guests begging for the recipe and asking for seconds.
- Ingredient Quality: Using high‑cocoa dark chocolate (70%+), fresh orange zest, and real butter ensures every component shines.
- Cooking Method: Baking at a moderate temperature preserves the buttery crumb while allowing the chocolate to set perfectly.
- Make‑Ahead Potential: The cookies freeze beautifully, and the glaze can be prepared ahead of time, making last‑minute entertaining a breeze.
Inside the Ingredient List
The Flavor Base
All‑Purpose Flour is the canvas for any cookie, providing structure without overwhelming the delicate flavors. Using a full‑cup measurement ensures the dough isn’t too dense, while still allowing the butter to coat each particle for a tender crumb. If you’re gluten‑sensitive, a 1‑to‑1 gluten‑free flour blend works just as well, but expect a slightly softer texture. When shopping for flour, look for a brand that’s bleached lightly; this keeps the color of the cookies a warm golden hue rather than a dull gray.
The Texture Crew
Baking Powder is the silent hero that gives the cookies a subtle lift, preventing them from becoming a flat, dense slab. Just a teaspoon is enough to create that airy interior while keeping the edges crisp. Salt (the 1/2 teaspoon variety) isn’t just a flavor enhancer; it tightens the gluten network, giving the cookie that satisfying snap. If you’re watching sodium, you can reduce it to a pinch, but the final taste won’t have that signature balance.
The Unexpected Star
Dark Chocolate, especially a 70% cocoa bar, is the backbone of this recipe. Its bitterness cuts through the sugar, while its natural fats keep the cookie moist. Melt it gently over a double boiler or in short bursts in the microwave, stirring often to avoid scorching. The orange zest and orange liqueur (or juice) bring a bright, citrusy lift that cuts through the richness—think of it as the cookie’s “high note.” If fresh zest isn’t on hand, a teaspoon of dried orange peel works, but the fresh version adds a burst of aroma that’s simply unbeatable.
The Final Flourish
The glaze combines powdered sugar, butter, and a splash of orange liqueur, creating a glossy coating that hardens slightly as it cools. This step adds a sweet, buttery sheen that makes the cookies look as good as they taste. Flake Sea Salt is sprinkled on top just before the glaze sets, providing that final pop of flavor and a satisfying crunch. If you love extra crunch, try crushing the flakes into smaller pieces before sprinkling—they’ll embed into the glaze for an even more pronounced salty bite.
Everything's prepped? Good. Let's get into the real action...
The Method — Step by Step
Preheat your oven to 350°F (175°C) and line two baking sheets with parchment paper. While the oven warms, whisk together the flour, baking powder, and 1/2 teaspoon salt in a large bowl. This dry mix should look like a fine, even dust—no clumps, no pockets of powder. Tip: Sifting the dry ingredients once more ensures an ultra‑light crumb.
In a separate bowl, beat the room‑temperature butter with the granulated sugar until the mixture is pale, fluffy, and smells like fresh‑baked biscuits. This usually takes about 3‑4 minutes on medium speed. Add the egg and continue beating until fully incorporated; the batter should look glossy and slightly thickened. Watch Out: Over‑beating can incorporate too much air, leading to cookies that puff up then collapse.
Stir in the orange zest and orange liqueur (or juice) into the butter‑sugar mixture. The zest should be finely grated; any large pieces will create bitter pockets. Let the mixture sit for a minute—this allows the zest’s essential oils to bloom, releasing that citrus perfume that will later mingle with the chocolate.
Gradually add the dry flour mixture to the wet ingredients, mixing on low speed until just combined. You’ll notice the dough becoming slightly shaggy—that’s a good sign. Over‑mixing at this stage can develop gluten, making the cookies tough instead of tender.
Melt the dark chocolate in a heat‑proof bowl set over simmering water, stirring until silky. Remove from heat and let it cool just enough that it’s still pourable but not hot enough to melt the butter in the dough. Fold the melted chocolate into the cookie batter in two additions, using a spatula to gently incorporate without deflating the batter.
Cover the dough with plastic wrap and chill in the refrigerator for at least 30 minutes. This step is crucial: it firms up the butter, allowing the cookies to hold their shape when baked, and it also deepens the flavor as the orange zest continues to infuse the chocolate.
While the dough chills, prepare the glaze. In a small saucepan, melt 2 tablespoons of butter over low heat, then whisk in the powdered sugar until smooth. Add a splash of orange liqueur (or juice) and whisk until the glaze is glossy and pourable. Set aside to cool slightly; it should be thick enough to coat the back of a spoon but still fluid.
Scoop the chilled dough onto the prepared baking sheets using a cookie scoop (about 1½ tablespoons per cookie). Space them 2 inches apart—they’ll spread just a little. Bake for 12‑14 minutes, or until the edges turn a light golden brown and the tops look set but still slightly soft. Sensory Check: You’ll hear a faint crackle as the edges begin to caramelize.
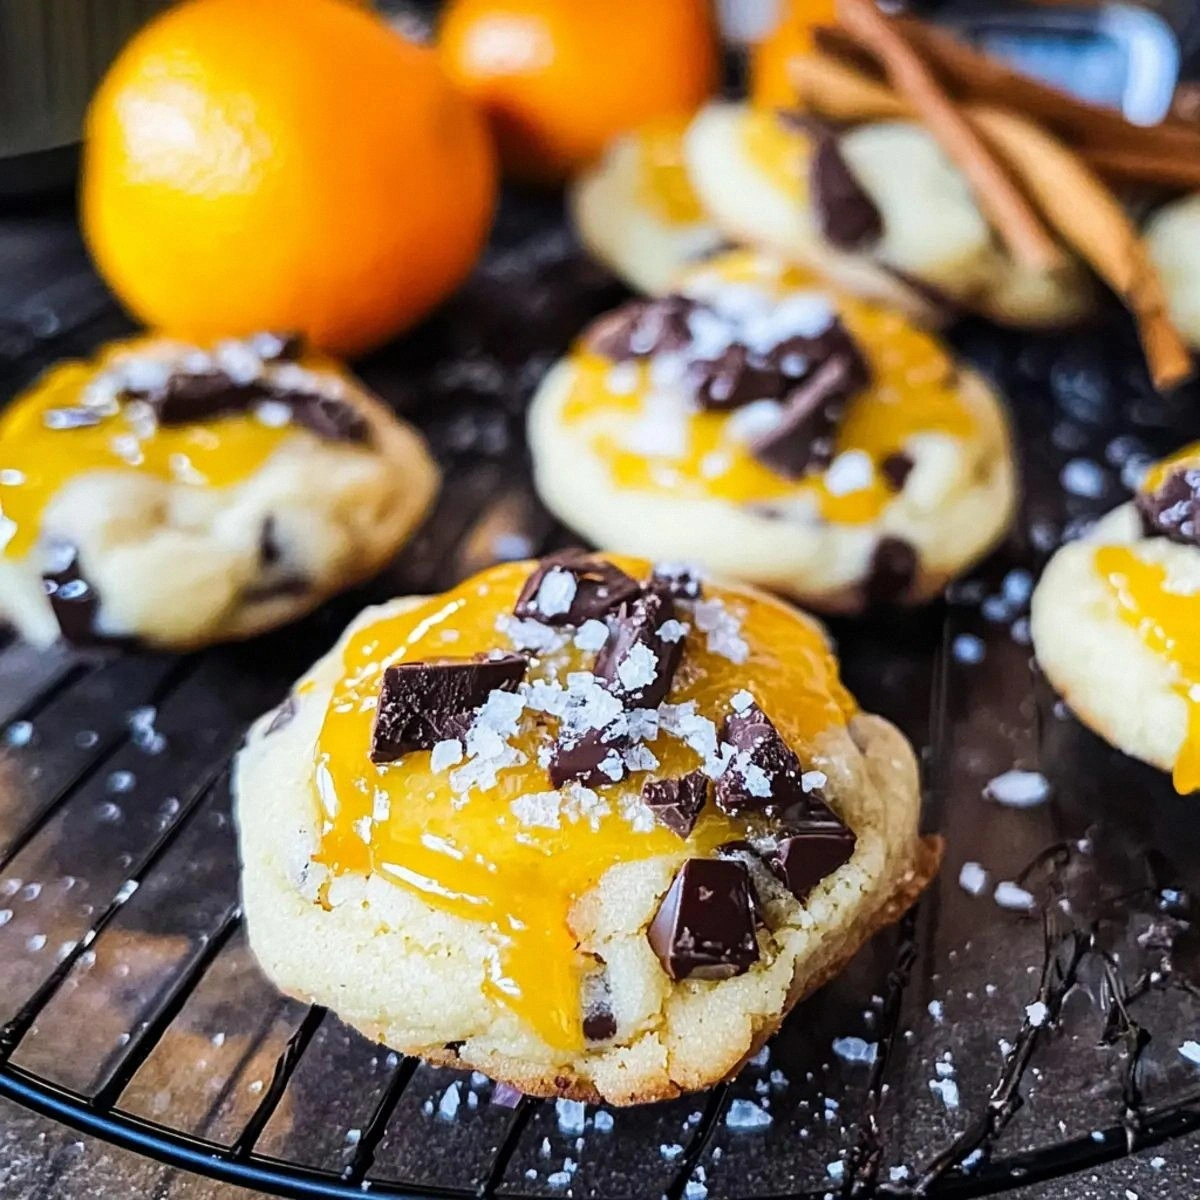
Remove the cookies from the oven and let them sit on the sheet for 2 minutes before transferring to a wire rack. While they’re still warm, drizzle the orange glaze over each cookie using a spoon or a small piping bag. Immediately sprinkle a pinch of flake sea salt on top of the glaze—this is the moment where salty meets sweet in perfect harmony.
Allow the glaze to set for about 10 minutes. The cookies will firm up, and the glaze will develop a subtle sheen that catches the light. Once set, store them in an airtight container at room temperature for up to a week, or freeze for longer storage. That’s it — you did it. But hold on, I’ve got a few more tricks that'll take this to another level...
Insider Tricks for Flawless Results
The Temperature Rule Nobody Follows
Most home bakers set the oven to a static temperature and forget about the pre‑heat nuance. For these cookies, I recommend a two‑stage bake: start at 350°F for the first 8 minutes, then drop to 325°F for the remaining time. This gradual cooling prevents the edges from over‑browning while allowing the center to set gently. I tried the single‑temperature method once and ended up with a cookie that was crisp on the outside but doughy in the middle—definitely not the texture we’re after.
Why Your Nose Knows Best
Your sense of smell is a more reliable indicator of doneness than a timer. When the cookies are about 2 minutes shy of the suggested bake time, give them a sniff. If you detect a nutty, caramelized aroma, they’re ready to come out. If the scent is still faintly buttery, give them a minute more. Trusting your nose saved me from a batch of over‑cooked cookies that tasted like burnt sugar.
The 5‑Minute Rest That Changes Everything
After baking, let the cookies rest on the sheet for exactly 5 minutes before moving them to a rack. This short pause allows steam to finish cooking the interior without over‑drying the edges. Skipping this step results in a cracked top and a slightly crumbly center. I once rushed this step and the cookies felt “off”—now I always set a timer for five minutes and watch the magic happen.
Glaze Timing Mastery
The glaze should be applied while the cookies are still warm, but not piping hot. If the glaze is too hot, it will soak into the cookie, making it soggy; too cool, and it will harden before the salt can adhere properly. Aim for a temperature that feels like a warm summer day—just right for a smooth drizzle that sets into a delicate crust.
Sea Salt Distribution Secret
Instead of sprinkling the flake sea salt directly from the shaker, use a small fine-mesh sieve to dust it evenly over each cookie. This ensures each bite gets that perfect salty pop without overwhelming the sweetness. I’ve seen too many bakers dump a heap of salt on top, resulting in a salty overload that masks the chocolate’s nuance.
Creative Twists and Variations
This recipe is a playground. Here are some of my favorite ways to switch things up:
Espresso Edge
Add 1 tablespoon of finely ground espresso to the dry ingredients. The coffee notes deepen the chocolate’s bitterness, creating a sophisticated mocha‑orange flavor that’s perfect for brunch.
Cranberry Crunch
Fold in ½ cup of dried cranberries after the chocolate is incorporated. The tart berries contrast the sweet glaze and add a chewy texture that’s especially delightful in the winter months.
Almond Joy
Stir in ¼ cup of toasted almond slivers along with the chocolate. The nuts add a buttery crunch and a subtle nutty aroma that pairs beautifully with orange.
Spiced Orange
Introduce ½ teaspoon of ground cardamom or a pinch of cinnamon to the wet mixture. The warm spice elevates the citrus, making the cookies feel cozy and festive.
Vegan Velvet
Swap the butter for a plant‑based margarine, use a flax egg (1 tbsp ground flaxseed + 3 tbsp water) instead of a large egg, and choose a dairy‑free dark chocolate. The result is a vegan version that still boasts that luxurious texture and flavor.
Storing and Bringing It Back to Life
Fridge Storage
Place cookies in an airtight container with a parchment sheet between layers. They’ll stay fresh for up to 5 days. If you notice the glaze hardening, let the container sit at room temperature for 10 minutes before serving.
Freezer Friendly
Arrange cookies on a baking sheet, freeze until solid, then transfer to a zip‑top freezer bag. They’ll keep for up to 3 months. When you’re ready to eat, pop them in the microwave for 15‑20 seconds; the heat revives the buttery crumb and softens the glaze.
Best Reheating Method
To bring a cookie back to its fresh‑out‑of‑the‑oven glory, preheat the oven to 300°F (150°C), place the cookie on a parchment‑lined tray, and bake for 5‑7 minutes. Add a tiny splash of water (a few drops) to the tray before heating; the steam prevents the cookie from drying out and restores that melt‑in‑your‑mouth interior.