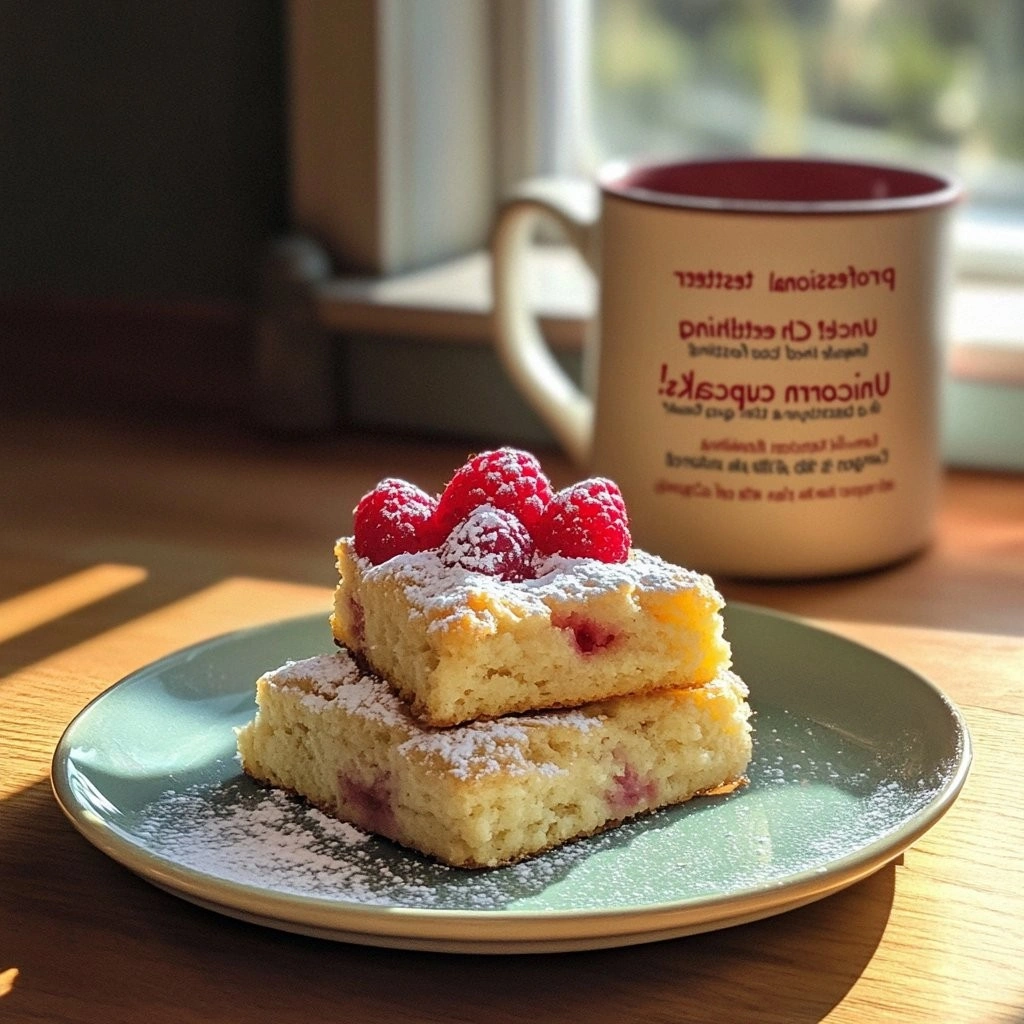
I was standing in my kitchen, staring at a bowl of flour that had somehow turned into a small, sticky mountain. My friends had dared me to whip up a batch of scones that would make their taste buds dance, and I was ready to prove them wrong. I pulled out my trusty rolling pin, the one that’s seen more dough than a bakery shelf, and the air was already humming with anticipation. The scent of cold butter and fresh raspberries was about to mingle with the sharp, clean smell of baking powder, promising a sweet, nutty adventure that would leave no crumb unturned.
Picture this: a golden, flaky crust that shatters like thin ice, revealing an airy interior that practically melts in your mouth. The raspberries burst with juice, their tartness balanced by a whisper of lemon zest and the subtle warmth of almond extract. Every bite is a layered experience—crunch, sweetness, citrus, and that unmistakable buttery undertone that makes you wonder why you ever settled for store-bought. The moment you open the oven door, the kitchen fills with a perfume that could convince even the most skeptical of you that this is the best version you'll ever make at home.
But what truly sets this recipe apart isn’t just the flavor profile; it’s the technique that turns ordinary ingredients into a showstopper. I’ve spent months refining the ratio of flour to almonds, discovering that a touch of almond flour can elevate the texture to a silky finish. The trick lies in the cold butter, cut into the flour like a secret handshake, and the gentle folding of the raspberries, ensuring they don’t break apart. If you’re wondering why the scones rise so beautifully, the answer is simple: the baking powder works in harmony with the lemon zest, creating tiny pockets of air that lift the dough just enough to keep it tender.
And there’s a little secret I’ve never told anyone—just a dash of honey in the glaze, a whisper of vanilla, and a sprinkle of sea salt to finish. The result? A glossy, caramelized coating that’s almost impossible to resist. I dare you to taste this and not go back for seconds. Picture yourself pulling these out of the oven, the whole kitchen smelling incredible, and your friends lining up for the first bite. Let me walk you through every single step — by the end, you'll wonder how you ever made it any other way.
What Makes This Version Stand Out
- Taste: The combination of sweet raspberries and nutty almonds creates a flavor profile that’s both comforting and sophisticated. The subtle citrus from lemon zest cuts through the richness, leaving a refreshing aftertaste.
- Texture: The dough’s flaky, buttery layers rival those of a high-end bakery, thanks to the meticulous cold butter technique. The raspberries remain intact, offering bursts of juiciness without turning the scones soggy.
- Ease: Despite its gourmet results, the recipe is straightforward. No fancy equipment, just a rolling pin and a mixing bowl. Even novice bakers can achieve professional quality.
- Ingredient Quality: Using fresh, high‑grade almonds and ripe raspberries elevates the dish. The almond extract adds depth, while the optional honey glaze offers a glossy finish.
- Versatility: The scones can be served warm or at room temperature, making them perfect for brunch, afternoon tea, or a quick snack. The recipe scales effortlessly, so you can bake a batch for a gathering.
- Make‑Ahead Potential: You can bake the scones ahead of time and reheat them lightly. The crust stays crisp, and the interior remains moist, preserving the original flavor.
- Visual Appeal: The almond topping creates a golden, nutty crust, while the raspberries add a splash of color that makes each scone look like a piece of art.
- Health Angle: The almond flour adds protein and healthy fats, and the raspberries contribute antioxidants and fiber, making these scones a slightly healthier indulgence.
Inside the Ingredient List
The Flour & Butter Blend
All‑purpose flour is the backbone of any scone, but the secret to that tender crumb comes from the butter. Cold, cubed butter is folded into the flour until the mixture resembles coarse crumbs. This process traps air pockets that expand during baking, creating a light, flaky structure. If you skip the cold butter step, the scones will turn out dense and chewy, losing the signature buttery bite.
For an extra lift, add a tablespoon of almond flour. Almond flour contributes a subtle nutty flavor and a slightly denser texture that balances the airy layers. It also boosts the protein content, making the scones more satisfying. If you’re allergic to almonds, you can substitute with oat flour or leave it out entirely, but expect a slightly different mouthfeel.
The Sweet & Savory Balance
Sugar is the sweetener that caramelizes the crust, but the real magic lies in the combination of vanilla and almond extracts. Vanilla adds warmth and depth, while almond extract enhances the nutty undertones, creating a harmonious blend. The pinch of salt is crucial; it elevates the flavors and balances the sweetness, ensuring no single component dominates.
If you prefer a dairy‑free version, replace the butter with coconut oil or vegan butter. The flavor profile will shift slightly, but the technique remains the same. Remember that dairy butter provides a richer taste, so a dairy substitute may result in a less pronounced buttery flavor.
The Unexpected Star: Fresh Raspberries
Raspberries are the showstopper of these scones. Their natural tartness contrasts beautifully with the sweet crust, while the seeds add a delightful crunch. Use fresh, ripe berries for maximum flavor; frozen berries can be used if fresh aren’t available, but they may release more liquid and risk sogginess.
A quick trick: toss the berries with a tablespoon of sugar before folding them into the dough. This helps the berries retain their shape and prevents them from breaking apart during mixing. If you’re using frozen berries, thaw them first and pat them dry to avoid excess moisture.
The Final Flourish: Lemon Zest & Glaze
Lemon zest adds a bright, citrusy note that cuts through the richness of the butter and almonds. Grate the zest finely to avoid large pieces that could overpower the flavor. The zest also gives a subtle visual pop when sprinkled on top before baking.
The glaze—made from honey, a splash of lemon juice, and a pinch of sea salt—brings a glossy finish and an extra layer of sweetness. Drizzle it over the scones right after they come out of the oven, letting it set into the flaky crust. The glaze can be omitted for a more rustic look, but the added shine makes the scones feel like a treat from a high‑end patisserie.
Everything’s prepped? Good. Let’s get into the real action.
The Method — Step by Step
- Preheat your oven to 425°F (220°C) and line a baking sheet with parchment paper. The high temperature ensures a crisp crust while keeping the interior moist. Let the oven heat fully before placing the dough inside; a warm oven is key to even baking. This is the moment of truth—your scones will rise beautifully only if the oven is hot enough.
- Mix the Dry in a large bowl: flour, almond flour, baking powder, sugar, and salt. Stir until the mixture looks like coarse crumbs. The dry ingredients must be evenly distributed to prevent pockets of unbaked dough. I dare you to taste a small bite of the dry mix—if it’s too sweet, you’ve got the right balance.
- Cut in Butter by adding cold, cubed butter to the dry mix. Using a pastry cutter or your fingertips, work the butter into the flour until the mixture resembles coarse crumbs with some pea‑size pieces. The butter should be cold; if it melts, the scones will be greasy. This step is crucial for flaky layers.
- Fold in Liquid by whisking together milk, egg, vanilla, almond extract, and lemon zest. Pour this mixture into the dry ingredients, stirring gently until just combined. Overmixing will develop gluten, resulting in tough scones. The dough should be slightly sticky but hold together when pressed.
- Gently Add Berries by folding in the raspberries with a slotted spoon. Handle them carefully to keep the berries intact—broken berries release juice that can make the dough soggy. The berries should be evenly distributed throughout the dough, creating pockets of fruit in every bite.
- Shape the Dough by turning it onto a lightly floured surface. Pat the dough into a circle about 1.5 inches thick, then cut into 8 equal wedges. Press the edges together to seal, preventing berries from escaping during baking. The dough should look slightly rough; a smooth surface indicates overworking.
- Top & Glaze by sprinkling sliced almonds over the tops of the scones. For an extra shine, whisk honey, lemon juice, and sea salt to make a glaze. Brush the glaze lightly over the almonds before baking. The glaze caramelizes, giving the scones a glossy finish that’s impossible to resist.
- Bake for 18–20 minutes, or until the tops are golden brown and the scones spring back when lightly pressed. The edges will pull away slightly, indicating doneness. Let them cool on a wire rack for 5 minutes before serving. This final step locks in the moisture and ensures a tender crumb.
That’s it—you did it. But hold on, I've got a few more tricks that'll take this to another level. From adjusting the glaze to perfecting the crumb, these insider tips will ensure every batch is flawless.
Insider Tricks for Flawless Results
The Temperature Rule Nobody Follows
While most bakers aim for a moderate oven temperature, this recipe thrives at a high 425°F (220°C). The quick rise locks in moisture, while the hot surface creates a crisp, caramelized crust. If you’re using a convection oven, reduce the temperature by 25°F to avoid over‑browning. This small adjustment keeps the scones golden without compromising the interior.
Why Your Nose Knows Best
Trust your nose—when the scones start to emit a warm, buttery aroma, they’re almost ready. The scent signals that the sugar has caramelized and the butter is melting into the dough. If you’re baking for a crowd, pause the oven door and sniff; it’s a reliable indicator that the crust is crisp enough.
The 5-Minute Rest That Changes Everything
After baking, let the scones rest on the wire rack for five minutes before serving. This pause allows the steam to redistribute, preventing soggy bottoms and ensuring a uniform crumb. A quick test: press the bottom of a scone—if it’s still damp, give it a few more minutes; if it’s dry, it’s ready to eat.
Almonds: Toasted or Untoasted?
Toasted almonds add a deeper flavor and a crunch that contrasts with the soft interior. Toast them in a dry skillet over medium heat until fragrant, then let them cool before topping the scones. If you prefer a lighter taste, simply use raw almonds; they’ll still provide the nutty texture without the extra toasty note.
Glaze Variation for Extra Sweetness
Swap the honey glaze for a simple powdered sugar dusting if you’re watching calories. Alternatively, add a splash of orange liqueur to the glaze for a citrusy kick. The glaze can be applied either before or after baking—applying it post‑bake creates a thicker, more pronounced crust.
Creative Twists and Variations
This recipe is a playground. Here are some of my favorite ways to switch things up:
Chocolate‑Berry Delight
Swapping the honey glaze for melted dark chocolate gives a rich, indulgent twist. Fold in a handful of chopped dark chocolate chips with the raspberries. The chocolate adds depth and pairs beautifully with the almond flavor.
Vanilla‑Infused Almonds
Replace the almond extract with vanilla extract and double the amount of sliced almonds. This creates a sweeter, more aromatic scone that’s perfect for a comforting breakfast.
Savory Herb Variation
Omit the sugar entirely and add fresh herbs like rosemary or thyme. Use a pinch of smoked paprika for a subtle smokiness. These savory scones are ideal for brunch or as a side to a hearty soup.
Coconut‑Berry Scones
Swap the all‑purpose flour for coconut flour and use coconut milk instead of dairy milk. The result is a gluten‑free, tropical version that’s slightly denser but packed with coconut flavor.
Spiced Pumpkin Scones
Add pumpkin puree, cinnamon, and nutmeg to the dough. Replace raspberries with dried cranberries for a fall‑season twist. These scones are perfect for Thanksgiving gatherings.
Almond‑Cocoa Crunch
Mix in cocoa powder for a chocolatey base, and top with chocolate‑covered almonds. The crunch from the almonds and the chocolate coating create a dessert that satisfies both sweet and nut cravings.
Storing and Bringing It Back to Life
Fridge Storage
Store the cooled scones in an airtight container at room temperature for up to 3 days. The crust may soften slightly, but the interior remains moist. If you need to keep them longer, wrap them individually in parchment paper before placing them in a zip‑lock bag.
Freezer Friendly
For longer storage, freeze the scones in a single layer on a baking sheet, then transfer them to a freezer bag after they’re completely cooled. They’ll keep for up to 3 months. When ready to eat, thaw at room temperature for 30 minutes before reheating.
Best Reheating Method
Reheat in a pre‑heated oven at 350°F (175°C) for 5–7 minutes, or until warmed through. For a crisp crust, finish with a quick 1–2 minute burst in a hot oven. Add a tiny splash of water to the bottom of the pan; the steam will keep the scones from drying out.