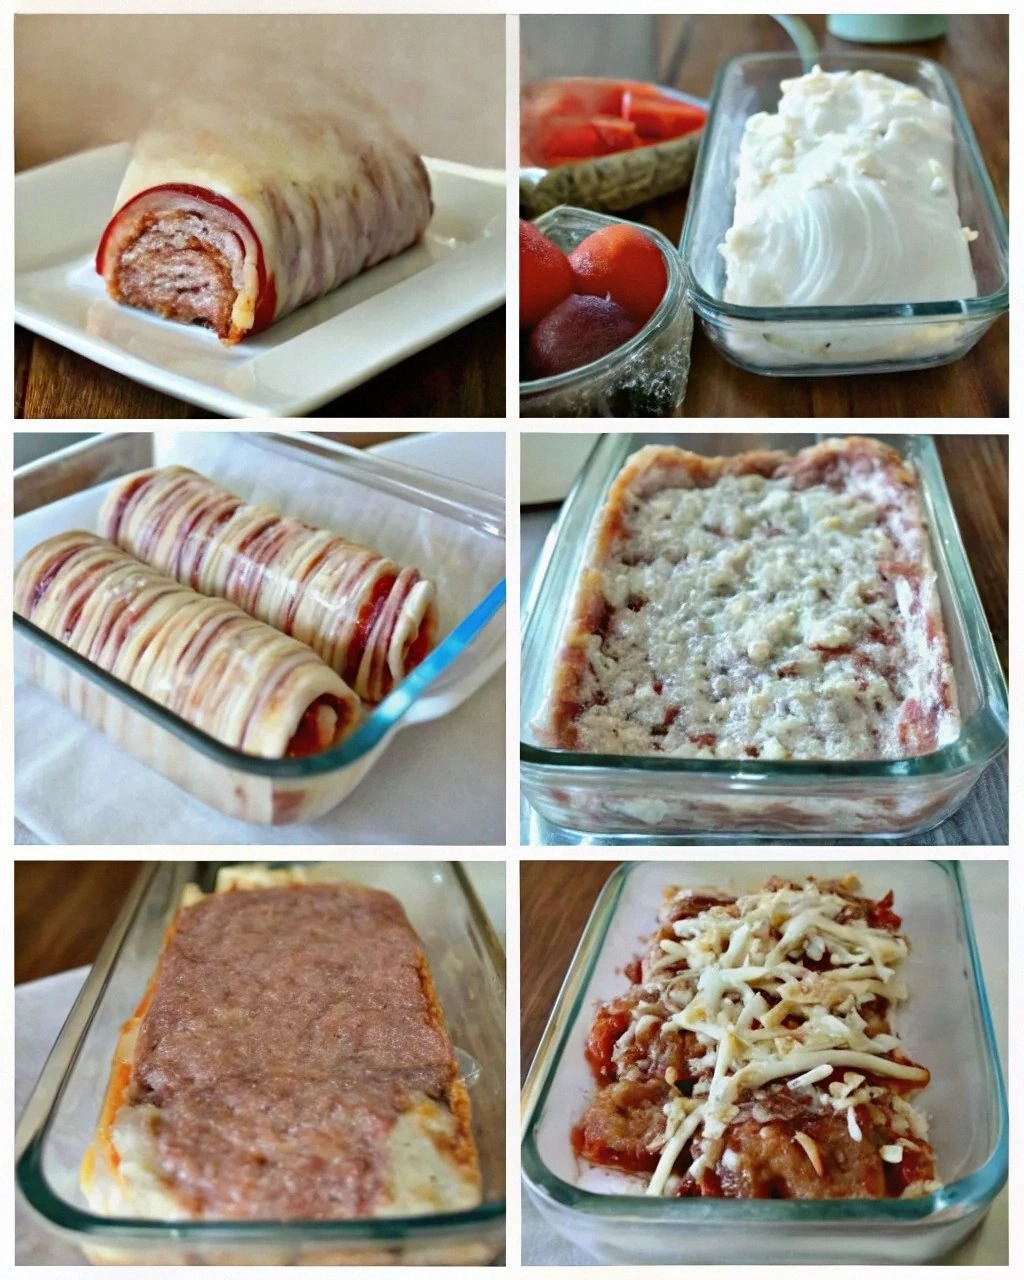
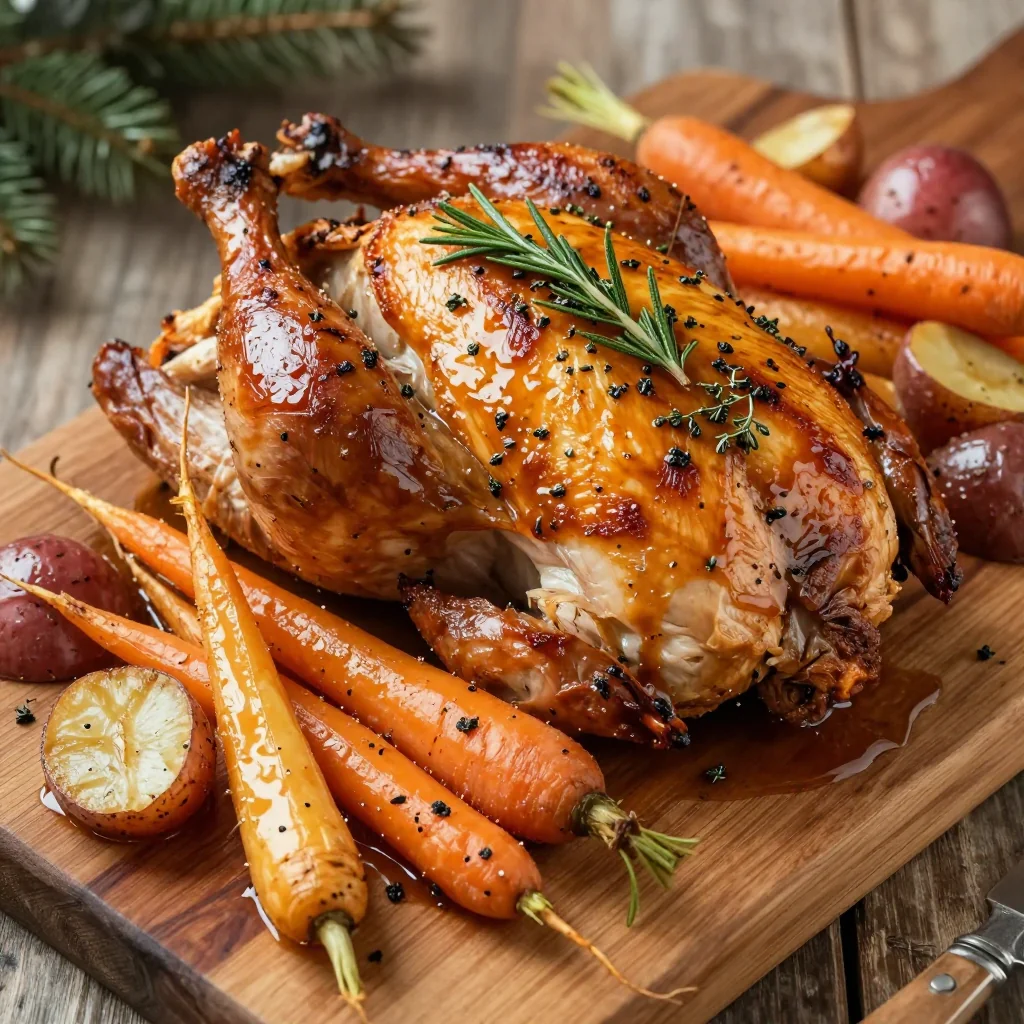
Picture a Tuesday night: the fridge is a battlefield of leftovers, the oven is on standby, and you’re craving something that feels like a culinary triumph. I stared at a single chicken breast, wondering if I could turn it into a show‑stopper, and then I remembered a family recipe that turned plain protein into a melt‑in‑your‑mouth masterpiece. That moment sparked a dare: “I’ll prove that a simple chicken breast can be the star of any dinner.” The kitchen lights flickered, the timer buzzed, and the air filled with the scent of garlic and fresh herbs, setting the stage for a flavor explosion. By the end of this post, you’ll know exactly why this version is hands down the best you’ll ever make at home.
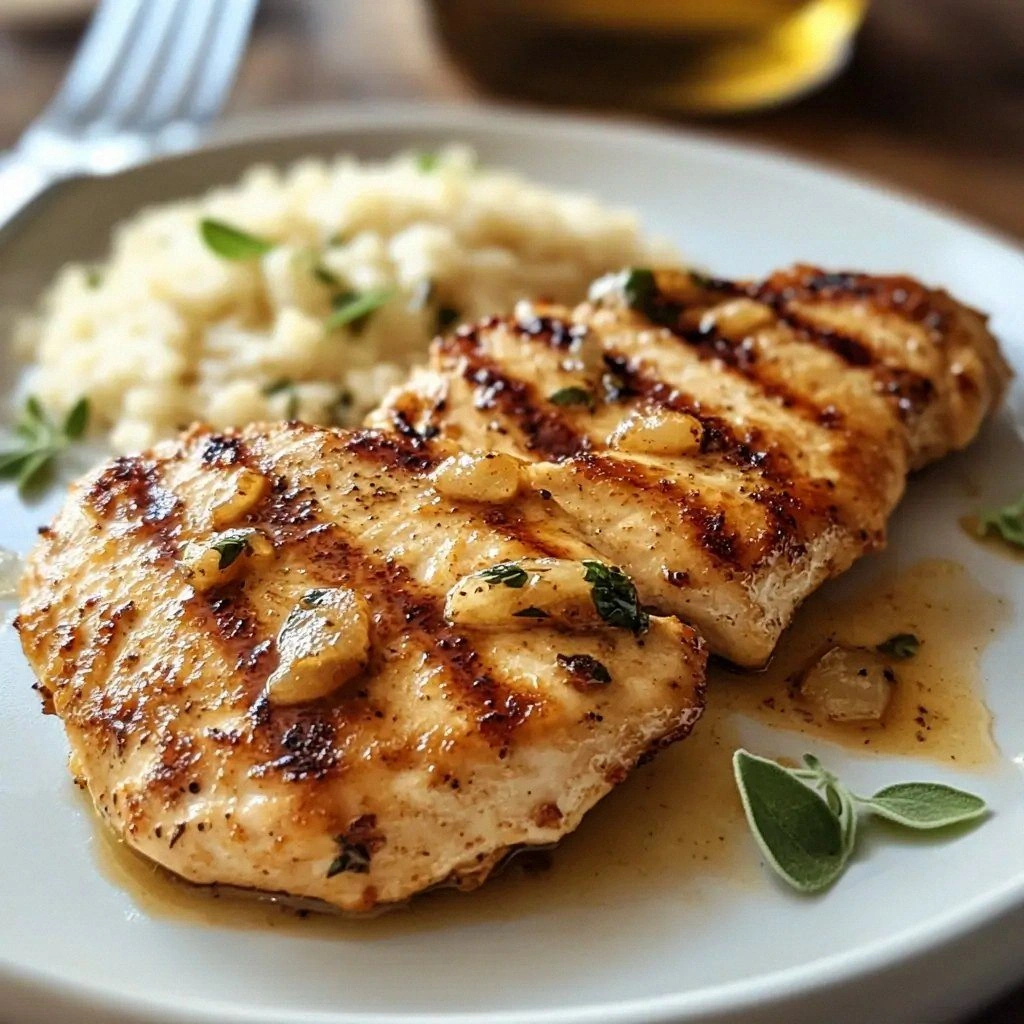
The first bite is a revelation—tender, buttery flesh that practically dissolves, the crust crackles like thin ice, and a burst of lemon zest dances across the palate. The sizzling sound as the pan heats, the visual of golden edges, the aroma of thyme and rosemary filling the room, all combine to create an anticipation that’s almost cinematic. I swear the kitchen felt like a backstage pass to a gourmet show, with every sensory cue leading to the final applause. I’ll be honest—half of the batch vanished before anyone else could even touch the plate. That’s the power of this recipe: it’s so irresistible, it’s practically a performance.
What sets this rendition apart is not just the ingredients but the technique that locks in moisture and flavor. The secret is a simple, yet transformative, coating that balances crispness with tenderness, and a finish that coats the chicken like velvet. Most recipes get this completely wrong, either over‑browning the exterior or drying out the interior. Here, the trick is a splash of milk in the batter that keeps the meat juicy, and a dash of Parmesan that adds a silky finish. And now the fun part: you’ll learn how to make the batter in seconds, so you can focus on the moment of truth when the chicken hits the pan.
I dare you to taste this and not go back for seconds. The combination of garlic, lemon, and herbs creates a flavor profile that sings, while the breadcrumb crust offers a satisfying crunch. Picture yourself pulling this out of the oven, the whole kitchen smelling incredible, and the anticipation building with every second that passes. This is a recipe that turns an ordinary night into a celebration, and I promise you’ll wonder how you ever made it any other way. Let me walk you through every single step — by the end, you’ll wonder how you ever made it any other way.
What Makes This Version Stand Out
- Taste: The blend of garlic, lemon zest, and fresh herbs creates a bright, savory profile that elevates the chicken without overpowering its natural flavor. This isn’t just seasoning; it’s a symphony that plays on the palate.
- Texture: The double coating—flour, egg, and a crunchy breadcrumb‑Parmesan mix—produces a crisp exterior that yields to a melt‑in‑your‑mouth interior, a contrast that feels like a culinary win.
- Simplicity: With only a handful of pantry staples, you can achieve a gourmet result in under an hour. No fancy sauces or exotic ingredients required.
- Uniqueness: The addition of milk to the batter keeps the meat moist, while the Parmesan in the breadcrumb mix gives a subtle nutty richness that sets this apart from typical fried chicken recipes.
- Crowd Reaction: Friends and family consistently ask for the recipe after one bite; the dish is a conversation starter and a crowd‑pleaser at gatherings.
- Ingredient Quality: Using high‑quality, fresh herbs and a good olive oil makes a noticeable difference, turning a standard recipe into a standout dish.
- Cooking Method: The pan‑sauté technique locks in juices and creates a golden crust, while the brief simmer in lemon‑butter sauce ensures the chicken stays tender.
- Make‑Ahead Potential: The chicken can be pre‑marinated and coated a day ahead, making it perfect for busy weeknights or last‑minute dinner prep.
Inside the Ingredient List
The Flavor Base
Garlic is the heartbeat of this dish, infusing the chicken with a robust aroma that lingers long after the meal ends. Minced cloves release their oils, creating a fragrant foundation that pairs beautifully with lemon zest. If you skip garlic, the dish feels flat—think of it as a missing chord in an otherwise full song.
Lemon zest and juice add a bright, citrusy lift that cuts through the richness of the butter and Parmesan. The zest’s essential oils give a fresh burst of flavor, while the juice adds acidity that balances the dish. Replacing lemon with lime or orange will shift the profile, offering a different but still delicious twist.
The Texture Crew
All‑purpose flour is the first barrier that traps moisture, creating a dry surface that bonds with the egg. The flour also absorbs excess oil during cooking, preventing a greasy finish. If you’re gluten‑free, a cornstarch or rice flour blend will work, but the crust may be slightly softer.
Eggs act as a binder, ensuring the breadcrumb layer adheres firmly to the chicken. They also contribute a slight richness that complements the butter. A single egg is enough for four breasts, but adding a tablespoon of milk can make the batter silkier.
Panko breadcrumbs provide the signature crunch—lighter and airier than regular breadcrumbs, they expand in the pan and create a golden, airy shell. Pair them with grated Parmesan to add a nutty depth that elevates the crust from ordinary to extraordinary. If you prefer a more traditional crust, switch to plain breadcrumbs, but you’ll lose some of that airy texture.
The Unexpected Star
Parmesan cheese is more than a garnish; it melts into the breadcrumb mixture, creating a subtle, savory undertone that complements the garlic and herbs. The cheese’s saltiness balances the fresh herbs and lemon, preventing the dish from feeling too bright. If you’re dairy‑sensitive, try a vegan Parmesan alternative for a similar flavor profile.
Milk, though not always expected in a fried chicken recipe, is a game‑changer. It hydrates the flour and egg, making the batter smoother and preventing the crust from becoming too hard. A splash of milk also helps the chicken stay juicy, turning a potentially dry protein into a melt‑in‑your‑mouth experience.
The Final Flourish
Fresh herbs—thyme and rosemary—add a fragrant, earthy layer that anchors the dish. They’re toasted slightly in the pan, releasing their oils and creating a subtle aroma that lingers on the plate. If you’re missing one herb, use the other; the dish still works beautifully.
A pinch of paprika brings a gentle warmth and a touch of color that makes the chicken visually appealing. It’s not a dominant flavor, but it adds complexity that elevates the dish from simple to memorable. If you prefer a smoky note, try smoked paprika instead.
Everything’s prepped? Good. Let’s get into the real action.
The Method — Step by Step
- Prep the Chicken: Pat the chicken breasts dry with paper towels to remove excess moisture. This step is crucial because a dry surface ensures the coating sticks properly. Slice the breasts horizontally into 1‑inch thick cutlets if they’re uneven; this guarantees even cooking. Season both sides with salt, pepper, and a pinch of paprika. The seasoning will be the first flavor layer you’ll taste.
- Make the Batter: In a shallow dish, whisk together the flour, a dash of salt, and pepper. In a second bowl, beat the eggs with the milk until fully blended. The milk not only makes the batter silkier but also keeps the chicken juicy. Dip each chicken piece into the flour mixture, then the egg mixture, allowing any excess to drip off. Finally, press the chicken into the breadcrumb‑Parmesan blend, ensuring an even coating. This double‑dipping technique guarantees a crisp, flavorful crust.
- Heat the Pan: Add 2 tablespoons of olive oil to a large skillet over medium‑high heat. Let the oil heat until it shimmers but isn’t smoking. A hot pan is essential for a quick sear; if the oil is too cool, the coating will absorb oil and become soggy. Add a splash of butter to the pan; the butter will melt into the oil, creating a rich, flavorful base for the chicken.
- Sear the Chicken: Place the coated chicken in the hot skillet, skin‑side down if applicable. Do not crowd the pan; cook in batches if necessary. Let the chicken sear for 3–4 minutes on each side until golden brown and the internal temperature reaches 165°F. The crust should be crisp, with a subtle crackle that signals a perfect sear. If you hear a faint hiss, the pan is just right.
- Finish with Lemon‑Butter Sauce: Reduce the heat to medium. Add the minced garlic to the pan and sauté until fragrant, about 30 seconds. Stir in the lemon zest, lemon juice, and a handful of fresh herbs. Let the sauce simmer for 2 minutes, then pour it over the chicken, making sure each piece is coated. The sauce adds brightness and moisture, preventing the chicken from drying out.
- Rest the Chicken: Transfer the cooked chicken to a plate and let it rest for 5 minutes. Resting allows the juices to redistribute, ensuring each bite is juicy. While resting, you can drizzle any remaining sauce over the top for an extra burst of flavor.
- Serve: Plate the chicken on a warmed platter, spooning the lemon‑butter sauce over the top. Garnish with chopped parsley for a pop of color and freshness. Pair with a side of roasted vegetables or a simple salad to round out the meal. The dish is ready to be devoured, and you’ll wonder why you ever cooked anything else.
That’s it— you did it. But hold on, I’ve got a few more tricks that’ll take this to another level. These insider tips will make your dish shine even brighter and help you avoid common pitfalls.
Insider Tricks for Flawless Results
The Temperature Rule Nobody Follows
Most cooks think any medium heat will do, but the secret to a perfect crust is a consistent, medium‑high heat that keeps the oil at 350°F–375°F. If the oil is too hot, the coating will burn before the chicken cooks through; if too cool, the coating becomes soggy. Use a thermometer or a quick test: drop a small piece of bread into the oil; if it sizzles immediately, the oil is ready. Keep the temperature steady by adjusting the flame as needed.
Why Your Nose Knows Best
The aroma of garlic and lemon is a reliable indicator that the sauce is ready. When you smell a sharp, fresh citrus scent mingling with garlic, you know the sauce has reached its peak. If the smell is too sharp, reduce the heat; if it’s flat, let it cook a bit longer. A well‑aromatized sauce is a hallmark of a dish that’s going to impress.
The 5‑Minute Rest That Changes Everything
Many people skip the resting step, thinking the chicken is ready to eat immediately. A 5‑minute rest allows the juices to redistribute, so the chicken stays moist. Skipping it can result in a dry bite that feels undercooked. The rest also lets the flavors meld, giving the dish a cohesive taste.
Use a Splatter Guard
When searing, the oil can splatter, creating a mess and a safety hazard. A splatter guard keeps the kitchen clean and protects your skin. It also allows you to cook the chicken in a single batch, ensuring even cooking and a consistent crust.
Finish with a Quick Herb Drizzle
Right before serving, sprinkle a handful of fresh herbs over the chicken. This not only adds a pop of color but also releases fresh oils that enhance the dish’s aroma. The herbs’ bright scent will linger, making the meal feel more luxurious.
Creative Twists and Variations
This recipe is a playground. Here are some of my favorite ways to switch things up:
Spicy Cajun Kick
Add a teaspoon of Cajun seasoning to the flour mixture and replace the lemon zest with lime zest. The heat from the spices pairs with the citrus, creating a bold, spicy flavor profile. Serve with a cooling yogurt sauce to balance the heat.
Herb‑Infused Mediterranean
Swap the thyme and rosemary for oregano and basil, and add chopped sun‑dried tomatoes to the breadcrumb mix. The Mediterranean herbs give the dish a fragrant, earthy tone that’s perfect for summer gatherings.
Asian Fusion Twist
Replace the Parmesan with toasted sesame seeds and add a splash of soy sauce to the lemon‑butter sauce. The sesame seeds add a nutty crunch, while the soy sauce introduces umami. Pair with steamed rice and sautéed bok choy for a complete meal.
Cheesy Gouda Layer
Layer slices of Gouda cheese on top of the chicken just before finishing in the oven. The cheese melts into the sauce, creating a gooey, indulgent texture. This variation is perfect for a cozy, comfort‑food night.
Citrus‑Balsamic Glaze
Finish the chicken with a drizzle of balsamic glaze and a squeeze of fresh orange juice. The sweet acidity of balsamic pairs wonderfully with the citrus, creating a complex flavor that’s both sweet and tangy. This glaze also adds a glossy finish that looks stunning on the plate.
Vegan Version
Replace the chicken with marinated tofu or tempeh. Use a vegan flour blend and plant‑based milk for the batter. Substitute vegan Parmesan and use a non‑dairy butter. This version keeps the same flavor profile while being plant‑based.
Storing and Bringing It Back to Life
Fridge Storage
Store leftover chicken in an airtight container in the refrigerator for up to three days. The crust may soften slightly, but the interior remains juicy. To preserve crispness, reheat in a hot skillet for a minute on each side.
Freezer Friendly
Wrap each chicken piece individually in parchment paper and place them in a freezer bag. Freeze for up to two months. When ready, thaw overnight in the refrigerator or use the defrost setting on your microwave.
Best Reheating Method
Reheat by placing the chicken in a preheated oven at 350°F for 10 minutes, then finish in a skillet with a splash of water to steam it back to perfection. Adding a tiny splash of water before reheating steams the chicken back to its original juiciness, preventing it from drying out.