It was a rainy Tuesday, the kind of day that makes you crave something sweet and comforting. I had a half‑baked loaf of bread in the fridge, a handful of stale cereal, and an unfulfilled wish for a dessert that feels like a childhood memory wrapped in a modern twist. I pulled out the Fruity Pebbles, the same rainbow cereal that once made my breakfast feel like a party, and decided to turn them into something that would make my taste buds sing. The kitchen smelled of toasted butter and sweet nostalgia, and I could hear the faint crackle of a skillet as the butter melted. I was about to create a no‑bake cheesecake that would redefine what a “cheesecake” could be.
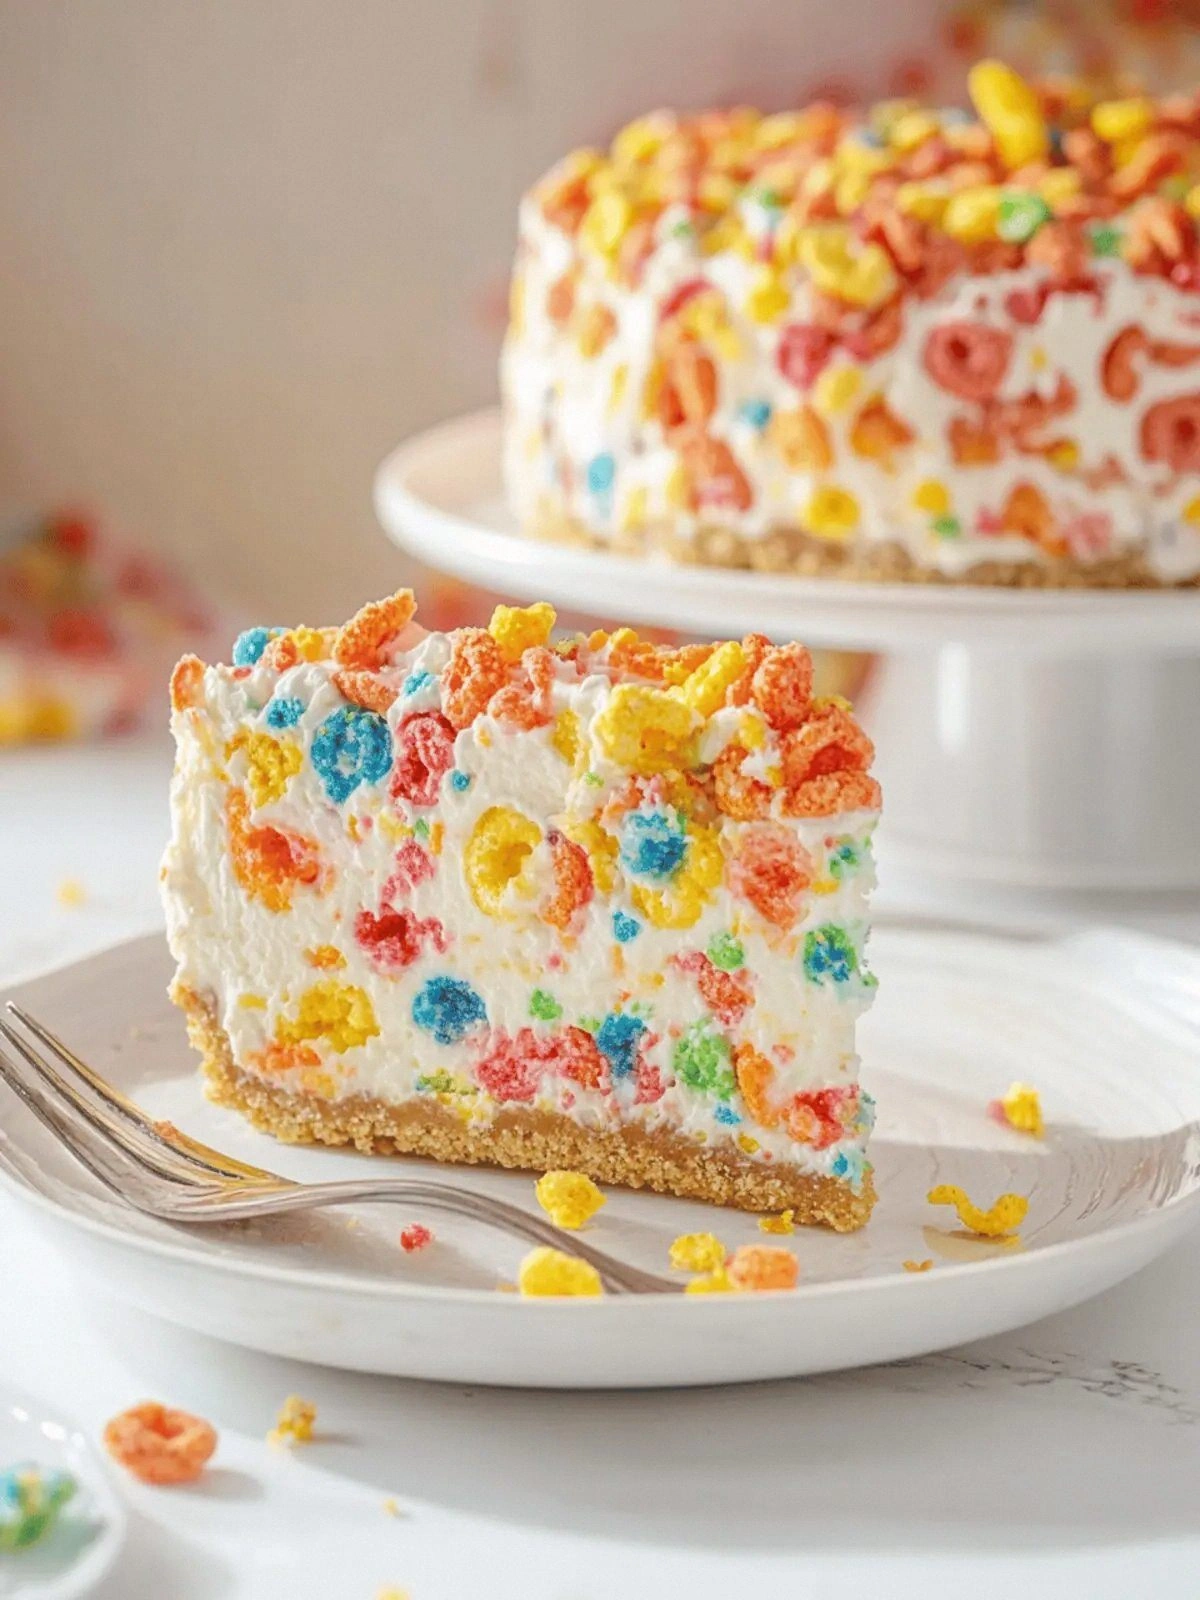
Picture this: a glossy, creamy filling that oozes out when sliced, surrounded by a crunchy, colorful crust of Fruity Pebbles and mini marshmallows. The first bite is a burst of fruity sweetness that melts on the tongue, followed by a creamy, tangy center that feels like a hug from the inside. The contrast of textures—crunchy on the outside, velvety on the inside—makes every forkful an adventure. I dare you to taste this and not go back for seconds, because once you do, you’ll wonder how you ever made any other cheesecake. That’s the power of this version: it’s hands down the best you’ll ever make at home.
I confess—I ate half the batch before anyone else got a chance to try it. The moment the first slice hit my spoon, I realized this wasn’t just a dessert; it was a statement. It’s the kind of dish that turns a simple gathering into a memorable event. Most recipes get this completely wrong, using heavy, cold ingredients that just melt together. Here, we blend warm, fresh flavors with a crunchy base that keeps the cheesecake light and airy. The result is a treat that feels indulgent yet refreshing, like a summer breeze in a jar.
In this article, I’ll walk you through every single step, from crunching the cereal to chilling the final product. I’ll share the secret ingredient that gives the cheesecake its signature zing, the technique that keeps the crust crisp, and the hacks that make the process a breeze. By the end, you’ll wonder how you ever made it any other way. Let me guide you through a culinary adventure that will have your friends begging for the recipe—because this isn’t just a dessert; it’s an experience.
What Makes This Version Stand Out
- Taste: The combination of fruity cereal and tangy cheesecake creates a flavor profile that is both nostalgic and sophisticated. The subtle lemon and raspberry extracts lift the sweetness, preventing it from becoming cloying. This balance keeps the dessert light and refreshing, ideal for any season.
- Texture: A crunchy, caramelized crust contrasts with a silky, mousse‑like filling. The marshmallows add a gentle chew that complements the cereal’s snap. The result feels like a multi‑layered candy bar, but with a creamy heart.
- Simplicity: No oven required. All you need is a saucepan, a blender, and a chill time of 30 minutes. The ingredients are pantry staples, making this a quick weeknight treat.
- Uniqueness: The use of Fruity Pebbles as the crust is a playful twist that sets this cheesecake apart from traditional graham‑cracker bases. The addition of raspberry extract gives it a subtle berry nuance that surprises the palate.
- Crowd Reaction: Friends who’ve tried it say it’s “the best no‑bake dessert” and that the crunchy topping is “unexpectedly delightful.” The colorful presentation makes it Instagram‑worthy.
- Ingredient Quality: Using high‑quality cream cheese and real fruit extracts elevates the flavor profile. The salted butter adds depth without overpowering the sweetness.
- Cooking Method: The quick sauté of cereal and butter creates a caramelized flavor that deepens the overall taste. The no‑bake process preserves the freshness of the fruit flavors.
- Make‑ahead Potential: Assemble the crust and filling a day early, then chill. This makes it perfect for parties, birthdays, or last‑minute dessert needs.
Inside the Ingredient List
The Flavor Base
The 5 cups of Fruity Pebbles are the heart of this cheesecake’s flavor. They bring a burst of fruity sweetness that feels like a candy bar on a plate. If you skip them, you lose the signature rainbow crunch that makes the dessert memorable. For a more subdued taste, try using a single color cereal like strawberry or blueberry. The bright colors also add a festive look, especially for parties.
The Texture Crew
Mini marshmallows give the cheesecake a subtle chew that balances the crunch. They also help bind the crust, preventing it from falling apart. If you’re allergic to marshmallows, you can substitute with mini chocolate chips or small pieces of marshmallow fluff. The ½ cup of salted butter is crucial for caramelizing the cereal, giving it a golden crust that’s both flavorful and visually appealing. Without butter, the crust would be dry and bland.
The Unexpected Star
The 24 oz of cream cheese provides the silky, creamy filling that makes this dessert feel indulgent. Cream cheese’s tangy profile cuts through the sweetness, creating a sophisticated balance. If you can’t find cream cheese, try a blend of mascarpone and Greek yogurt; it will keep the texture light. The 1 tablespoon of lemon juice adds a bright acidity that wakes up the flavors, especially when paired with the raspberry extract.
The Final Flourish
The 1 tablespoon of cornstarch acts as a natural thickener, ensuring the cheesecake sets properly in the fridge. The ½ teaspoon of salt balances the overall sweetness, preventing the dessert from feeling cloying. The ½ cup of sugar is the sweetener that keeps the filling luscious without overpowering the fruit notes. Lastly, the additional Fruity Pebbles on top add a decorative crunch that’s both edible and eye‑catching.
Everything’s prepped? Good. Let’s get into the real action.
The Method — Step by Step
- Heat the ½ cup of salted butter in a medium saucepan over medium heat until it melts completely. Stir occasionally to ensure the butter doesn’t brown. Add the 5 cups of Fruity Pebbles to the pan and toast them for about 4–5 minutes, or until they start to turn golden and fragrant. Keep a close eye on them; the moment they begin to crackle is the cue for the next step. Once toasted, remove the pan from heat and let the mixture cool slightly before adding the marshmallows.
- Fold the 1 cup of mini marshmallows into the warm cereal mixture. The heat from the cereal will melt the marshmallows just enough, creating a sticky, chewy texture. Stir until the marshmallows are evenly distributed and the mixture feels cohesive. This is where the magic begins, and it’s crucial to get the right consistency. If the mixture feels too dry, add a teaspoon of water to help bind the ingredients.
- Press the toasted cereal and marshmallow mixture into the bottom of a 9‑inch springform pan, forming an even crust. Use the back of a spoon or a flat-bottomed glass to press it down firmly, ensuring no air pockets. A compact crust will hold the filling together and give that satisfying bite. Let the crust cool to room temperature while you prepare the filling. This step is often overlooked but is essential for a stable cheesecake.
- In a blender, combine the 24 oz of cream cheese, ½ cup of sugar, ¼ cup of heavy cream, 1 tablespoon of lemon juice, 1 teaspoon of vanilla extract, 1 teaspoon of raspberry extract, and 1 tablespoon of cornstarch. Blend on high until the mixture is smooth and silky, with no lumps. The cornstarch will help the filling set without becoming gummy. If the batter is too thick, add a splash of milk or cream to reach the right consistency. The goal is a pourable but thick mixture that will firm up in the fridge.
- Pour the creamy filling over the cooled crust, spreading it evenly with a spatula. The filling should sit just above the crust, forming a smooth surface. Gently tap the pan on the counter a few times to release any trapped air bubbles. The filling should look glossy and inviting. This step ensures an even distribution of flavor and texture.
- Refrigerate the cheesecake for at least 4 hours, preferably overnight, to allow it to set fully. The chilled environment helps the cornstarch thicken the filling and ensures a firm bite. While the cheesecake chills, you can prepare the final topping. The longer it sits, the more the flavors meld together, creating a harmonious taste.
- Before serving, top the chilled cheesecake with additional Fruity Pebbles for a vibrant finish. The extra crunch adds a delightful contrast to the creamy filling. Dust a few lemon zest curls on top for a fresh aroma. Slice with a hot knife for clean cuts, and serve immediately. The first bite will have you saying “Wow, this is incredible!”
That’s it — you did it. But hold on, I’ve got a few more tricks that will take this to another level.
Insider Tricks for Flawless Results
The Temperature Rule Nobody Follows
Many people think any room temperature cream cheese will do, but the key is to let the cream cheese sit at room temperature for at least 30 minutes before blending. This prevents the batter from becoming lumpy. I’ve seen cakes that turn out lumpy because the cream cheese was still chilled. The smooth texture is what makes the filling feel like a silky mousse. If you’re in a hurry, use a microwave to warm the cream cheese for 15 seconds, but do not overheat it.
Why Your Nose Knows Best
When you’re mixing the batter, keep your nose close. The aroma of toasted cereal and melted butter is the first sign that the crust is done. If it smells like burnt sugar, you’re overcooking it. A well‑toasted crust will give the cheesecake a nutty undertone that elevates the overall flavor. Trust your nose; it’s the best judge of flavor.
The 5‑Minute Rest That Changes Everything
After pouring the filling into the pan, let it rest for 5 minutes before refrigerating. This brief pause allows the batter to settle and prevents air pockets from forming. It also gives the cornstarch a chance to hydrate fully, which ensures a smooth set. I’ve had cakes that cracked because I rushed the chill process; this simple rest eliminates that risk.
Garnish Like a Pro
Instead of a generic sprinkle of extra cereal, try arranging the Fruity Pebbles in a decorative pattern. Use a small cookie cutter to cut the cereal into shapes, then place them in a circular pattern on top. This adds a playful visual element that makes the cheesecake look like a piece of art. The garnish also enhances the flavor with a fresh crunch.
Use a Springform Pan for Easy Release
While a regular pan works, a springform pan makes it easier to release the cheesecake after chilling. The removable side allows you to lift the entire dessert without breaking the crust. It also keeps the edges intact, giving you a clean slice. If you don’t have a springform pan, line the bottom with parchment paper to prevent sticking.
Creative Twists and Variations
Berry Burst Twist
Swap the raspberry extract with a handful of fresh blueberries. Blend the blueberries into the cream cheese mixture to create a vibrant blue hue. This variation adds a juicy burst of flavor that pairs wonderfully with the sweet cereal. It’s perfect for a summer gathering or a birthday celebration.
Chocolate Peanut Butter Layer
Incorporate a layer of melted peanut butter between the crust and the filling. Spoon a thin layer of peanut butter over the crust before pouring the cheesecake batter. The nutty, chocolatey flavor complements the fruity base and adds a new dimension of taste. It’s a crowd‑pleaser for peanut butter lovers.
Almond Joy Edition
Replace the mini marshmallows with mini chocolate chips and sprinkle shredded coconut over the crust. This gives the cheesecake a tropical feel reminiscent of an Almond Joy candy. The coconut adds a subtle chewiness that pairs well with the crunchy base. The final result is a sweet, nutty, and slightly chewy dessert.
Minty Fresh Surprise
Add ½ teaspoon of peppermint extract to the cream cheese mixture. The mint provides a refreshing contrast to the sweet cereal. Serve the cheesecake chilled, and you’ll get a cool, crisp finish that feels like a summer breeze. This version is ideal for holiday parties.
Espresso Infusion
Stir a tablespoon of instant espresso powder into the batter for a coffee‑kissed twist. The espresso adds depth and a subtle bitterness that balances the sweetness. It’s a sophisticated take that works well for brunch or after‑dinner desserts.
Low‑Sugar Version
Replace the ½ cup of sugar with a sugar substitute like erythritol or stevia, adjusting the amount to taste. The cheesecake will still set properly, and the fruity notes will shine through. This version is great for those watching their sugar intake without compromising flavor.
Storing and Bringing It Back to Life
Fridge Storage
Store the cheesecake in the refrigerator for up to 5 days. Keep it in a sealed container or wrapped tightly in plastic wrap to prevent it from absorbing fridge odors. The cold environment keeps the filling firm and the crust crisp. When you’re ready to serve, let it sit at room temperature for 10 minutes to soften slightly.
Freezer Friendly
For longer storage, place the cheesecake in a freezer‑safe container and freeze for up to 2 months. Wrap the container tightly with plastic wrap and then a layer of aluminum foil to prevent freezer burn. When you’re ready to eat, thaw overnight in the refrigerator. This keeps the texture intact and the flavors fresh.
Best Reheating Method
Reheating a no‑bake cheesecake can be tricky. Instead of microwaving, place the cheesecake in a preheated 350°F oven for 5 minutes. This gentle heat warms it without melting the filling. If you prefer a quicker method, use a microwave on low power for 15–20 seconds, checking frequently to avoid overheating. A tiny splash of water before reheating can help steam the filling back to a silky consistency.