I ruined Christmas dinner last year. Not with the turkey — that was fine. Not with the pie — that disappeared in minutes. No, I ruined it with my attempt at "healthy holiday snacks" that tasted like cardboard sprinkled with regret. My family still brings it up. "Hey, remember those sad energy balls?" they'll say, chuckling while passing around the good chocolates they hid from me. But here's the thing: I don't give up that easily. I spent the next twelve months in my kitchen like a mad scientist, determined to create energy bites that would make my relatives weep with joy instead of disappointment.
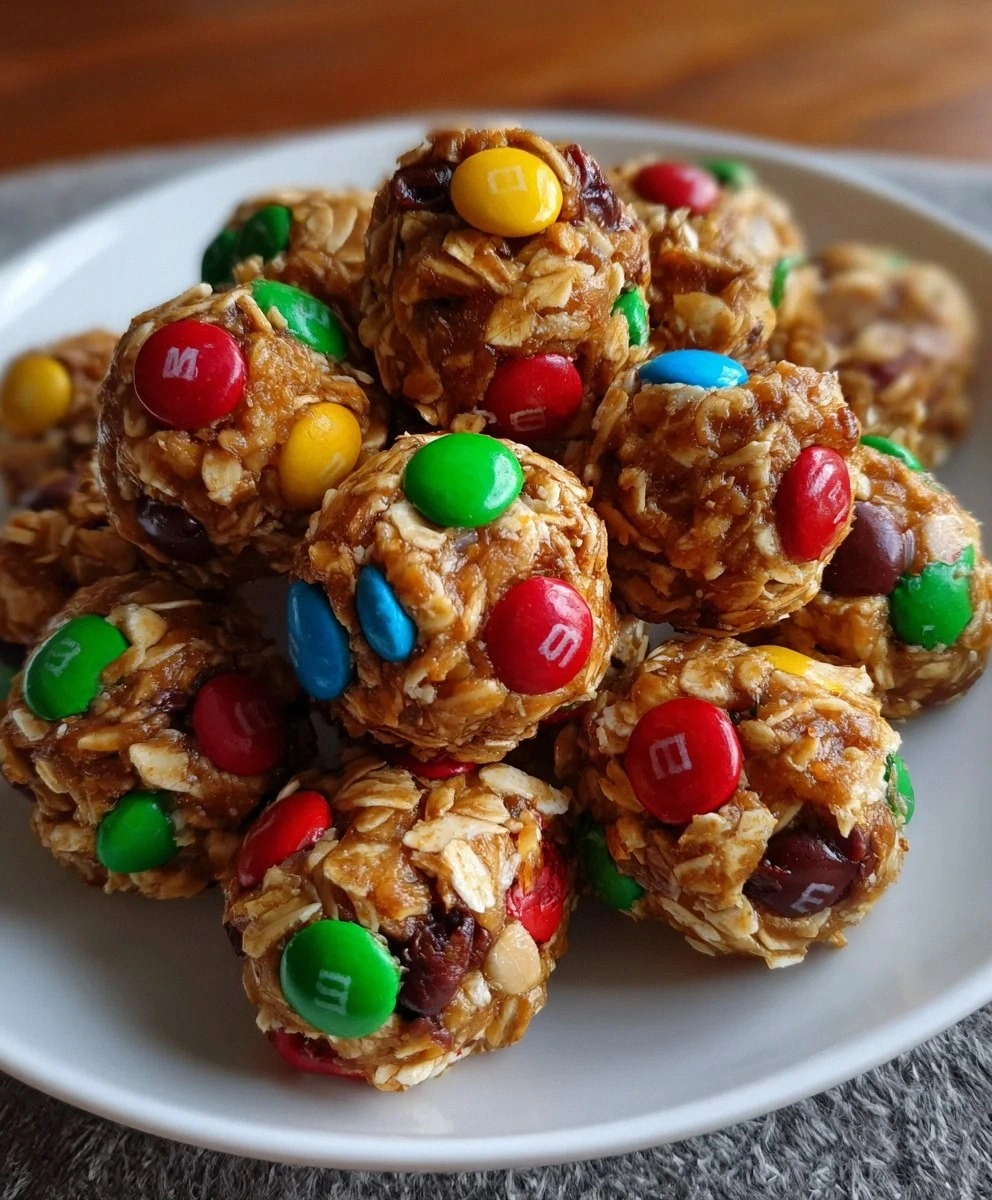
Picture this: It's December 23rd, I'm in my kitchen at midnight, surrounded by bags of quick oats, jars of peanut butter, and enough honey to make Winnie-the-Pooh jealous. The house smells like a candy factory exploded. My neighbors probably think I've lost my mind — and maybe I have. But then it happens. I roll these little spheres of Christmas magic between my palms, pop one in my mouth, and suddenly I'm transported to a winter wonderland where elves high-five each other and reindeer do victory dances. The combination of hearty oats, creamy peanut butter, golden honey, and those festive mini M&Ms creates something that shouldn't work but absolutely does.
These aren't your typical dry, sad energy bites that taste like you're being punished for wanting dessert. These are the Rolls-Royce of healthy holiday treats. They're chewy without being gummy, sweet without sending you into a sugar coma, and colorful enough to make even the grinchiest family member crack a smile. I dare you to taste these and not go back for seconds. Actually, I double-dog dare you — because I ate half the batch before anyone else got to try them, and I need someone else to share in my shame.
Stay with me here — this is worth it. I'm about to show you how to create Christmas Energy Bites that'll make you the hero of every cookie exchange, the star of every potluck, and possibly the most popular person in your neighborhood. Let me walk you through every single step — by the end, you'll wonder how you ever made it any other way.
What Makes This Version Stand Out
Taste Explosion: These bites deliver layers of flavor that unfold like a Christmas story — first the nutty richness of peanut butter, then the warm sweetness of honey, finishing with the candy-coated crunch of holiday M&Ms. Most recipes taste like sweetened cardboard, but these actually make your taste buds do a happy dance.
Perfect Texture: Say goodbye to rock-hard energy balls that could break a tooth. These beauties have the ideal chewiness — soft enough for Grandma to enjoy, sturdy enough that they won't crumble in your cookie tin. The quick oats provide just enough bite without turning these into bird food.
Zero Baking Required: While everyone else is sweating over hot ovens, you'll be chilling with a cup of cocoa, rolling these no-bake wonders in minutes. Perfect for those holiday days when you can't bear to add more heat to your already overheated kitchen.
Instant Crowd Magnet: These disappear faster than ugly Christmas sweaters at a fashion show. Kids love the candy colors, adults appreciate the healthier twist, and everyone respects that you're not serving another boring fruitcake.
Premium Ingredients: We're not using cheap ingredients that taste like disappointment. Quality peanut butter, real honey (not that corn syrup imposter), and actual M&Ms make these taste like you splurged at a fancy candy shop.
Make-Ahead Magic: Whip up a double batch on Sunday, freeze them, and you've got instant gifts, party contributions, or emergency sweet fixes all month long. They thaw in minutes and taste just as fresh as day one.
Customizable Canvas: Think of this recipe as your holiday playground. Swap in different nut butters, add crushed candy canes, roll in coconut — the possibilities are endless, and I'll show you all my favorite variations later.
Inside the Ingredient List
The Foundation Squad
Quick oats aren't just oatmeal's impatient cousin — they're the backbone of these energy bites, providing that satisfying chew that makes them feel substantial rather than candy-like. Their smaller size means they integrate seamlessly with the wet ingredients, creating a uniform texture that holds together without crumbling. Skip the old-fashioned oats here unless you enjoy feeling like you're eating granola bars that forgot how to stick together. If you're in a pinch, pulse regular oats in a food processor a few times, but honestly, quick oats cost like two dollars — just buy them and thank me later.
Peanut butter is the glue that holds our Christmas dreams together, but not all peanut butter is created equal. Reach for the natural, creamy variety — not that hydrogenated stuff that could survive a nuclear winter. You want peanut butter that actually tastes like peanuts, not like sweetened plastic. The oil separation is normal; embrace it as a sign you're using the good stuff. If allergies are a concern, almond butter works beautifully and adds a more sophisticated flavor profile that makes people think you're fancy.
The Sweetness Factor
Honey isn't just sugar in liquid form — it's nature's flavor enhancer, bringing subtle floral notes that complement the nutty richness of peanut butter. The viscosity of honey acts like edible glue, binding everything together while keeping these bites moist and chewy for days. Don't substitute corn syrup unless you want treats that taste like disappointment. If you're vegan, maple syrup works, though you'll need to add a bit more since it's thinner than honey.
The Festive Touch
Christmas Mini M&Ms are where the magic happens, transforming ordinary energy bites into holiday showstoppers. These tiny candy-coated chocolates add pops of red, green, and white that scream "Christmas" louder than Mariah Carey in a department store. The candy coating provides a slight crunch that contrasts beautifully with the chewy base, while the chocolate melts just enough to create little pockets of joy throughout each bite. Regular M&Ms work in a pinch, but the mini size distributes more evenly, ensuring every bite gets some candy cheer.
The Supporting Cast
Vanilla extract might seem optional, but it's the difference between "pretty good" and "why can't I stop eating these?" Just a teaspoon amplifies all the other flavors, making the peanut butter nuttier, the honey sweeter, and the chocolate more chocolatey. Use real vanilla extract, not the imitation stuff that tastes like sadness. A pinch of salt might seem counterintuitive in a sweet treat, but it's the secret weapon that makes all the flavors pop like Christmas lights.
Everything's prepped? Good. Let's get into the real action...
The Method — Step by Step
- Clear your counter and grab your biggest mixing bowl — we're about to create holiday magic. In goes your quick oats, two cups of those little oat heroes that form the foundation of our Christmas dreams. Spread them out so they form an even layer across the bottom of your bowl. This isn't just for aesthetics — it helps you see exactly what you're working with and prevents clumping when we add the wet ingredients. If you've ever ended up with dry pockets in your energy bites, this visual check prevents that disappointment.
- Now for the star of our show: peanut butter. Scoop out one cup of the creamy stuff, but here's the trick — don't just dump it in cold from the fridge. Room temperature peanut butter blends like a dream, while cold peanut butter fights you every step of the way. If you're like me and store yours in the fridge, give it 30 seconds in the microwave until it's soft and pliable. You want it smooth enough to stir but not so melted it turns your mixture into soup.
- Honey time — nature's liquid gold gets its moment to shine. Pour in half a cup of good quality honey, watching as it cascades over the peanut butter like a golden waterfall. This is where the magic starts happening; as honey meets peanut butter, they begin their beautiful relationship, creating a sticky sweet mixture that'll hold everything together. Don't use that honey that's been sitting in your pantry since last Christmas — fresh honey makes a difference you can taste.
- Vanilla extract and salt join the party now — just a teaspoon of vanilla and a pinch of salt might seem insignificant, but trust me on this one. The vanilla adds depth while the salt enhances every other flavor, making the peanut butter taste nuttier and the honey taste sweeter. Mix everything together until you have a cohesive, slightly sticky mixture that holds together when you squeeze it. If it's too dry and crumbly, add another tablespoon of honey. Too wet and sticky? Sprinkle in more oats.
- Here comes the fun part — channel your inner child and get ready to roll. Grab a tablespoon of mixture and roll it between your palms, applying gentle pressure. You're aiming for balls about the size of a ping pong ball, but hey, it's your kitchen — make them as big or small as you like. Just keep them consistent so they set evenly. If the mixture sticks to your hands like crazy, dampen your palms slightly with water. Not soaking wet, just barely damp enough to prevent sticking.
- Now for the grand finale — those Christmas Mini M&Ms that transform these from ordinary energy bites into holiday showstoppers. Press them gently into the surface of each ball, about 5-7 M&Ms per bite. Don't just throw them in and mix — pressing them in ensures they stay put and create those beautiful pops of color. The candy coating is surprisingly sturdy, but be gentle or you'll crack them and end up with candy confetti.
- Arrange your finished bites on a parchment-lined baking sheet or plate, making sure they're not touching. They need their personal space to set properly. Pop them in the fridge for at least 30 minutes — this isn't just for patience-testing, it's when they transform from sticky blobs into perfectly set, professional-looking energy bites. The cold helps the peanut butter firm up and everything meld together into bite-sized perfection.
- The moment of truth — after what feels like forever (but is really just 30 minutes), pull one out and take a bite. The outside should be firm but not rock-hard, while the inside stays chewy and soft. The M&Ms provide little crunches of candy-coated joy, while the base delivers that perfect combination of nutty, sweet, and satisfying. If you've done everything right, you'll immediately understand why I ate half the batch before anyone else got to try them.
That's it — you did it. But hold on, I've got a few more tricks that'll take this to another level...
Insider Tricks for Flawless Results
The Temperature Rule Nobody Follows
Room temperature ingredients aren't just a suggestion — they're the difference between energy bites that hold together like champions and ones that crumble like my willpower around Christmas cookies. Cold peanut butter won't blend properly, leaving you with greasy pockets that separate from the oats. Cold honey becomes thick and difficult to mix, creating a workout that'll have you cursing my name. Take everything out of the fridge 30 minutes before you start, and thank me when your mixture comes together like it was born to be one.
Why Your Nose Knows Best
Here's something most recipes won't tell you: smell your oats before using them. Rancid oats have a distinct stale, cardboard-like odor that'll ruin your entire batch. Oats contain natural oils that can go bad, especially if they've been sitting in your pantry since last Christmas. Fresh oats smell slightly sweet and nutty, not like forgotten breakfast cereal. This simple sniff test prevents disappointment and ensures your energy bites taste like holiday joy rather than sad pantry surprises.
The 5-Minute Rest That Changes Everything
After mixing your base ingredients, let the mixture rest for five minutes before rolling. This brief pause allows the oats to absorb some of the moisture from the peanut butter and honey, creating a more cohesive mixture that rolls like a dream. A friend tried skipping this step once — let's just say it didn't end well. She ended up with a sticky mess that required a spatula and some questionable language to get off her hands. Five minutes of patience saves you from becoming one of those cooking fail videos.
Size Matters More Than You Think
Consistency isn't just for Instagram aesthetics — it ensures your energy bites set evenly and portion control actually works. Use a small cookie scoop or tablespoon to measure each portion before rolling. Bites that are too large won't set properly in the center, while tiny ones dry out faster than your Christmas tree without water. Aim for about one tablespoon of mixture per bite, and you'll achieve that perfect balance of portable and satisfying.
The Freezer Secret
Here's my favorite party trick: freeze your energy bites for 20 minutes instead of refrigerating for 30. The rapid chill creates a slightly firmer exterior while keeping the inside perfectly chewy. This quick-set method is perfect for last-minute guests or when you need dessert in a hurry. Plus, partially frozen energy bites taste like candy bars — my kids prefer them this way and honestly, so do I when nobody's looking.
Creative Twists and Variations
This recipe is a playground. Here are some of my favorite ways to switch things up:
The White Christmas Version
Swap the peanut butter for white chocolate almond butter and use white chocolate chips instead of M&Ms. Add some shredded coconut for snow-like texture, and you've got energy bites that look like they belong in a winter wonderland. The white chocolate adds extra sweetness, making these taste like candy while still maintaining that energy-boosting oat base. My daughter claims these taste like Christmas morning feels.
The Rudolph's Revenge
Add a tablespoon of cocoa powder to the base mixture and use red and green M&Ms for a chocolatey twist. The cocoa adds depth without overwhelming the other flavors, creating energy bites that taste like brownie batter met Christmas candy and had beautiful babies. If you're feeling fancy, roll them in crushed candy canes for a peppermint bark vibe that'll make you the star of any cookie exchange.
The Grinch's Heart
Use almond butter instead of peanut butter, add a teaspoon of matcha powder for natural green color, and use only red M&Ms. These green energy bites with red candy spots look like the Grinch's heart growing three sizes. The matcha adds antioxidants while providing that perfect green hue without artificial colors. They're surprisingly delicious, even for people who claim they don't like matcha.
The Snowball Surprise
Roll your finished bites in powdered sugar for a snow-covered effect that's both beautiful and delicious. The sugar creates a slight crust that contrasts beautifully with the chewy interior. Add some crushed peppermint candies to the powdered sugar for candy cane snow that tastes like Christmas exploded in your mouth. These look especially gorgeous arranged on a dark plate or tin.
The Nutcracker Sweet
Add two tablespoons of Nutella to your peanut butter for a hazelnut-chocolate twist that tastes like Ferrero Rocher met an energy bite. Use gold and silver dragées instead of M&Ms for an elegant touch that looks like expensive candy. These sophisticated bites are perfect for adult gatherings where you want to impress without looking like you're trying too hard.
The Sugar Cookie Remix
Add a teaspoon of almond extract and roll your finished bites in colored sugar for sugar cookie energy bites that capture all the flavor without any baking. The almond extract provides that classic sugar cookie flavor, while the colored sugar adds crunch and visual appeal. These are perfect for cookie exchanges when you're tired of actual cookies but still want to participate.
Storing and Bringing It Back to Life
Fridge Storage
Your Christmas Energy Bites will keep beautifully in the refrigerator for up to two weeks — though let's be honest, they'll disappear long before then. Store them in an airtight container with parchment paper between layers to prevent sticking. The cold actually improves their texture, making them firmer and more satisfying to bite into. Just bring them to room temperature for five minutes before serving if you prefer a softer chew.
Freezer Friendly
These little champions freeze like pros for up to three months. Arrange them in a single layer on a baking sheet, freeze until solid, then transfer to freezer bags. They thaw in about 10 minutes at room temperature, or you can eat them partially frozen for a candy-bar experience. Pro tip: freeze individual portions in small bags for grab-and-go snacks that'll save you from mall food court disasters during holiday shopping.
Best Reheating Method
While these are best enjoyed cold or at room temperature, if they've been over-refrigerated and become too firm, let them sit at room temperature for 10-15 minutes. Don't microwave them — the M&Ms will crack and the peanut butter can separate. If you're bringing them to a party, transport them in a cooler bag and let them warm up naturally once you arrive. They're designed to be enjoyed at room temperature, making them perfect for potlucks and cookie exchanges.