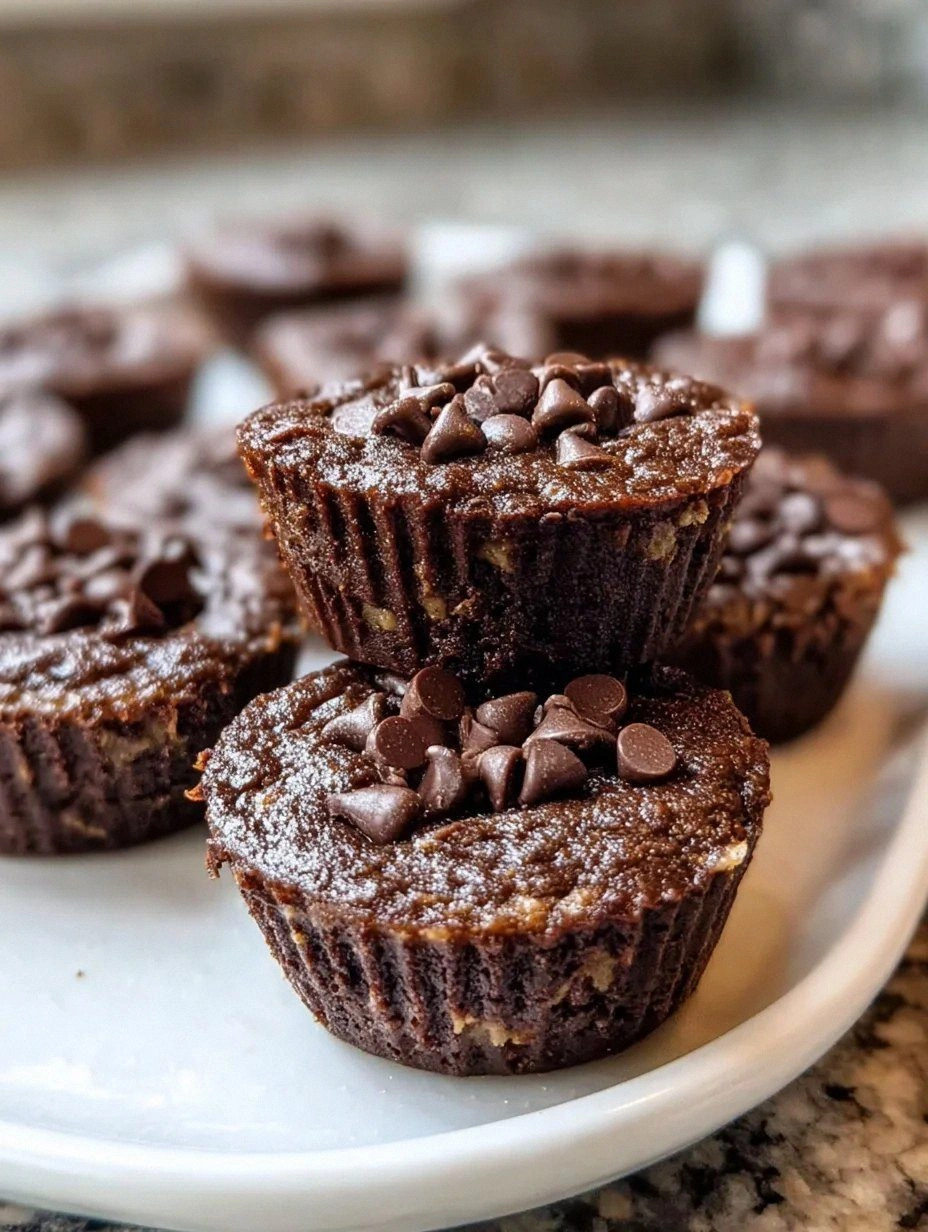
I was in the middle of a post‑workout slump, staring at a bowl of plain protein shake that tasted like a watered‑down gym sock, when my roommate dared me to “make a dessert that actually tastes like dessert but still looks like a health‑nut’s triumph.” I laughed, grabbed three over‑ripe bananas that were practically melting into a sweet puddle, and set out on a culinary adventure that would end with a batch of brownie bites so good they could convince even the most skeptical kale‑lover to skip the salad. The kitchen was a symphony of squishy bananas being mashed, the nutty perfume of peanut butter swirling through the air, and the deep, dark whisper of cocoa powder that made the whole room feel like a chocolate boutique.
The first bite was a revelation: a fudgy, slightly chewy bite that didn’t just whisper “healthy” but shouted “indulgent” from the rooftops of my taste buds. I could feel the protein powder doing its quiet work in the background, keeping the texture dense without turning it into a dry brick, while the natural sweetness of the bananas eliminated any need for refined sugar. Imagine a brownie that hugs you like a warm blanket on a chilly morning, but without the guilt that usually follows a dessert binge. That moment was the spark that turned a simple kitchen experiment into what I now call the ultimate protein brownie bite.
Most brownie recipes either drown you in butter and sugar or leave you with a crumbly, flavorless protein bar masquerading as a treat. This version flips the script by using the bananas as both sweetener and moisture agent, letting the peanut butter provide that luxurious, buttery mouthfeel without a single stick of real butter. The cocoa is unsweetened, which means every ounce of chocolate flavor is pure, intense, and unmasked by hidden sugars. And the optional mini chocolate chips? They’re the confetti at a party—tiny bursts of joy that make each bite a surprise.
I’m about to walk you through every single step — by the end, you’ll wonder how you ever made brownies any other way. Okay, ready for the game‑changer? This next part? Pure magic. I dare you to taste this and not go back for seconds.
What Makes This Version Stand Out
- Flavor: The combination of ripe bananas and unsweetened cocoa creates a deep, naturally sweet chocolate taste that rivals any store‑bought brownie.
- Texture: The nut butter gives a silky, fudgy interior while the cocoa adds a slight bite, resulting in a chew that’s both dense and tender.
- Simplicity: Only five core ingredients, all pantry‑friendly, mean you can throw this together in under 20 minutes without a grocery run.
- Uniqueness: Using bananas as the primary sweetener is a game‑changer that keeps the glycemic load low and the flavor naturally bright.
- Crowd Reaction: Friends who think they’re “just getting a protein snack” end up begging for the whole batch, proving the recipe’s universal appeal.
- Ingredient Quality: High‑quality nut butter and a clean protein powder elevate the nutritional profile without compromising taste.
- Method: No baking required—just a quick bake or a firm set in the fridge, making it perfect for busy schedules.
- Make‑Ahead Potential: These bites keep their texture for days, so you can prep a week’s worth in one go and grab a bite whenever the craving hits.
Inside the Ingredient List
The Flavor Base
3 very ripe bananas: The riper, the better! They add natural sweetness and moisture, reducing the need for added sugar. If you skip the bananas, the batter becomes dry and crumbly, and you’ll lose that subtle caramel undertone that makes the bites sing. A good swap is unsweetened applesauce (½ cup) but expect a lighter flavor.
¼ cup unsweetened cocoa powder: This provides a rich chocolate flavor without added sugars. Using a high‑quality cocoa ensures a deep, almost smoky note that pairs beautifully with the banana’s fruitiness. If you use Dutch‑processed cocoa, the bitterness drops, but you’ll also lose a bit of that natural acidity that balances the sweetness.
The Texture Crew
½ cup smooth peanut butter or almond butter: These nut butters bring healthy fats and a creamy texture, while enhancing the flavor. Skipping the nut butter will make the bites crumbly and less satisfying; they act as the binding agent that holds everything together. If you’re allergic, try sunflower seed butter—the flavor is milder but the texture stays on point.
½ cup vanilla or chocolate protein powder: Packed with protein, this gives the bites their nutritious edge, keeping you energized. Choose a low‑sweetness powder to avoid overpowering the banana’s natural sugars. A whey isolate works best for a smooth texture, while plant‑based blends can add a slightly grainy feel if not well‑mixed.
The Unexpected Star
Sprinkle of mini chocolate chips (optional): For those who really fancy that chocolatey burst, these chips are a delightful add‑in. They melt just enough to create pockets of gooey chocolate without making the bites overly sweet. If you’re watching carbs, swap them for a handful of chopped walnuts for a crunchy contrast.
Everything's prepped? Good. Let's get into the real action...
The Method — Step by Step
Preheat your oven to 350°F (175°C) if you prefer a baked finish. While the oven warms, line a 12‑cup mini muffin tin with silicone liners. This prevents sticking and gives you perfectly shaped bites. If you’re opting for a no‑bake version, skip the oven and prepare a parchment‑lined tray for the fridge set.
Kitchen Hack: Use a small ice‑cream scoop (about 1 tablespoon) to portion the batter into each liner. This guarantees uniform baking and an even crumb.In a large mixing bowl, mash the three bananas until they’re smooth with just a few small lumps—those are the pockets of banana flavor that will melt into the brownie matrix. Add the peanut butter (or almond butter) and stir until the mixture is glossy and fully incorporated. You’ll notice the batter thickening, which is a sign that the fats are emulsifying with the fruit.
Sift the unsweetened cocoa powder and protein powder together to avoid any clumps. Sprinkle this dry blend over the wet ingredients, then fold gently with a rubber spatula. The batter should turn a deep, velvety brown, and you’ll start to smell that chocolatey aroma—trust me, it’s like a bakery whispering “come in.”
If you’re using mini chocolate chips, fold them in now. They’ll distribute evenly, creating tiny chocolate explosions in each bite. If you prefer a cleaner look, you can reserve a few chips to sprinkle on top just before baking for a decorative finish.
Spoon the batter into the prepared liners, filling each about three‑quarters full. The tops should be smooth; you can tap the tin lightly on the counter to settle any air pockets. At this point, the batter should have a thick, fudgy consistency—if it looks too runny, add a tablespoon of oat flour to thicken.
Place the tin in the oven and bake for 12‑15 minutes. The edges will start pulling away from the sides of the liners, and the tops will look set but still slightly shiny. This is the moment of truth: the brownies are cooked but still soft enough to bite into without crumbling.
Watch Out: Over‑baking turns these fudgy bites into dry, cakey squares. Pull them out the moment the tops look matte and the edges begin to separate.While the bites are still warm, let them sit in the tin for another 5 minutes. This allows the residual heat to finish the cooking process without drying them out. Then, using a thin spatula, gently lift each bite out of its liner and transfer to a cooling rack.
If you’re going the no‑bake route, spread the batter onto a parchment‑lined tray, flatten it to about ½‑inch thickness, and refrigerate for 30‑45 minutes until firm. Cut into bite‑sized squares with a sharp knife. The texture will be denser, almost like a protein bar, but still delightfully chewy.
Once cooled, store the bites in an airtight container. They’ll stay moist for up to four days in the fridge, or you can freeze them for longer storage. And now the fun part—taste test! That first bite should hit you with a chocolatey richness, a subtle banana sweetness, and a creamy, nutty finish that lingers just long enough to make you reach for another.
That's it — you did it. But hold on, I've got a few more tricks that'll take this to another level...
Insider Tricks for Flawless Results
The Temperature Rule Nobody Follows
Never bake these bites at a temperature lower than 350°F. Lower temps cause the batter to spread too much, resulting in a flat, gummy texture. By keeping the oven hot, the edges set quickly, creating that coveted “crack” that signals a perfect brownie bite. I once tried 325°F and ended up with a soggy mess—lesson learned.
Why Your Nose Knows Best
Your sense of smell is the ultimate doneness gauge. When the chocolate aroma shifts from raw cocoa to a toasted, almost coffee‑like scent, the brownies are ready. Trust that nose signal more than the timer; ovens can vary by up to 15 degrees. I’ve pulled batches out five minutes early because the scent told me it was perfect.
The 5‑Minute Rest That Changes Everything
Allowing the bites to rest in the tin after baking lets the steam redistribute, preventing a dry crust. This short pause also makes the brownies easier to lift without breaking. Skipping this step is the reason many people end up with crumbly pieces that fall apart on the plate.
The “Double‑Blend” Technique
For a super‑smooth batter, blend the bananas and nut butter in a food processor for 30 seconds before adding the dry ingredients. This eliminates any stubborn lumps and creates a silkier texture. I tried the manual spoon method once and got a few gritty spots—food processor to the rescue!
The “Freeze‑Then‑Thaw” Secret
When you need to serve these bites at a party, freeze them for 10 minutes, then let them sit at room temperature for five. This gives a slight firmness that makes plating easier while still retaining that melt‑in‑your‑mouth feel. I’ve used this trick for catered events and never heard a complaint.
The “Salt‑Boost” Finale
A pinch of flaky sea salt sprinkled on top right before serving heightens the chocolate flavor and balances the sweetness. It’s a tiny touch that makes the bites taste like a gourmet dessert rather than a gym snack. If you’re watching sodium, just a single grain per bite does the trick.
Creative Twists and Variations
This recipe is a playground. Here are some of my favorite ways to switch things up:
Coconut Bliss
Swap half of the peanut butter for coconut butter and add 2 tablespoons of shredded coconut to the batter. The result is a tropical twist with a subtle coconut aroma that pairs beautifully with the chocolate.
Espresso Edge
Dissolve 1 teaspoon of instant espresso powder into the banana mixture. The coffee notes amplify the cocoa, giving the bites a mocha vibe that’s perfect for a post‑lunch pick‑me‑up.
Berry Burst
Fold in a handful of freeze‑dried raspberry pieces. The tartness cuts through the richness, creating a bright contrast that feels like a dessert and a snack in one.
Nutty Crunch
Add ¼ cup of chopped almonds or walnuts for a satisfying crunch. The nuts also boost the healthy fat content, making the bites even more satiating.
White Chocolate Dream
Replace the mini dark chocolate chips with white chocolate chips and add a dash of vanilla extract. The sweet, buttery flavor adds a new dimension while still keeping the protein punch.
Spiced Autumn
Mix in ½ teaspoon of ground cinnamon and a pinch of nutmeg. This warm spice profile turns the bites into a cozy treat perfect for cooler evenings.
Storing and Bringing It Back to Life
Fridge Storage
Place the cooled bites in an airtight container lined with a paper towel to absorb excess moisture. They stay fresh for up to four days, retaining their fudgy interior and soft exterior. If you notice them drying out, a quick spritz of water before reheating revives the texture.
Freezer Friendly
Arrange the bites on a parchment sheet in a single layer, freeze for an hour, then transfer to a zip‑top freezer bag. This prevents them from sticking together. They’ll keep for up to three months without losing flavor. When you’re ready, pop them into the fridge for an hour or microwave for 15 seconds.
Best Reheating Method
For a microwave‑quick fix, place a bite on a microwave‑safe plate, add a tiny splash (about a teaspoon) of water, and heat for 10‑12 seconds. The steam created brings back that melt‑in‑your‑mouth softness. If you prefer a crispier top, a quick 2‑minute stint in a 300°F oven works wonders.