It started with a kitchen mishap that left my friends laughing and my taste buds begging for redemption. I had tried to recreate the classic Philly cheesesteak, but my attempt ended up as a soggy, flavorless mess that could only be described as “meh.” The next night, a dare from a friend forced me to whip up something that would make even the most skeptical foodie swoon. I was determined to deliver a version that would earn the title of the best Philly cheesesteak sliders ever made at home. I promised myself that this would be a game‑changer, and I kept that promise every time I sliced, sautéed, and baked.
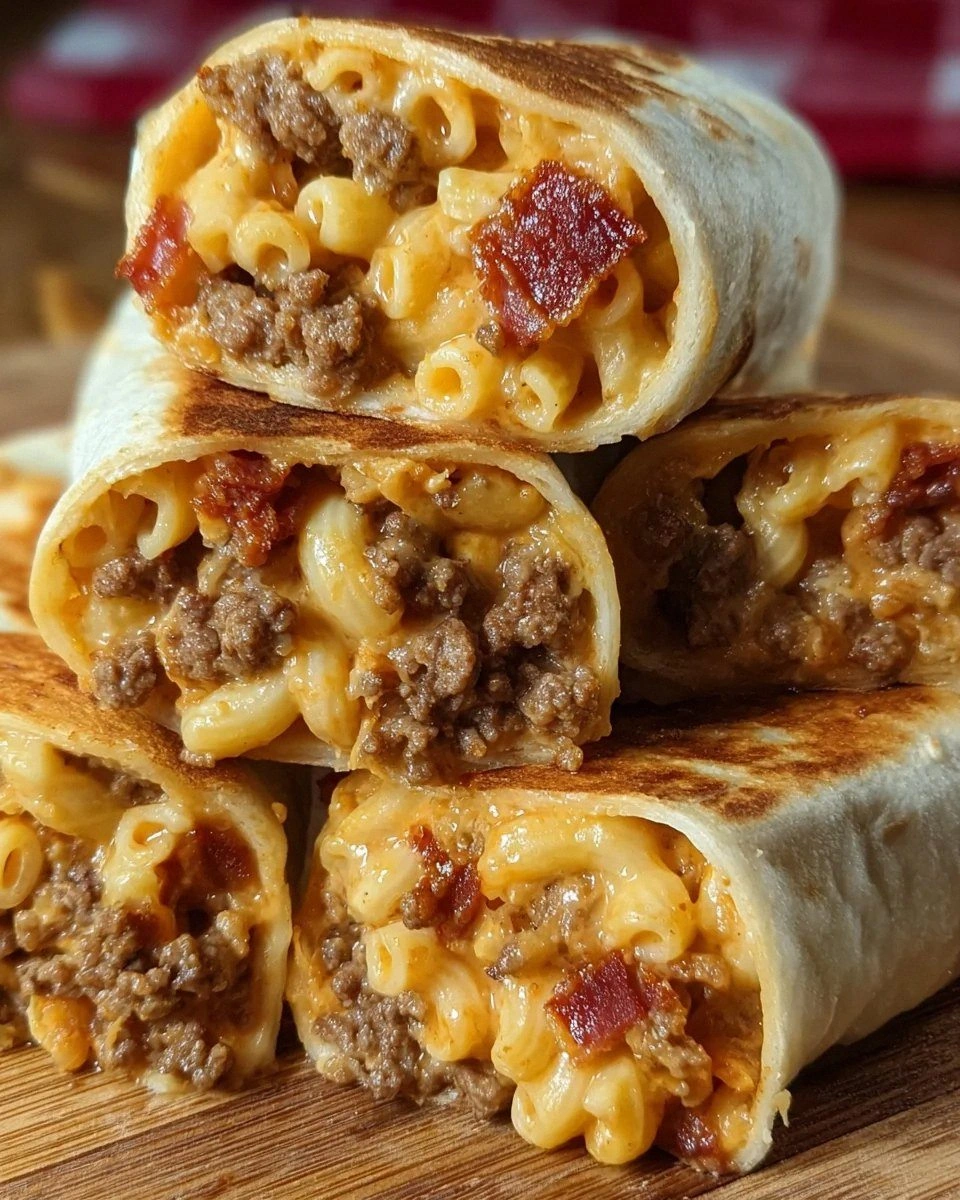
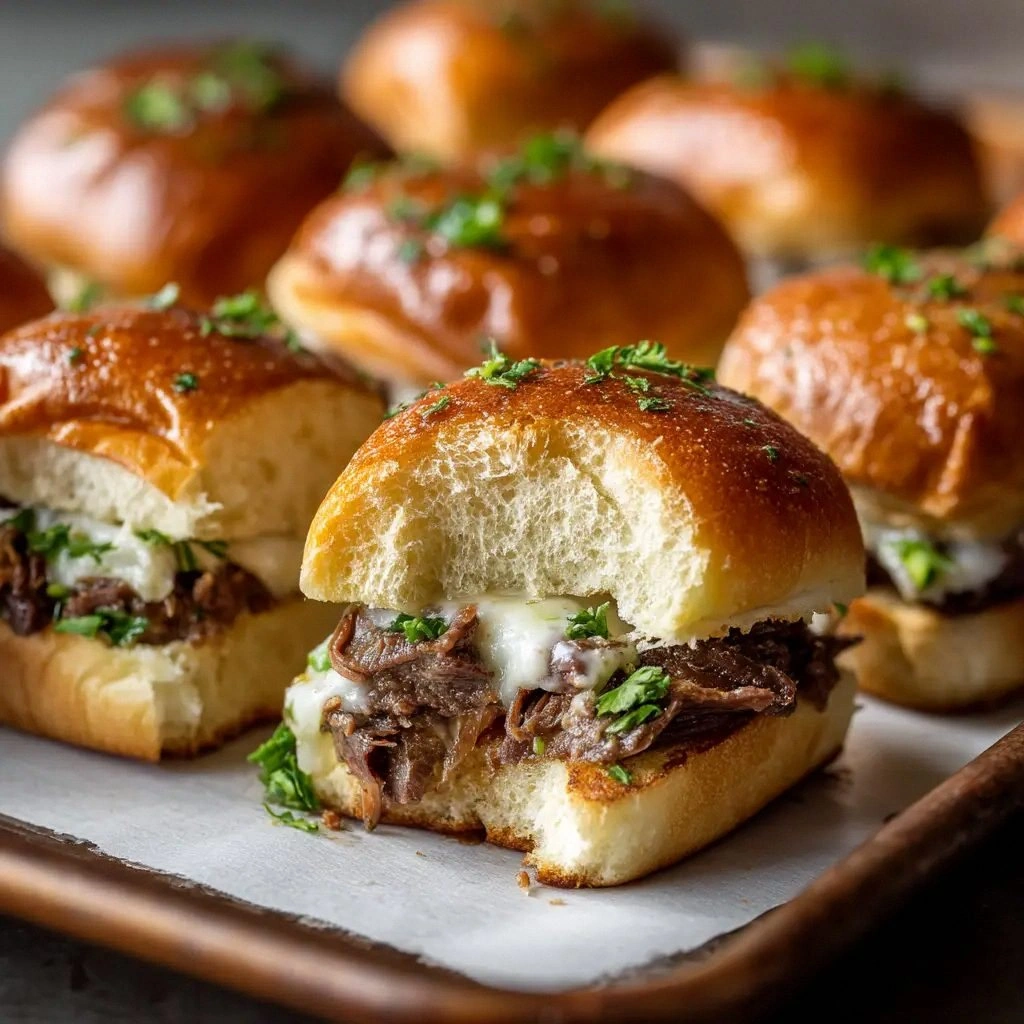
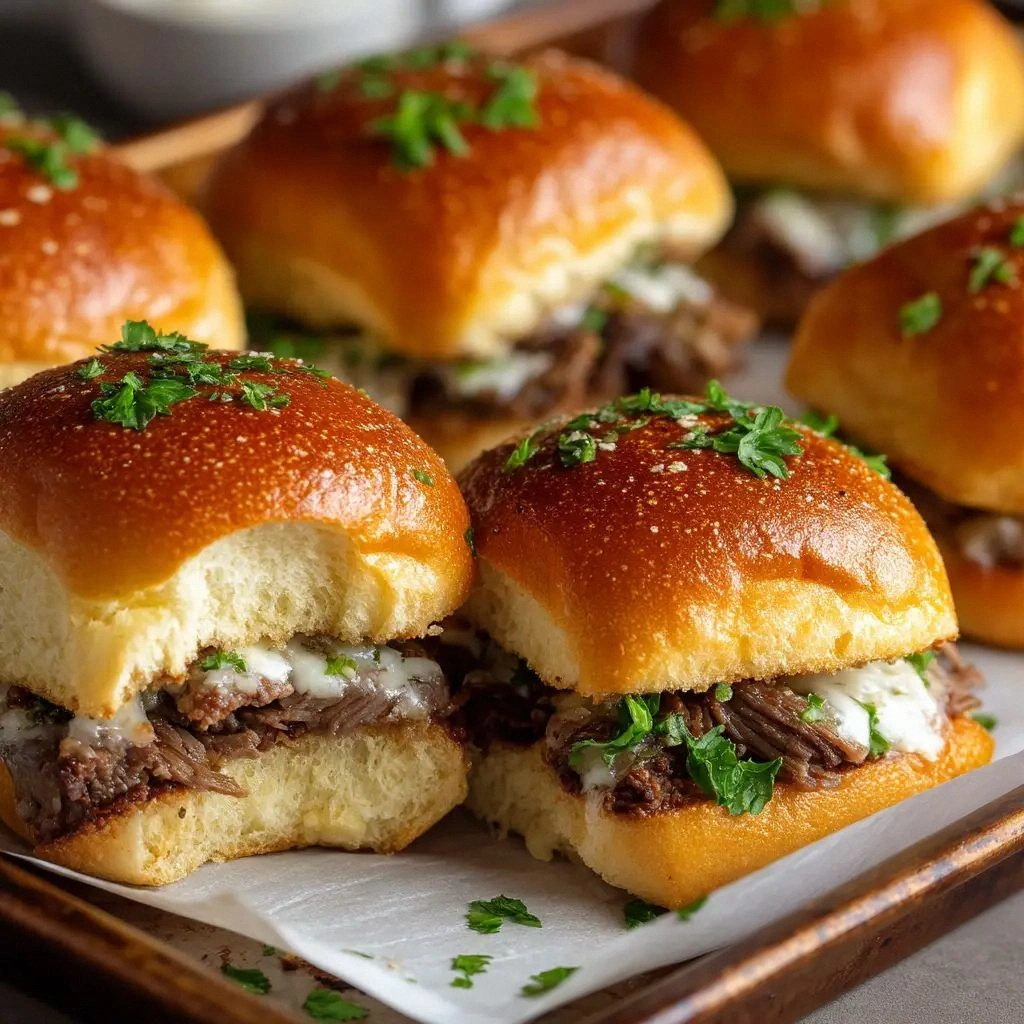
Picture yourself pulling a tray of golden, buttery sliders out of the oven, the kitchen smelling like a cozy, savory hug. The sound of sizzling beef and the hiss of onions caramelizing form a soundtrack that’s almost too good to be true. The first bite is a symphony: the tender, seared beef meets the crisp, slightly sweet onion, the pepper’s bright bite, and the creamy, melty provolone. The Hawaiian roll adds a subtle sweetness and a buttery crunch that holds everything together. Each slider is a bite-sized masterpiece that will make you question why you ever settled for anything less.
This version stands out because I’ve tweaked the classic recipe with a few secret ingredients and techniques that elevate the flavor profile and texture to new heights. I’ve added a splash of Worcestershire sauce to deepen the umami, a touch of garlic powder for an aromatic kick, and two separate butter steps to ensure the rolls are perfectly crisp yet moist. I also use shaved beef instead of ground, giving the sliders a luxurious texture that melts in your mouth. The result is a dish that’s not only incredibly delicious but also incredibly easy to make, making it the go-to recipe for any gathering.
I dare you to taste this and not go back for seconds. The first bite will have you reaching for the next slider, and before you know it, you’ll have finished the whole batch. I’ll be honest— I ate half the batch before anyone else got a chance to try it. Most recipes get this completely wrong by overcooking the beef or underbrowning the cheese, but I’ve found the sweet spot that keeps everything juicy and flavorful. If you've ever struggled with making a satisfying Philly cheesesteak, you're not alone, and I've got the fix. The best part? You can make it ahead of time and reheat it without losing any of that buttery, cheesy goodness.
Okay, ready for the game‑changer? I’m about to walk you through every single step, and by the end, you'll wonder how you ever made it any other way. Let’s dive into the details, because this is more than just a recipe— it’s a culinary experience that will transform your kitchen into a Philly pizzeria. Stay with me here— this is worth it. The journey begins with a simple prep, but the payoff is a dish that will have your guests begging for the recipe.
What Makes This Version Stand Out
- Flavor: The addition of Worcestershire sauce and garlic powder creates a depth that traditional recipes lack, giving the beef a savory, umami-rich profile that lingers on the palate.
- Texture: Shaved beef offers a melt‑in‑your‑mouth experience, while the caramelized onions and bell pepper add a subtle crunch that contrasts beautifully with the soft rolls.
- Cheese: Provolone melts smoothly without becoming greasy, providing a creamy layer that balances the beef’s richness.
- Rolls: Hawaiian sweet rolls bring a slight sweetness and a buttery crust, elevating the sliders from ordinary to unforgettable.
- Visual Appeal: The sliders stack like miniature skyscrapers, each layer visible and enticing, making them as photogenic as they are delicious.
- Make‑ahead: The assembly can be completed ahead of time, and the sliders bake to perfection even after refrigeration.
- Versatility: Swap cheeses, add spice, or use gluten‑free rolls— this recipe adapts to your cravings and dietary needs.
- Party‑Ready: Serve them on a platter, and watch the crowd line up for a taste that feels like a celebration.
Alright, let's break down exactly what goes into this masterpiece. And before we dive deeper, here’s a quick kitchen hack to save you time and keep everything organized.
Inside the Ingredient List
The Flavor Base
The foundation of any great slider is a robust flavor base. Shaved beef is the star, offering a tender bite that’s more luxurious than ground steak. Worcestershire sauce infuses the meat with a subtle tang and umami punch that’s essential for depth. A pinch of garlic powder adds an aromatic layer that complements the beef’s richness without overpowering it. Skipping any of these would leave the sliders feeling flat and underwhelming.
The Texture Crew
Onions and green bell pepper are the dynamic duo that bring crunch, sweetness, and color to the mix. The onions caramelize to a golden brown, delivering a sweet, savory profile that cuts through the richness of the beef. The bell pepper adds a crisp bite and a pop of color that makes each slider visually appealing. If you omit them, you lose that essential textural contrast that makes each bite exciting.
The Unexpected Star
Provolone cheese is the unexpected star that melts into a silky, creamy layer. It’s chosen for its smooth melt and mild flavor that doesn’t compete with the beef. The cheese’s slight tang balances the sweetness of the onions and the buttery rolls. If you replace it with a sharper cheese like cheddar, the flavor profile shifts dramatically, which might not suit everyone.
The Final Flourish
The Hawaiian sweet rolls bring a subtle sweetness and a buttery crust that holds everything together. Two separate butter steps—one for sautéing and one for glazing—ensure the rolls are crisp on the outside and tender on the inside. Salt and black pepper provide the necessary seasoning balance, while the butter adds richness and a glossy finish. Each component plays a crucial role; missing any one of them would throw off the harmony of flavors.
Everything's prepped? Good. Let's get into the real action. And before we proceed, a fun fact that ties the ingredients together.
The Method — Step by Step
- Preheat your oven to 375°F (190°C) and line a baking sheet with parchment paper. Slice the Hawaiian rolls lengthwise, leaving the bottom intact, then lightly butter the cut sides. This ensures a crispy, golden crust while keeping the inside soft. Keep the rolls on a warm towel to prevent them from drying out before baking. The aroma of butter and bread will start to mingle, signaling that the preparation is on track. Remember, the rolls are the canvas for the rest of the masterpiece.
- In a large skillet, melt 6 tablespoons of butter over medium-high heat. Add the shaved beef and sear until browned, about 5 minutes. Stir frequently to prevent sticking and to ensure even cooking. The sizzling sound is a cue that the beef is developing a flavorful crust. Once browned, remove the beef from the pan and set it aside on a plate. The beef will later rejoin the sauce, absorbing all the aromatic flavors.
- In the same skillet, add the remaining butter and sauté diced onion and bell pepper until translucent, about 4 minutes. Stir in the garlic powder and cook for an additional 30 seconds, allowing the spices to bloom. The onions should caramelize slightly, turning golden and fragrant. This step is crucial for building depth; the sweetness of the onions pairs perfectly with the beef’s savory notes. Keep the heat moderate to avoid burning the peppers. The aroma will intensify, making the kitchen feel like a bustling deli.
- Return the beef to the pan, pour in 1 tablespoon of Worcestershire sauce, and season with 1 teaspoon of salt and ½ teaspoon of black pepper. Stir until the beef is evenly coated and the flavors meld, about 2 minutes. The Worcestershire sauce adds a subtle tang that enhances the beef’s natural umami. Taste and adjust seasoning if necessary; a pinch more salt can bring the whole dish together. The mixture should have a slightly glossy sheen, indicating that the butter has fully incorporated. This step ensures each bite is packed with savory goodness.
- While the beef mixture simmers, preheat a second skillet over medium heat. Place slices of provolone cheese on a sheet and toast until the cheese starts to melt, about 1 minute per side. This quick toast creates a slightly caramelized surface that enhances the cheese’s flavor. Keep an eye on the cheese; it should not brown too darkly, or it will taste bitter. Once toasted, set the cheese aside; it will be added to each slider in the next step. The cheese’s gooeyness is the final touch that brings everything together.
- Assemble the sliders: Spoon a generous amount of beef mixture onto each roll, top with a slice of melted provolone, and close the roll. Arrange the sliders on the prepared baking sheet, spacing them evenly. Drizzle the remaining 4 tablespoons of melted butter over the top of each slider to promote a golden crust. Bake for 8–10 minutes, or until the rolls are golden and the cheese is perfectly melty. The butter glaze will give the sliders a glossy, appetizing appearance. Keep an eye on the sliders; they bake quickly once the oven is preheated.
- Remove the sliders from the oven and let them rest for 2 minutes before serving. The rest period allows the cheese to set slightly, preventing a cheese spill when you bite. Serve hot, ideally with a side of creamy ranch or a spicy aioli for dipping. The contrast between the warm, buttery sliders and the cool, tangy sauce is unbeatable. If you’re planning a party, set the sliders on a platter with a decorative garnish like fresh parsley or chives. The presentation will elevate the dish from simple to spectacular.
- That’s it—you did it! But hold on, I've got a few more tricks that'll take this to another level. Keep the sliders warm by covering them with foil until serving. If you’re prepping ahead, store them in an airtight container and reheat in a preheated oven at 350°F for 5 minutes. The butter glaze will re‑melt, restoring that glorious crunch. Remember, the secret to a perfect slider is in the balance of flavors and textures, so don’t skip any step. With these tips, you’ll have a crowd‑pleaser that’s ready in no time. Enjoy the compliments—you’ve earned them.
Insider Tricks for Flawless Results
The Temperature Rule Nobody Follows
Many cooks assume a high heat will cook everything faster, but the key to juicy beef is a steady medium‑high temperature that allows the meat to sear without drying out. If you cook too quickly, the beef will lose its natural juices, resulting in a dry, bland slider. Keep the skillet at a consistent 375°F and monitor the beef with a thermometer; 140°F is the sweet spot. The beef should be browned on the outside while remaining pink inside for maximum flavor. This small temperature tweak can transform a mediocre slider into a showstopper.
Why Your Nose Knows Best
Your nose is your best ally when cooking; it can detect when flavors are balanced or when something needs adjustment. If the beef smells overly metallic, you may have over‑cooked it. A faint, sweet aroma from caramelized onions indicates that you’ve hit the right level of sweetness. Trust your senses: adjust seasoning, add a splash of Worcestershire, or let the onions cook a bit longer based on what you smell. The aroma will guide you to the perfect slider.
The 5-Minute Rest That Changes Everything
After baking, let the sliders rest for exactly five minutes. This brief pause allows the cheese to set, preventing it from oozing onto the roll when you bite. It also lets the flavors meld, creating a richer taste. A friend once skipped this rest period, and the result was a soggy, cheese‑leakage disaster. I’ve learned that this short pause is the difference between a good slider and a great slider. Try it, and you’ll taste the difference.
Keep It Moist Without the Mess
If you’re worried about the rolls drying out during baking, sprinkle a light dusting of water onto the sliders before they go into the oven. The water will create steam, keeping the interior moist while the butter glaze crisps the exterior. Alternatively, cover the sliders loosely with foil for the first half of baking, then remove the foil to allow browning. These tricks keep the sliders tender and flavorful without sacrificing texture.
Make It Party‑Ready in Minutes
For a quick party fix, assemble the sliders on a large platter and use a hand mixer to drizzle melted butter over them. Then, slide the platter under the broiler for 2 minutes, watching carefully. This method gives you a crispy top without a full bake. It’s perfect for game nights when you need to serve a crowd in under 15 minutes. The sliders will still be warm, flavorful, and irresistibly cheesy.
Creative Twists and Variations
This recipe is a playground. Here are some of my favorite ways to switch things up: each twist adds a new layer of flavor or accommodates dietary preferences. I’ll keep the base intact while swapping one component to keep the sliders fresh and exciting. Whether you’re looking for a spicy kick or a low‑carb option, there’s a variation for everyone. Let’s explore the possibilities together.
Cheese Swap Spectacular
Swap the provolone for sharp cheddar or pepper jack for a more robust flavor profile. The cheddar’s sharper taste will cut through the richness of the beef, while pepper jack adds a subtle heat. The cheese should still melt smoothly; if it doesn’t, try a lower heat setting. This swap is perfect for those who prefer a stronger cheese bite and adds an extra dimension to the sliders.
Spicy Kick Edition
Add a handful of crushed red pepper flakes or a splash of hot sauce to the beef mixture for a fiery twist. The heat will complement the sweetness of the onions and the buttery rolls. Keep the spice level moderate; you don’t want it to overpower the other flavors. This variation is ideal for guests who love a little heat in their comfort food.
Veggie‑Heavy Version
Replace the beef with thinly sliced mushrooms or use a plant‑based steak alternative. The mushrooms provide an earthy flavor that pairs well with the onions and peppers. Use a splash of soy sauce to mimic the umami of beef. This version is great for vegetarians or those looking to reduce meat consumption without sacrificing flavor.
Low‑Carb Take
Swap the Hawaiian rolls for low‑carb buns or lettuce wraps. The lettuce will add a fresh crunch and keep the sliders light. Make sure the rolls or wraps are pre‑toasted to prevent sogginess. This twist is perfect for those on a keto or low‑carb diet who still crave that classic Philly flavor.
Gluten‑Free Roll Upgrade
Use gluten‑free rolls or a bagel slice for a different texture. Ensure the rolls are fresh to maintain moisture. The gluten‑free option doesn’t compromise the buttery flavor and is a great alternative for those with dietary restrictions. The sliders will still look and taste impressive.
Breakfast Breakfast (just kidding)
Serve the sliders with a side of scrambled eggs or a drizzle of maple syrup for a brunch twist. The sweet and savory combination will surprise your guests and add a playful element to your breakfast spread. The sliders’ rich flavor pairs well with a hearty breakfast, making it a versatile dish for any time of day.
Storing and Bringing It Back to Life
Fridge Storage
Store assembled sliders in an airtight container for up to 3 days in the refrigerator. Keep the butter glaze separate to maintain crispness. When ready to serve, reheat in a 350°F oven for 5 minutes to revive the cheese’s gooeyness. Avoid microwaving; it can make the rolls soggy. The sliders will taste fresh and delicious after proper storage.
Freezer Friendly
Freezing is a great way to keep the sliders for later. Wrap each slider tightly in foil or plastic wrap, then place them in a freezer bag. They can be stored for up to 2 weeks. When you’re ready to enjoy, thaw in the refrigerator overnight and bake at 350°F for 10 minutes. The texture remains nearly identical to freshly made sliders.
Best Reheating Method
The best way to reheat is in a preheated oven at 350°F for 5–10 minutes. Add a splash of water to the baking sheet to create steam, which keeps the interior moist. If you’re short on time, microwave on high for 1 minute, then transfer to a skillet for a quick crisp. The key is to reheat gently to preserve the buttery crust and melty cheese.