Picture this: a Saturday afternoon, a half‑finished pot roast on the stove, the kitchen smelling like a smoky barbecue, and a friend on the phone insisting, “You’ve got to try the rotisserie version.” I stared at the half‑cooked pork, then at the recipe that had been floating in my mind all week—an idea that was half‑inspired by a trip to a Mediterranean market and half‑born from a kitchen disaster that left me with a dry, flavorless roast. That moment was the spark that set me on a mission to create a dish that would make the whole house breathe, and I’ve been chasing that aroma ever since.
When the pork finally hit the rotisserie, the sound was unmistakable: a low, steady hum, the sizzle of fat melting into the air, and that instant, almost electric, crackle as the meat kissed the grill. The scent that rose was a heady mix of oregano, cumin, and smoked paprika, layered with the bright citrus tang of lemon and the subtle acidity of red wine vinegar. I could taste the promise of juicy, tender meat just by watching it turn, the edges crisping to a golden‑brown perfection that would shatter like thin ice if you pressed it with a fork. It was the kind of moment that makes you feel like a culinary wizard, and I couldn’t resist sharing every single detail.
What makes this version stand out, you ask? It’s a combination of a few game‑changing elements: a yogurt‑based rub that locks in moisture, a balanced spice blend that cuts through the richness, and the use of fresh vegetables that add crunch and brightness. The result is a dish that feels both indulgent and wholesome, a single plate that could serve as a hearty dinner or a crowd‑pleasing appetizer. I dare you to taste this and not go back for seconds; the flavors are so layered, they keep coming back. And if you’ve ever struggled with rotisserie meat that comes out dry or too greasy, you’re not alone—this is the fix you’ve been waiting for.
Most recipes get this completely wrong, focusing either on the meat or the sauce but never both. Here’s what actually works: the yogurt coating keeps the meat moist, the citrus lifts the heaviness, and the fresh veggies provide a crisp counterpoint. Picture yourself pulling this out of the oven, the whole kitchen smelling incredible, and everyone asking, “What’s the secret?” That secret is simple, but it’s delivered with a flair that will make you feel like a chef in your own home kitchen.
Okay, ready for the game‑changer? Let me walk you through every single step—by the end, you’ll wonder how you ever made it any other way. From the initial marination to the final assembly in warm pita, each element is designed to amplify flavor, texture, and visual appeal. Get your apron on, because this is going to be a delicious adventure that will stay in your memory for months.
What Makes This Version Stand Out
- Taste: The yogurt rub creates a silky, tangy coating that balances the savory depth of the meat. It’s the difference between a plain roast and a flavor explosion.
- Texture: The rotisserie method gives the meat a crisp exterior while keeping the interior juicy and tender. The result is a satisfying bite that’s hard to resist.
- Freshness: Adding tomatoes, red onion, lettuce, and parsley not only boosts nutrition but also adds a bright, crunchy contrast to the richness.
- Convenience: Marinating the meat ahead of time means you can prepare it the night before, saving precious minutes on a busy day.
- Versatility: The core recipe works with either pork or chicken, and you can swap in other proteins like lamb or beef for a twist.
- Make‑ahead Potential: The assembled pita can be wrapped and frozen, then reheated for a quick, flavorful meal later.
- Ingredient Quality: Using high‑quality Greek yogurt and fresh herbs elevates the dish from ordinary to extraordinary.
- Crowd Reaction: This dish is a conversation starter—guests rave about the juicy meat and the vibrant, fresh toppings.
Inside the Ingredient List
The Flavor Base
At the heart of this recipe is a yogurt‑based rub that marries moisture with flavor. Greek yogurt is thick, creamy, and a perfect carrier for spices, ensuring the meat stays juicy while absorbing every aromatic note. The yogurt also reacts with the acid in lemon juice, creating a tenderizing effect that makes the pork or chicken practically melt in your mouth. If you skip the yogurt, you’ll end up with a dry roast that lacks the silky texture that makes this dish unforgettable.
Olive oil is the silent hero that binds the rub together and helps the spices adhere. Its mild flavor complements the herbs without overpowering them, and the fat content helps the meat brown beautifully. If you’re looking to cut calories, you can reduce the oil by a tablespoon, but the texture will be slightly less glossy.
Garlic, lemon juice, and red wine vinegar form a vibrant, acidic backbone. Garlic adds depth and a hint of heat, while lemon juice brings brightness and cuts through the richness. Red wine vinegar offers a subtle tang that lingers on the palate. Together, they create a balanced flavor profile that’s both bold and harmonious.
The Texture Crew
Smoked paprika and cumin are the duo that gives the meat its signature color and smoky undertones. Smoked paprika brings a subtle smokiness that mimics the rotisserie’s char, while cumin adds a warm, earthy depth. Together, they’re the foundation of the meat’s flavor profile. If you’re sensitive to heat, reduce the cumin to half a teaspoon; the dish will still be delicious.
Dried oregano, a classic Mediterranean herb, infuses the rub with a slightly bitter, herbal note that cuts through the fat. It also pairs beautifully with the fresh parsley added at the end, creating a cohesive herbaceous theme. If you can’t find oregano, a mix of thyme and rosemary works well, though the flavor will shift slightly.
The Unexpected Star
Fresh parsley, used as a garnish, adds a pop of color and a bright, grassy finish. It’s the final touch that lifts the dish, making it feel fresh and vibrant. If parsley is out of season, cilantro offers a different but equally refreshing herbal note.
Tomatoes, red onion, and lettuce provide crunch, juiciness, and a refreshing counterbalance to the savory meat. The tomatoes’ natural sweetness and acidity echo the lemon and vinegar in the rub, while the onion adds sharpness. Lettuce leaves bring a crisp bite that makes each bite feel lighter. Skipping any of these vegetables will reduce the dish’s complexity and freshness.
Everything’s prepped? Good. Let’s get into the real action...
The Method — Step by Step
- Step 1: Marinate the Meat. In a bowl, whisk together the Greek yogurt, olive oil, minced garlic, lemon juice, red wine vinegar, dried oregano, cumin, smoked paprika, salt, and pepper. Gently fold the pork or chicken into the mixture, ensuring each piece is fully coated. Cover and refrigerate for at least 2 hours, preferably overnight, to let the flavors penetrate deep into the muscle fibers. This step is where the magic begins—if you skip it, the meat will be flat and lifeless.
- Step 2: Prepare the Rotisserie. If you’re using a countertop rotisserie, preheat it to medium (about 350 °F). Thread the marinated meat onto the spit, balancing the weight so it turns evenly. If you’re using a grill, set it up for indirect heat and place a drip pan below the meat to catch juices. The goal is to cook the meat slowly, allowing the fat to render and the juices to infuse the rub.
- Step 3: Roast to Perfection. Roast the meat for 45 minutes, turning it every 10 minutes to ensure even browning. The meat should develop a deep mahogany crust while the interior remains pink and juicy. A digital thermometer inserted into the thickest part should read 145 °F for pork or 165 °F for chicken. If you notice the surface drying out, brush it lightly with a mixture of olive oil and lemon juice.
- Step 4: Rest the Meat. Once the meat reaches the desired temperature, remove it from the rotisserie and let it rest for 10 minutes. This allows the juices to redistribute, ensuring each bite stays moist. I’ve seen people skip this step, only to end up with a dry roast that feels like a piece of cardboard.
- Step 5: Slice Thinly. Slice the rested meat into thin, even strips. The thinness is key—it ensures the meat melds with the pita and toppings without overwhelming them. If you prefer thicker slices, just be aware the bite will be more substantial.
- Step 6: Prepare the Vegetables. While the meat rests, dice the tomato, slice the red onion thinly, and tear the lettuce into bite‑sized pieces. Roughly chop the parsley and set aside. The freshness of these vegetables is what turns a simple sandwich into a vibrant, balanced dish.
- Step 7: Warm the Pita. Warm the pita breads in a dry skillet over medium heat for about 30 seconds per side, or wrap them in foil and heat in a 350 °F oven for 5 minutes. Warm pita holds the filling better and adds a subtle toasty flavor. If you forget this step, the pita will be cold and soggy once the juices seep in.
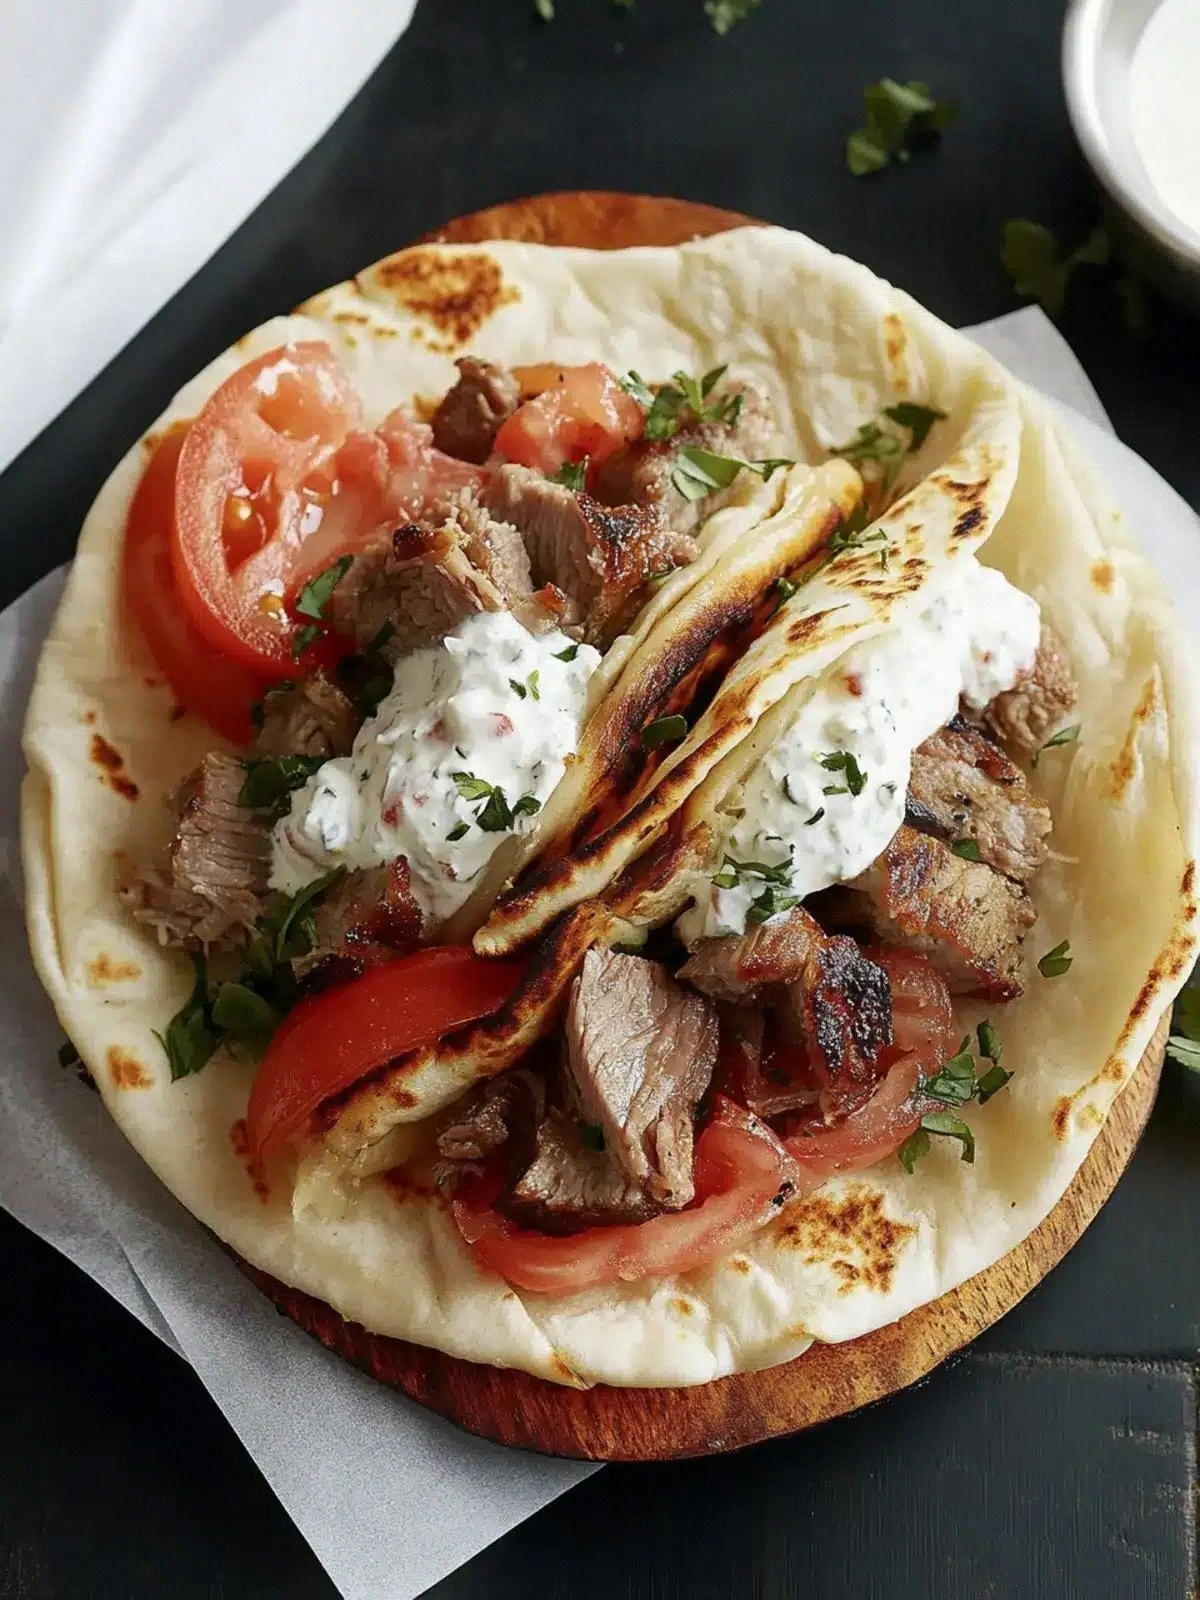
- Step 8: Assemble. Lay a slice of pita on a plate, pile the sliced meat, then top with tomato, onion, lettuce, and parsley. Drizzle a little extra lemon juice or a spoonful of yogurt sauce if you like. Fold the pita in half and serve immediately. The combination of textures—crunchy veggies, juicy meat, soft pita—creates a symphony of flavors that will have everyone asking for seconds.
- Step 9: Serve and Enjoy. Plate the pita with a side of fresh herbs or a small bowl of tzatziki for dipping. The dish is best enjoyed hot, but if you’re planning ahead, wrap the pita in parchment paper and store it in the fridge for a quick grab‑and‑go lunch. Remember, the key to a great rotisserie pita is balance: not too greasy, not too dry, and always bursting with fresh flavor.
Insider Tricks for Flawless Results
The Temperature Rule Nobody Follows
Many home cooks aim for a “medium” heat, but that can be too hot for this dish. Aim for a steady 350 °F and keep the meat rotating. A lower temperature allows the fat to render slowly, creating a juicy interior while still achieving that desirable char on the outside. If you’re using a grill, set up a two‑zone fire: one side for direct heat and the other for indirect, so you can move the meat as it cooks.
Why Your Nose Knows Best
During the roasting process, you’ll notice the aroma shift from the initial garlic and herbs to a deeper, caramelized scent. Trust that smell—when the meat starts to emit a sweet, slightly smoky fragrance, it’s a sign the exterior is crisping properly. If you’re uncertain, give the meat a quick press; a firm, slightly springy feel indicates it’s ready.
The 5-Minute Rest That Changes Everything
Resting the meat for just five minutes after removing it from heat is often overlooked, but it’s critical. This pause lets the juices redistribute, preventing them from spilling out when you slice. Skipping the rest can lead to a dry, uneven bite. If you’re in a rush, cover the meat loosely with foil to keep it warm while it rests.
Layering for Flavor Depth
When assembling the pita, start with the meat, then layer the tomato, onion, lettuce, and parsley. This order ensures each bite contains a mix of textures and flavors. The veggies’ juices mingle with the meat’s fat, creating a cohesive taste that’s more than the sum of its parts.
Finishing Touches
A quick drizzle of lemon juice or a dollop of yogurt sauce right before serving adds brightness and moisture. If you prefer a bit of heat, sprinkle a pinch of crushed red pepper flakes. The final garnish is not just decorative; it’s a flavor enhancer that elevates the entire dish.
Creative Twists and Variations
This recipe is a playground. Here are some of my favorite ways to switch things up:
Spicy Mediterranean Wrap
Swap the Greek yogurt for a spicy harissa yogurt blend, and add a handful of chopped roasted red peppers. The heat from the harissa pairs beautifully with the smoky paprika, while the roasted peppers add a sweet, smoky undertone. This version is perfect for those who love a kick.
Lemon‑Herb Chicken Tacos
Use chicken breast instead of pork, and serve the meat in corn tortillas with a squeeze of lime, a sprinkle of fresh cilantro, and a dollop of avocado crema. The bright lime cuts through the richness, and the creamy avocado provides a velvety finish.
BBQ Fusion Pita
Replace the oregano and cumin with a tablespoon of smoky BBQ sauce in the rub, and finish the pita with a drizzle of tangy BBQ sauce and a handful of coleslaw. This fusion takes the dish into the realm of classic American BBQ, offering a new flavor profile that’s both familiar and exciting.
Veggie‑Rich Power Wrap
For a vegetarian version, replace the meat with grilled halloumi or tofu slices marinated in the same yogurt rub. Add sliced avocado, roasted zucchini, and a handful of spinach for extra nutrition. The tofu’s texture mimics the meat’s chew, while the veggies add crunch.
Gourmet Pita with Pesto
Stir in a spoonful of basil pesto into the yogurt rub, and top the finished pita with fresh basil leaves and grated Parmesan. The pesto adds an herbal, nutty depth, while the Parmesan brings a salty, umami finish.
Low‑Carb Twist
Serve the meat and veggies in a lettuce wrap instead of pita for a low‑carb alternative. The crisp lettuce provides a satisfying crunch, and the low‑carb wrap keeps the dish light and fresh.
Storing and Bringing It Back to Life
Fridge Storage
Store the assembled pita in an airtight container or wrap tightly in parchment paper and foil. Keep it in the fridge for up to 2 days. When you’re ready to eat, simply reheat in a skillet over medium heat for 2–3 minutes, or microwave on high for 30 seconds, until the pita is warm and the filling is heated through.
Freezer Friendly
Wrap the pita individually in foil and place in a freezer bag. Freeze for up to 3 months. When you’re ready to enjoy, thaw overnight in the fridge or defrost in the microwave. Reheat as described above for best results.
Best Reheating Method
Reheat the pita in a dry skillet or on a grill over medium heat; this restores the crispness of the bread and prevents sogginess. For a quick microwave method, wrap the pita in a damp paper towel and microwave for 20–30 seconds. Add a splash of water before reheating to create steam that keeps the filling moist and the pita from drying out.