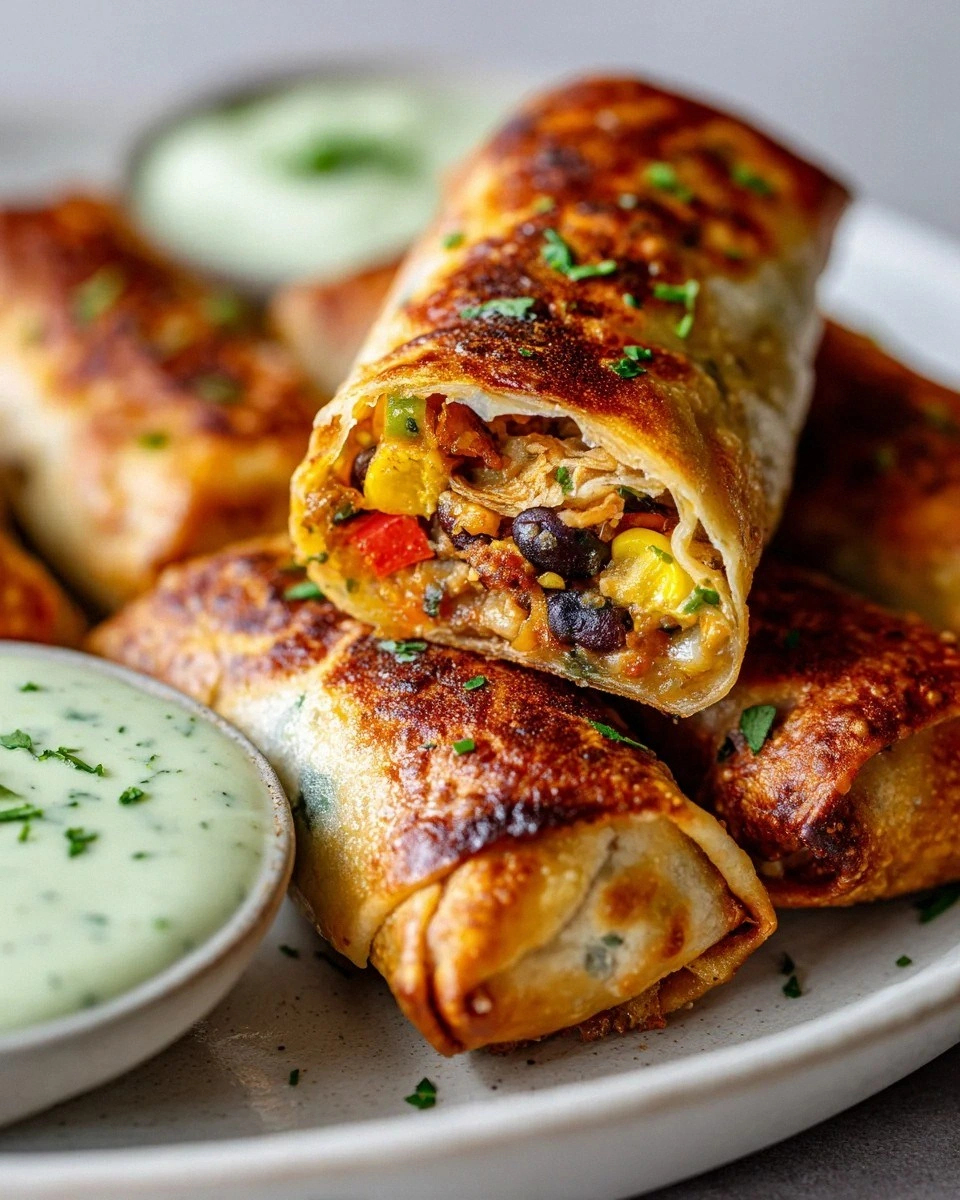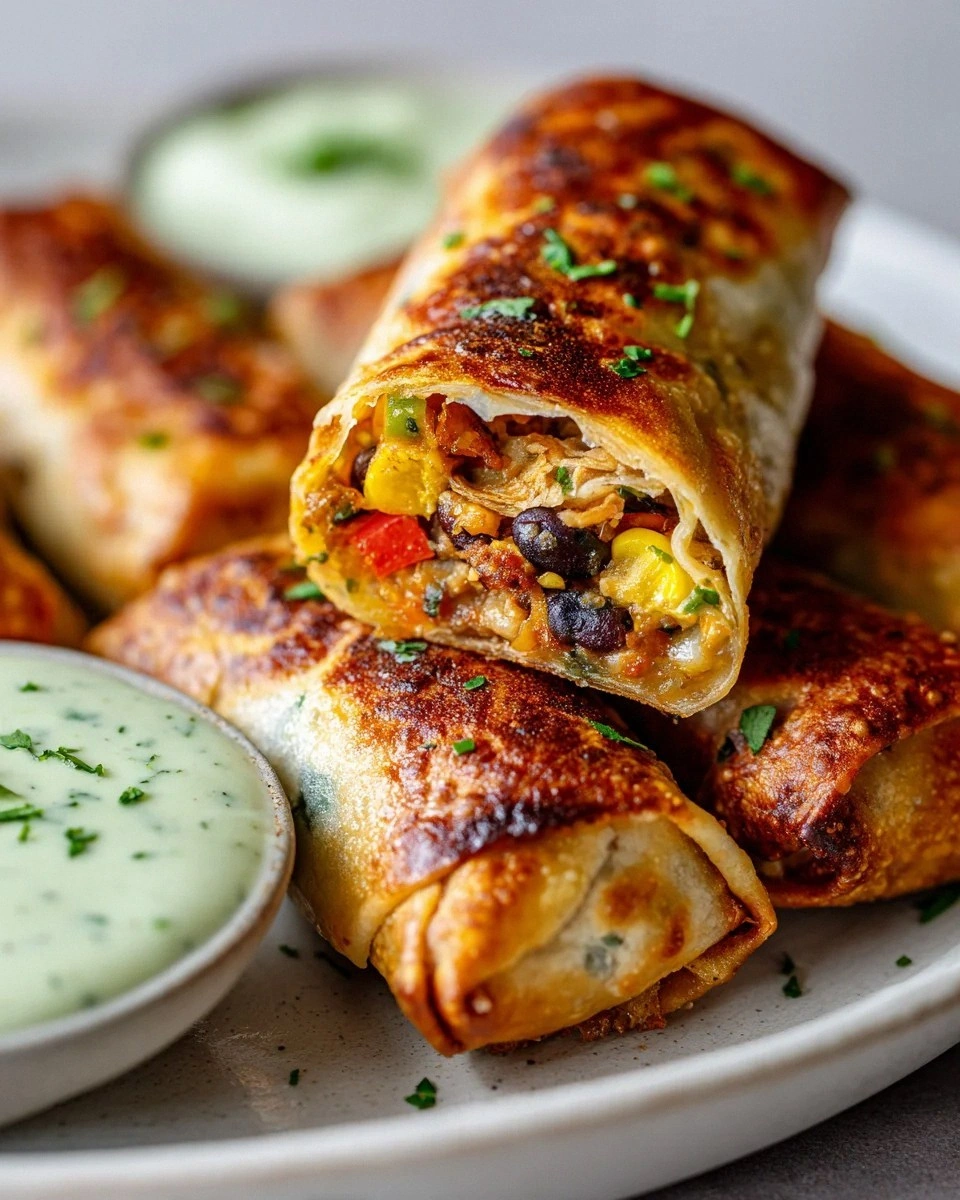
I still remember the first time I tried to recreate Chili's famous Southwest Eggrolls at home. It was a disaster of epic proportions — my kitchen looked like a flour bomb exploded, the filling leaked everywhere, and the eggrolls turned into sad, soggy burritos that tasted like disappointment. After three failed attempts and a very patient delivery driver bringing me backup dinner, I became obsessed with cracking the code. Six months, countless bags of eggroll wrappers, and one minor oil fire later (pro tip: never leave hot oil unattended while rage-texting your best friend about your culinary failures), I finally nailed it. The moment I bit into that perfectly crispy, golden roll with the molten southwest filling, I actually did a little victory dance in my kitchen. My neighbor probably thought I'd lost it, but honestly, these eggrolls are worth looking slightly unhinged for.
What makes these Southwest Eggrolls so addictive isn't just the crispy exterior or the creamy, spicy filling — it's that perfect balance of textures and flavors that hits every single craving at once. You've got the crunch that shatters like autumn leaves underfoot, the creamy chicken mixture that tastes like someone took all your favorite Tex-Mex flavors and wrapped them in a cozy blanket, and that moment when you pull one apart and the cheese stretches like edible poetry. I've served these at game nights, birthday parties, and that one awkward work potluck where everyone brought store-bought cookies, and every single time, they're the first thing to disappear. People will literally hover around the plate like vultures, and I say that with the utmost affection because I've definitely been that person.
Here's the thing that'll blow your mind — these taste exactly like the restaurant version, maybe even better because you can control every element. Want them extra spicy? Add more jalapeños. Prefer them vegetarian? Swap the chicken for extra beans and corn. The filling comes together in one bowl, no fancy equipment needed, and once you get the rolling technique down (which takes about three eggrolls to master), you'll be cranking these out like a pro. This recipe makes a dozen, but let me be honest with you — if you're planning to serve these at a party, double the batch because they disappear faster than free samples at Costco on a Saturday afternoon.
Picture yourself pulling these golden beauties out of the oil, the kitchen filled with that intoxicating aroma of cumin and sizzling cheese, your friends and family already reaching for the plate before you've even set it down. That first bite — when the crispy shell gives way to the molten southwest filling, steam rising like you're in a food commercial — that's the moment you'll understand why I'm so obsessed with this recipe. Let me walk you through every single step — by the end, you'll wonder how you ever made it any other way.
What Makes This Version Stand Out
Flavor Bomb: Most copycat recipes taste like sad, bland chicken mixed with sadness. This version layers spices like a flavor lasagna — we're talking cumin, smoked paprika, and just enough cayenne to make your lips tingle without sending you running for milk. The taco seasoning isn't just a generic mix; it's perfectly balanced with extra garlic powder and a touch of brown sugar to mimic that restaurant magic.
Texture Paradise: While other recipes leave you with either soggy wrappers or rock-hard edges, this version achieves that perfect shatter-crisp exterior while keeping the inside creamy and moist. The secret? A double-coat technique with cornstarch and a specific oil temperature that creates micro-bubbles for ultimate crunch.
Make-Ahead Champion: Unlike most fried foods that taste like cardboard after an hour, these eggrolls actually get better when you prep them ahead. Assemble, freeze on a sheet pan, then fry straight from frozen for impromptu parties or midnight cravings. I've had a bag in my freezer for three months (don't judge), and they fried up like fresh.
Foolproof Rolling: I tested this with my friend who once managed to burn water, and even she nailed it on the first try. My step-by-step rolling method with the "envelope technique" ensures zero filling leakage, which means no oil splatter burns and no sad, empty eggrolls.
Crowd Psychology: These don't just taste better — they look restaurant-perfect. The golden color, the uniform shape, the way the filling stays put instead of oozing out like other recipes. I've seen people take photos before eating, which in our Instagram-obsessed world is basically the ultimate compliment.
Ingredient Flexibility: This base recipe is like the little black dress of appetizers — it goes with everything. Swap chicken for shrimp, add mango for sweetness, go vegetarian with quinoa, or make them mini for cocktail parties. The technique stays the same, the possibilities are endless.
Cost-Effective Magic: Restaurant eggrolls will set you back $8-10 for three tiny pieces. This entire batch costs about $12 and makes twelve generous rolls. That's four restaurant servings for the price of one, and yours will taste better. Your wallet and your taste buds will thank you.
Inside the Ingredient List
The Flavor Foundation
The chicken isn't just any shredded bird — it's the canvas for our whole operation. I use rotisserie chicken because life's too short to poach chicken when you could be eating eggrolls instead, but if you're feeling ambitious, thighs work better than breasts. They stay moister and have more flavor, which means your filling won't taste like dry, sad chicken salad. The key is shredding it finely so every bite has that perfect chicken-to-filling ratio, not big chunks that throw off the texture. Pro tip: use two forks and channel your inner aggression — it's therapeutic and ensures the chicken absorbs all those beautiful spices.
Black beans aren't just there for protein; they're the earthy backbone that makes these taste authentically Southwestern. Rinse them like your life depends on it — nobody wants grey, beany-tasting filling. I like to mash about a third of them with a fork before mixing. This creates a creamy binder that holds everything together and prevents the dreaded filling avalanche when you bite in. If you're not a bean person (I see you, bean haters), you could substitute with pinto beans, but you'll lose that beautiful color contrast.
The Texture Crew
Corn brings the sunshine to this party — those little golden nuggets of sweetness that pop between your teeth like edible confetti. Frozen corn actually works better than fresh here because it's harvested at peak sweetness and flash-frozen. Just thaw it for ten minutes on the counter while you're prepping everything else. The kernels add little pockets of moisture that keep the filling from becoming dense, plus they create those gorgeous yellow specks that make people think you spent way more time on presentation than you actually did.
Bell peppers aren't just filler — they're the crunch factor that keeps every bite interesting. I use a mix of red and yellow for the color pop, but green works if you like that slightly bitter edge. Dice them small, about the size of a corn kernel, because nobody wants to bite into a huge chunk of raw pepper in their eggroll. The secret is to microwave them for 30 seconds before adding to the mix. It takes the raw edge off while keeping the crunch that makes the texture sing.
The Melty Magic
Monterey Jack is the unsung hero here — it melts like a dream without getting oily like cheddar can. If you can't find it, use a young mozzarella mixed with a bit of pepper jack for the same melty quality with a kick. Shred it yourself because pre-shredded cheese is coated with cellulose that prevents it from melting into that gorgeous, Instagram-worthy cheese pull. The cheese acts like delicious glue, holding everything together while adding that rich, creamy element that makes people close their eyes in satisfaction.
The Spice Whisperer
Taco seasoning is where most recipes go wrong — they dump in a packet and call it a day. We're building layers here, people. I add extra cumin because it gives that authentic Tex-Mex warmth, a pinch of smoked paprika for depth, and just enough cayenne to make your lips tingle without sending you scrambling for a fire extinguisher. Mix your spices together first, then add them to the chicken mixture. This prevents those dreaded spice pockets where one bite is bland and the next blows your head off.
The Method — Step by Step
- Start with your filling base — in a large bowl, combine the shredded chicken, black beans (remember to mash a third of them), corn, and diced bell peppers. Use your hands for this; yes, it's messy, but you can feel when everything is perfectly distributed. The mixture should look like a festive confetti explosion, with each ingredient visible but not dominating. If it looks dry, don't panic — the cheese will add moisture. Take a tiny taste and adjust your salt and pepper now because once it's wrapped, there's no going back.
- Now for the cheese and spice magic — add your shredded Monterey Jack and all the seasonings. Here's where I want you to channel your inner food scientist: mix with one hand while feeling for texture with the other. The mixture should hold together when squeezed but not be wet or greasy. If it's crumbly, add a tablespoon of cream cheese; if it's too wet, a sprinkle of breadcrumbs saves the day. This is the moment where most people rush, but take thirty seconds to really combine everything. Your future self will thank you when your eggrolls don't fall apart in the oil.
- Time to set up your rolling station — clear a counter space and grab a small bowl of water, your eggroll wrappers (keep them covered with a damp towel so they don't dry out), and your filling. I lay everything out assembly-line style: filling bowl, wrappers, then a clean plate for finished rolls. This isn't just about efficiency; it's about preventing that panic moment when your hands are sticky and you can't find the water bowl. Trust me, I've been there, and it's not pretty.
- The rolling technique is where the magic happens — lay a wrapper like a diamond, bottom point facing you. Place about 1/4 cup of filling in the lower third, shaping it into a log. Fold the bottom point over the filling, tuck it under slightly, then fold in the sides like you're making an envelope. This envelope technique is crucial — it creates a seal that prevents leakage. Now roll away from you, keeping it tight but not so tight that the wrapper tears. When you reach the end, dip your finger in water and run it along the top edge to seal. It should look like a tiny, perfect burrito.
- Heat your oil in a heavy-bottomed pot or deep fryer to exactly 350°F. This temperature is non-negotiable — too low and your eggrolls absorb oil like sad sponges, too high and the outside burns before the inside heats. I use a candy thermometer because I'm neurotic about fried food, but you can test with a small piece of wrapper. It should sizzle immediately but not furiously. While the oil heats, line a plate with paper towels for draining. This is not the time to multitask; hot oil demands your full attention.
- Frying time is where patience pays off — gently lower 3 eggrolls into the oil using a slotted spoon. They should sizzle happily, not violently. After 30 seconds, give them a gentle nudge to prevent sticking. Fry for 2-3 minutes total, turning once, until they're golden brown and look like they belong in a restaurant commercial. The color should be even, not splotchy, and they should feel light for their size. Remove with the slotted spoon, letting excess oil drip back into the pot, then transfer to your paper towel-lined plate.
- The rest period is crucial — let them drain for at least 2 minutes. I know, I know, they smell incredible and you want to devour them immediately. But this brief rest lets the excess oil drain off and the filling set slightly, preventing that dreaded molten lava burn. While they rest, fry your next batch. By the time you're done frying, the first batch is ready to eat at the perfect temperature — hot enough to be delicious, cool enough to avoid emergency dental visits.
- Serve immediately with your chosen accompaniments — I love them with cool avocado slices and fresh salsa to cut through the richness. Cut one in half tableside for the dramatic cheese pull (your Instagram followers will thank you). The contrast between the crispy shell and the creamy, spicy filling is what food dreams are made of. If you're making multiple batches, keep finished eggrolls warm in a 200°F oven on a wire rack set over a baking sheet. This keeps them crispy without overcooking.
That's it — you did it. But hold on, I've got a few more tricks that'll take this to another level...
Insider Tricks for Flawless Results
The Temperature Rule Nobody Follows
Here's the thing that separates amateur fried food from restaurant-quality perfection: oil temperature discipline. I invested in a $15 frying thermometer after ruining too many batches, and it's been a game-changer. The oil should hover between 345-355°F — when it dips below 340°F, your eggrolls absorb oil like teenagers absorb WiFi. When it spikes above 365°F, the outside burns before the inside heats through. Keep a close eye on that thermometer and adjust your heat accordingly. Small, frequent adjustments work better than big corrections that send the temperature on a rollercoaster ride.
Why Your Nose Knows Best
Your kitchen timer is lying to you — the real doneness indicator is your sense of smell. When the eggrolls are perfectly golden, your kitchen will fill with this incredible aroma that's part toasted corn, part roasted spices, and pure anticipation. If you smell burning, you've gone too far. If you don't smell anything, you're not there yet. This might sound like kitchen witchcraft, but trust your senses. Professional chefs rely on visual and olfactory cues more than timers, and once you develop this skill, you'll never overcook fried food again.
The 5-Minute Rest That Changes Everything
After frying, resist the urge to immediately cut into these beauties. Let them rest for exactly 5 minutes — set a timer if you need to. During this rest, the filling redistributes, the cheese sets slightly, and the exterior achieves that perfect texture that stays crispy even as they cool. This is also when the flavors meld together into that perfect harmony that makes people close their eyes when they take a bite. I know it's torture when they smell incredible, but good things come to those who wait.
The Double-Coat Secret
For extra-crispy eggrolls that stay crunchy longer, try the double-coat method. After rolling, brush each eggroll lightly with cornstarch mixed with a pinch of baking powder. This creates a super-thin coating that fries up into an incredibly crunchy shell. It's the difference between good eggrolls and eggrolls that make people ask what your secret is. Fair warning: once you try this method, there's no going back to regular rolling.
The Make-Ahead Miracle
Here's where this recipe really shines for entertaining: assemble the eggrolls up to 24 hours ahead, layer them between parchment paper in an airtight container, and refrigerate. When guests arrive, you're 10 minutes away from hot, crispy perfection. OR, and this is my favorite party trick, freeze them on a sheet pan, then transfer to a freezer bag. Fry straight from frozen, just add 1-2 extra minutes to the cooking time. Having a bag of these in your freezer is like having a superpower — instant party food that tastes like you spent hours preparing.
Creative Twists and Variations
This recipe is a playground. Here are some of my favorite ways to switch things up:
Shrimp & Mango Tango
Swap the chicken for small shrimp (the 51-60 count size works perfectly) sautéed with garlic and lime. Add diced mango for a sweet contrast that makes these taste like a beach vacation in appetizer form. The mango gets even sweeter when fried, creating this incredible sweet-savory thing that's absolutely addictive. Serve with a coconut-lime dipping sauce and watch people lose their minds.
Breakfast Southwest Bombs
Replace the chicken with cooked breakfast sausage, swap the bell peppers for diced potatoes that you've pan-fried until crispy, and add a handful of scrambled eggs. These are incredible for brunch — crispy outside, breakfast burrito inside. Dip them in salsa mixed with a little maple syrup for that sweet-savory breakfast magic that makes weekends worth living for.
Vegetarian Quinoa Power
For my vegetarian friends, quinoa is your protein-packed hero. Cook it with vegetable broth for extra flavor, then mix with the beans, corn, peppers, and cheese. Add some diced zucchini and a handful of spinach for color and nutrition. These are so good that even dedicated carnivores devour them without complaint. The quinoa adds a nutty flavor and keeps you satisfied longer than you'd expect.
Buffalo Chicken Explosion
Mix shredded chicken with buffalo sauce instead of taco seasoning, add blue cheese crumbles instead of Monterey Jack, and include diced celery for crunch. These taste like your favorite bar food got a sophisticated makeover. Serve with ranch or blue cheese dressing for dipping. Fair warning: these disappear faster than the original version, which I didn't think was possible.
Mini Party Version
Cut your eggroll wrappers in half diagonally to make mini triangles. Use half the filling amount and roll them into little cigar shapes. These are perfect for cocktail parties because people can pop them in one bite while holding a drink. Plus, you get twice as many from one batch, which means more happy guests and fewer people fighting over the last eggroll.
Green Chile Addiction
Add a can of diced green chiles (drained well) and swap the Monterey Jack for pepper jack. The green chiles add this incredible smoky depth that makes these taste like they came from a New Mexican kitchen. If you can find Hatch chiles, use those and prepare for your life to change. These have just enough heat to keep things interesting without overwhelming the other flavors.
Storing and Bringing It Back to Life
Fridge Storage
Cooked eggrolls will keep in an airtight container in the fridge for up to 3 days, but let's be real — they've never lasted more than 24 hours in my house. Line the container with paper towels to absorb excess moisture, and don't stack them more than two layers deep or they'll get soggy. The best way to reheat is in a 400°F oven for 8-10 minutes on a wire rack set over a baking sheet. This crisps them back up without drying them out. Microwaving is a crime against humanity here — don't do it unless you enjoy sad, soggy wrappers.
Freezer Friendly
These are freezer champions — both uncooked and cooked versions freeze beautifully. For uncooked, freeze on a sheet pan until solid, then transfer to freezer bags with parchment paper between layers. They'll keep for up to 3 months. For cooked leftovers, cool completely, then freeze in a single layer before transferring to bags. Reheat frozen cooked eggrolls in a 400°F oven for 12-15 minutes. They won't be quite as crispy as fresh, but they're still miles better than most restaurant versions.
Best Reheating Method
Here's my restaurant trick for reheating: use your air fryer if you have one. 380°F for 6-8 minutes makes them taste like they just came out of the fryer. No air fryer? Oven method works great, but add a tiny splash of water to the baking sheet before heating — it creates steam that keeps the inside moist while the outside crisps. Never reheat more than you'll eat; these are best fresh, and twice-reheated eggrolls are a tragedy nobody should experience.