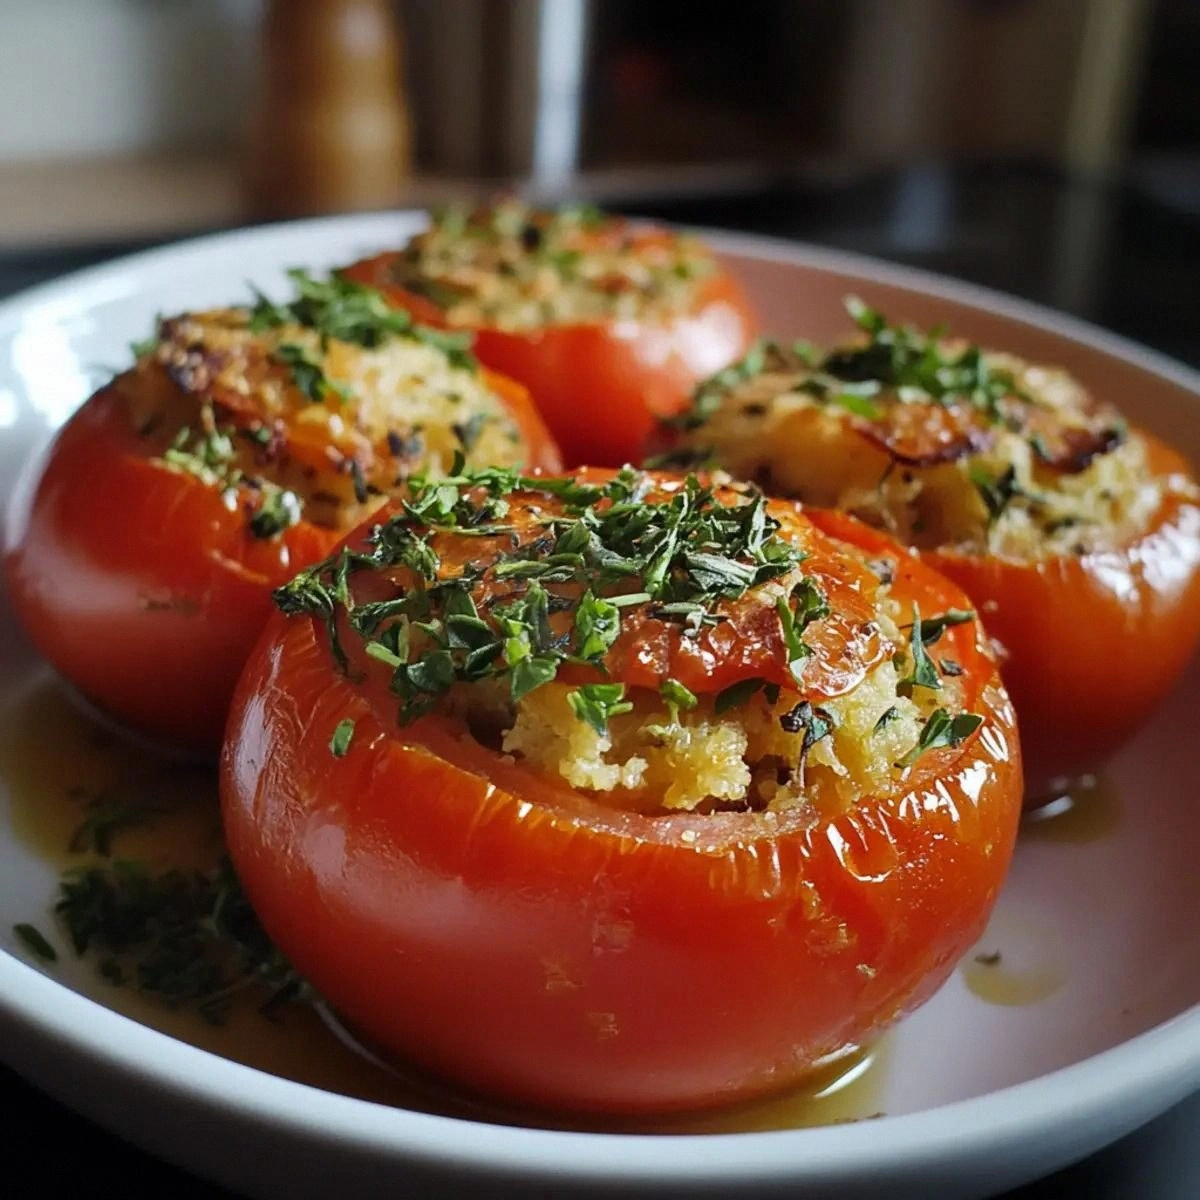
Picture this: a scorching summer afternoon, the garden buzzing with cicadas, and the kitchen smelling like burnt sugar from a failed soufflé. I stared at the blistered oven door, feeling the heat seep through my jacket, and thought, “I need a dish that’s fresh, forgiving, and absolutely glorious.” The answer came in the form of a humble tomato, its ruby skin glistening like a promise. I grabbed a handful of ripe tomatoes, tossed them in a bowl, and decided to turn them into the star of the evening.
I sliced the tops off, scooped out the seeds, and filled the hollow with a fragrant medley of herbs, garlic, and breadcrumbs. The aroma that rose was a sunlit bouquet—thyme, rosemary, basil, and a whisper of lemon zest mingled in a dance that made my mouth water. As I slid the stuffed tomatoes onto a baking sheet, the sound of the oven preheating was a comforting, low rumble that felt like a promise of warmth. I dared myself to taste the mixture before baking, and the first bite was a revelation: a crispy, cheesy crust surrounding a juicy, herb‑laden center.
I dared you to taste this and not go back for seconds. If you’ve ever tried a stuffed tomato that felt flat or too watery, you’re not alone. Most recipes get this completely wrong, adding too much liquid or not enough crunch. I’ve spent countless hours tweaking the ratio of breadcrumbs to juice, and I finally found the sweet spot where the stuffing holds together yet still melts into a silky, savory sauce.
The beauty of this version is that it’s both simple and sophisticated. You need only a handful of fresh ingredients, and the technique is straightforward: hollow, stuff, bake. The result is a dish that feels like a celebration of Provence, even if you’re cooking in a cramped kitchen. I’ll be honest—I ate half the batch before anyone else got to try it. That’s the power of flavor, my friends: once you taste it, you can’t stop.
Let me walk you through every single step—by the end, you’ll wonder how you ever made it any other way. This is hands down the best version you'll ever make at home, and I’m about to share the secret that turns ordinary tomatoes into a culinary masterpiece.
What Makes This Version Stand Out
- Taste: The blend of fresh thyme, rosemary, basil, and a hint of lemon zest creates a bright, aromatic profile that lifts the natural sweetness of the tomato. The Parmesan adds a salty, nutty depth that balances the herbs.
- Texture: The breadcrumb coating crisps into a golden crust while the inside remains moist and tender, offering a delightful contrast with every bite.
- Ingredient Quality: Using only the freshest, locally sourced herbs and ripe tomatoes guarantees a flavor that’s vibrant and authentic.
- Simplicity: No complex sauces or elaborate preparations—just a few steps that anyone can master in under an hour.
- Crowd Reaction: Guests rave about the eye‑catching presentation and the burst of flavors. It’s a dish that turns a casual dinner into an elegant affair.
- Make‑Ahead Potential: The stuffed tomatoes can be assembled a day ahead and refrigerated, then baked right before serving for ultimate convenience.
- Versatility: The recipe adapts to dietary preferences—swap breadcrumbs for almond meal for gluten‑free, or use a vegan cheese for a plant‑based version.
- Seasonality: Though it’s a general recipe, it shines during tomato season in late summer, when the fruit is at its peak.
Inside the Ingredient List
The Flavor Base
Fresh thyme, rosemary, and basil are the heart of this dish. These herbs bring earthy, piney, and sweet notes that complement the tomato’s natural acidity. If you skip one, the flavor profile will feel incomplete—think of it as removing a chord from a melody. Swap dried herbs for fresh if you’re in a pinch, but remember that dried herbs are more concentrated; use about half the amount.
The Texture Crew
Breadcrumbs are the unsung hero that gives the stuffing its structure. They absorb the juices from the tomato and create a golden, crunchy exterior. If you’re gluten‑free, try almond flour or crushed crackers; they’ll provide a similar bite. The Parmesan cheese adds a salty, nutty flavor and melts into a silky sauce that binds everything together.
The Unexpected Star
Lemon zest is the secret weapon that lifts the dish. It adds a bright, citrusy pop that balances the richness of the cheese and the depth of the herbs. Without it, the stuffed tomatoes would taste heavy and flat. If you don’t have a zester, a microplane works just as well.
The Final Flourish
Fresh parsley and a drizzle of olive oil finish the dish with a burst of color and a silky sheen. The parsley adds a fresh, slightly peppery note that cuts through the richness, while the olive oil elevates the overall mouthfeel. A pinch of black pepper ties everything together, adding a subtle heat that’s just enough to wake up the palate.
Everything’s prepped? Good. Let’s get into the real action.
The Method — Step by Step
- Step 1: Preheat the oven. Set your oven to 375°F (190°C). While it’s heating, place a baking sheet in the middle rack. The preheated surface ensures even cooking and a crisp crust. Watch the timer; the oven should be hot enough that a piece of paper sizzles when dropped on it.
- Step 2: Prepare the tomatoes. Slice the tops off each tomato and scoop out the seeds and pulp with a spoon. Reserve the tops to place back on the stuffed tomatoes later. The hollow should be deep enough to hold the filling but not so deep that it collapses. Keep the tomatoes in a shallow dish to catch any juice.
- Step 3: Mix the stuffing. In a bowl, combine the chopped onion, minced garlic, fresh herbs, breadcrumbs, grated Parmesan, lemon zest, salt, and pepper. Add the olive oil and mix until the crumbs are evenly coated and the mixture holds together when pressed. If the mix feels dry, add a splash of water or extra olive oil.
- Step 4: Fill the tomatoes. Spoon the stuffing into each tomato cavity, packing it tightly but not overfilling. The stuffing should rise slightly above the rim. This creates a beautiful visual when the tops are placed back on. A small spoon or a piping bag works great for precise filling.
- Step 5: Reassemble. Replace the tomato tops, pressing gently to seal. If you prefer a more rustic look, you can leave the tops off and bake the tomatoes open‑faced. The choice is yours; both approaches yield delicious results.
- Step 6: Drizzle with olive oil. Lightly brush the tops of the stuffed tomatoes with olive oil. This helps the crust brown and adds a glossy finish. Use a pastry brush for even coverage. The oil also adds a subtle nutty flavor that complements the herbs.
- Step 7: Bake. Place the baking sheet in the preheated oven and bake for 20–25 minutes, until the tomatoes are tender and the tops are golden brown. The aroma that fills the kitchen at this point is absolutely intoxicating. The crust should feel crisp to the touch, and the filling should be bubbling slightly.
- Step 8: Finish with parsley. Remove the tomatoes from the oven and sprinkle fresh parsley over the tops. The parsley adds a pop of color and a fresh, peppery note that balances the richness. Let the tomatoes rest for 5 minutes before serving, allowing the flavors to meld.
- Step 9: Serve. Arrange the stuffed tomatoes on a platter and drizzle any remaining juices from the baking sheet. Pair them with crusty bread or a simple green salad. The dish is best enjoyed hot, when the cheese is still melty and the herbs are fragrant. A glass of chilled rosé or a light white wine complements the flavors beautifully.
That’s it — you did it. But hold on, I've got a few more tricks that'll take this to another level.
Insider Tricks for Flawless Results
The Temperature Rule Nobody Follows
Most people bake at 400°F, but 375°F gives a more even cook and prevents the tomatoes from splitting. The lower temperature allows the juices to meld with the herbs without evaporating too quickly. I’ve tried 350°F as well, and the result was a slightly softer crust, but 375°F is the sweet spot for crunch and flavor.
Why Your Nose Knows Best
Before you pop the tomatoes in the oven, give them a quick sniff. A faint, sweet aroma indicates the herbs are fragrant and the breadcrumbs are toasted. If you detect a bitter note, the garlic may be overcooked; reduce the cooking time slightly. Trust your nose—it’s the best judge of flavor.
The 5-Minute Rest That Changes Everything
After baking, let the tomatoes rest for 5 minutes. This brief pause allows the juices to redistribute, so every bite is moist and flavorful. I’ve seen people cut straight into the tomatoes, and the result is a watery mess. Patience pays off.
The Herb Swap Secret
If you’re craving a different flavor profile, swap rosemary for sage or thyme for oregano. Each herb brings a distinct aroma: sage gives a slightly peppery bite, oregano adds a touch of sweetness. Experimenting keeps the dish fresh and exciting.
The Breadcrumb Trick
Toast your breadcrumbs in a dry skillet before adding them to the stuffing. This step deepens the flavor and gives the crust a nutty crunch. A pinch of smoked paprika can also add a subtle smoky undertone.
Creative Twists and Variations
This recipe is a playground. Here are some of my favorite ways to switch things up:
Cheesy Gnocchi Stuffing
Swap breadcrumbs for crumbled gnocchi and add a splash of ricotta. The result is a pillowy, cheesy interior that melts in your mouth. Perfect for a comforting family dinner.
Mediterranean Veggie Boost
Add chopped sun‑dried tomatoes, olives, and feta to the stuffing. The briny flavors complement the fresh herbs and create a Mediterranean vibe. Great for a brunch or tapas spread.
Spicy Cajun Twist
Incorporate a pinch of cayenne pepper and replace parsley with chopped cilantro. The heat and citrusy freshness add a lively edge. This version pairs beautifully with a cold beer.
Vegan Version
Use a plant‑based Parmesan substitute and gluten‑free breadcrumbs. The dish remains hearty and flavorful without any animal products. It’s a crowd‑pleaser for vegans and meat‑eaters alike.
Gluten‑Free Option
Replace breadcrumbs with crushed gluten‑free crackers or almond flour. The texture stays crisp, and the dish still delivers on flavor. Ideal for those with dietary restrictions.
Summer Salad Integration
Serve the stuffed tomatoes atop a bed of arugula, sliced peaches, and a light vinaigrette. The tomatoes become a star in a refreshing summer salad. It’s a perfect light lunch or a side dish.
Storing and Bringing It Back to Life
Fridge Storage
Store the assembled, unbaked tomatoes in an airtight container for up to 24 hours. If you’re baking within a few hours, keep them in the fridge to prevent spoilage. The filling will stay moist and ready to bake.
Freezer Friendly
For longer storage, freeze the stuffed tomatoes before baking. Wrap each tomato individually in plastic wrap, then place them in a freezer bag. They’ll keep for up to 2 months. Thaw in the refrigerator overnight before baking.
Best Reheating Method
Reheat in a 350°F oven for 10 minutes, or until the cheese is melted and the tomatoes are warm. Add a tiny splash of water to the baking dish before reheating to keep the stuffing moist. This simple trick restores the original texture and flavor.